
This page first lists and describes Service Object Settings, then Work order settings that affect service object and finally information about user permissions.
Go to Group settings – Module settings – Service object settings and Work order settings to select your settings.
Selecting/changing settings requires admin permissions.
View settings
- Invoiced to enabled
A field to indicate that another customer is to be invoiced is added. A drop down-list helps you find a customer. - Rented to enabled
A field to indicate leased to another customer is added. A drop down-list helps you find a customer. - Year activated
A field for manufacturing year are added. - Serial number enabled.
A field for serial number is added. - Machine number enabled
A field for machine number is added. - Auto generate machine number
The system gives the machine a machine number, automatically. Ie a serial number based on your most recently entered number. The number can be changed manually. - Time-based service objects
This setting allows you to choose whether service on the object should be run-time based. By default, the option is selected when you create a new service object. You can remove the option on the object record.
A field is added where you enter the runtime hours per week.
During the service interval, you can choose to enter hours or a day interval.
Without this setting, you can only select days during the service interval. - Autogenerate serial number
- Contact enabled on service objects
Field for contact information is added. - Use fixed intervals by default
Check box. Checked is the default. The next service is created based on when the previous service was scheduled instead of when it was performed. - Use matching with previous service by default
Check box. If checked, the next generated service will be based on the last performed service. This means that parts used, which deviate from the service interval, will be included. Service will be scheduled on the same day and time of the week and assigned to the same technician as previous service. - Use QR verification
Enables the service technician to verify being at place by scanning a QR code. This function is currently not used. - Show service object QR
Creates a QR code for the service object.
Learn more about QR codes. - Use multiple counters
Enables multiple counters on a service object. - Use agreement number on service object
Creates a field for agreement number. This number is not retrieved from any agreements created in serviceprotocol.com but is a purely free text field. - Activate third part supplier
- Enable child service objects
Provides the possibility to specify a service object as a child object of a parent service object. The Parent object field is added to the service object record. The parent object record states that – and where – the object is used as a child object. No other connections are made between the two objects. The field is merely information. - Enable support for NFC tags
Read more about NFC tags here. - Custom information enabled
Makes the Custom information field visible. Read more about the field and creating templates for custom information. - Show unique ID
With this service object setting , a unique serial number (ID) is created for the service object. The ID is automatically generated and cannot be changed. This number is therefore in addition to the serial number and machine number. - Force overlapping service intervals
By default, this is checked and if the intervals do not overlap (See more under Service intervals) you will receive a warning.
If you uncheck this, however, you can enter intervals that do not overlap and you will not receive a warning.
If you change the selection, previously created ranges are not changed. - Require signature on status change
Choose whether a signature should be required to change custom statuses. - Remove orders on inactivate
With this selection, all orders associated with the serviceobjekt are deleted when you deactivate a object. - Show wizard when creating a new service object
Here you choose whether you want to use the wizard to add a new service object. If unchecked, the popup asking if you want to use the wizard will not appear and you will not need/cannot choose which one. - Allow anonymous access
With this option, anyone can scan a QR code and go directly to limited information about a service object. You will not see any links to orders, service intervals, agreements, etc. and cannot change anything.
Regarding language: The information is displayed in the language set in the browser on the mobile device with which the code is scanned. If we do not support the set language, English will be displayed.
Use this setting with caution! These fields is viewed: Customer
Documents
Facility
Model
Description
Årsmodell
Maskin number
Serial number
Custom information
Performed services
Parts
Map - Require model
To be able to create new service objects, you must select a model. - Hide model description
The Description field is not displayed and Model is instead mandatory.
Create custom fields
When you need fields that are not in the system, you can create your own. Learn how to create custom fields here.
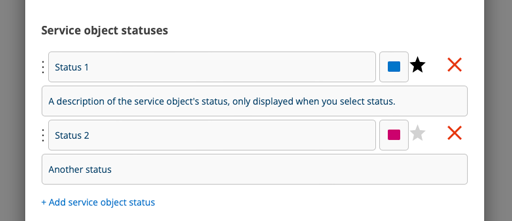
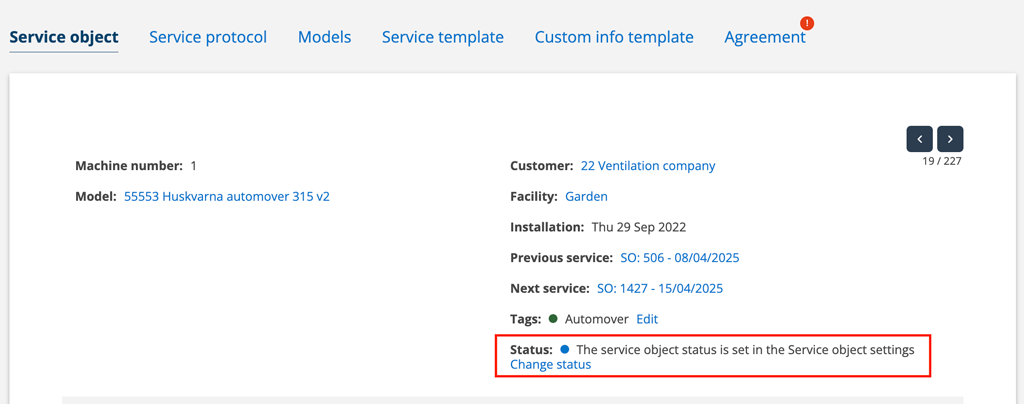
Service object status
Status is also displayed on orders under the service object
Do this:
- Enter the expression you want to use on your status in the “Name” field.
- Select a color by clicking on the blue color box. The color is displayed as a dot in front of the status.
- Optionally, fill in a description to clarify what the status means. The description appears in the popup when you select the status and when you hover over a status.
- Click the star next to the status you want as the default – if any. The status you set as the default is automatically selected when you create a service object, so you don’t have to set the status for each new object.
- Save
Is signatur required?
Choose whether a signature should be required to change status by checking the box under View settings “Require signature on status change”.
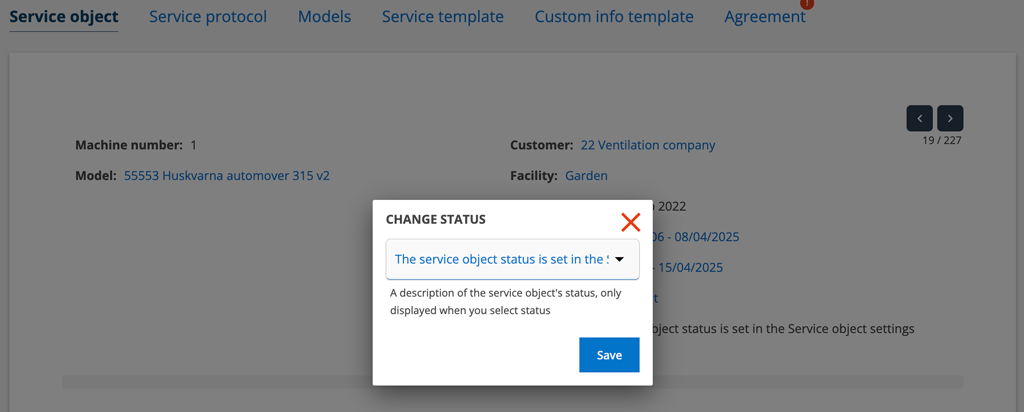
Where is the custom status field displayed?
On the service object, then select Status by clicking the “Change status” link.
Select status in the popup.
Click Save.
Print templates
Upload your own print templates
Here you will find instructions and all tags that can be used while creating a template.
Work order setting that affects service objects
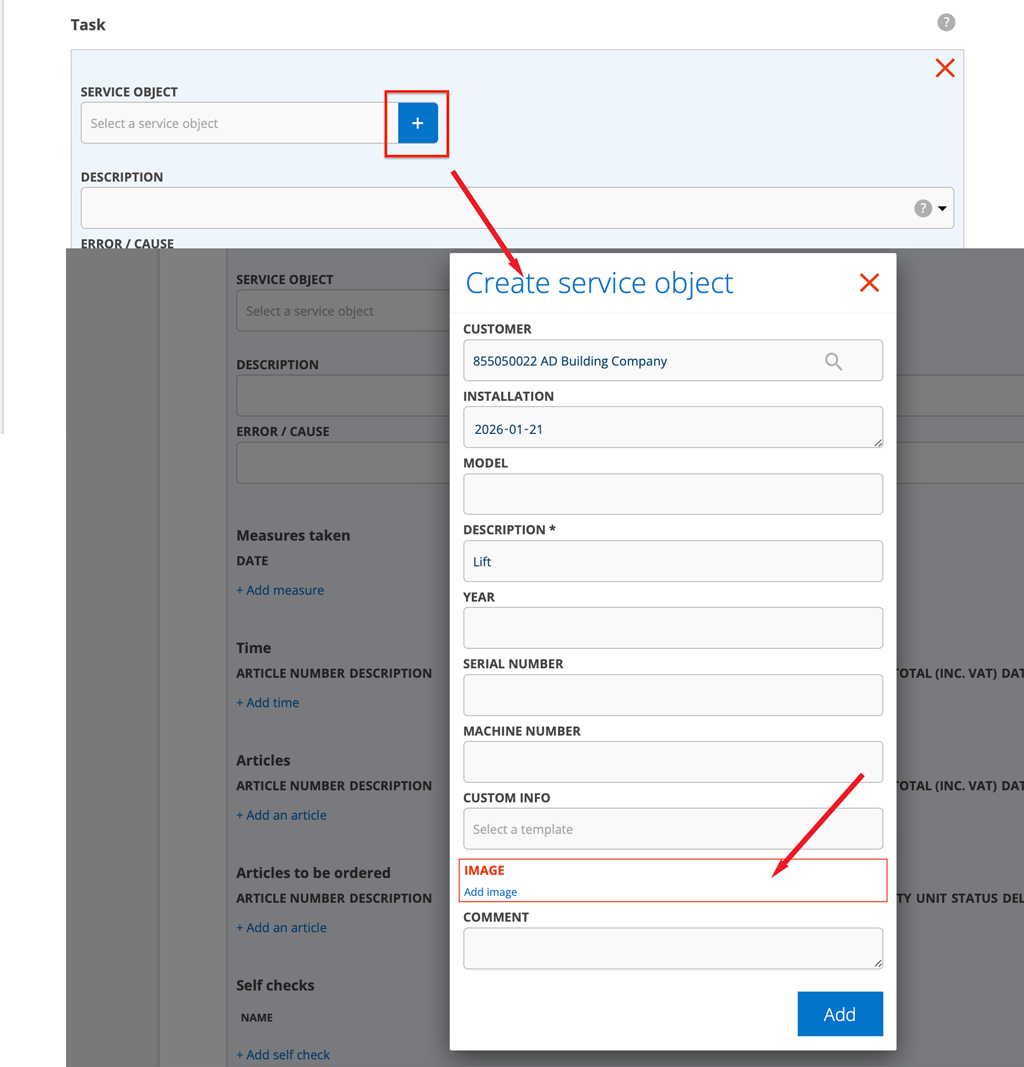
- Require service object picture on create
When you create a new service object by clicking the + symbol in the Service object field on a Work Order, you must also add an image.
- Require service object runtime if a counter exists
The work order cannot be saved without the current operating time being filled in. - Show custom info
Adds the content on the Custom Info field from the service object under the Assignment on the work order.
Custom information is retrieved from the service object record. Info templates for Custom information are created in Service – Info template. - Require service object for signing
A service object must be included in the order in order for it to be signed.
User permissions concerning service object
You change these settings by clicking on the username on the Group Settings page.
View, Edit, Create, Delete, Reading, Uploading, Delete/Edit uploaded files, Clone