
In the Time Report, you see and add your time worked. Time report can be found under the Function menu. If you don’t see it, you are not authorised to or do not need to use the time report function.
The system itself can report time from orders. If this has been set for your group you, basically, do not need to add anything to the time report.
There are a number of settings for the time report, so if you don’t recognize yourself in the descriptions on this page, it’s probably due to a setting. Ask your supervisor how you should fill out and use the Time Report.
The time report retrieves times from orders, if the article (work or travel time articles – eg working time, travel time, fixed service cost…) in the Article Register is registered as Transport to time report.
If you have added work time to a service order, that time is only retrieved when you create the service protocol, i.e. click Perform service. On the started protocol, you check and adjust the number of hours and date.
The time report can also retrieve time from bookings on orders or the Planner with the Time Report setting “Include all bookings from the Planner”.
Example of time report with explanations
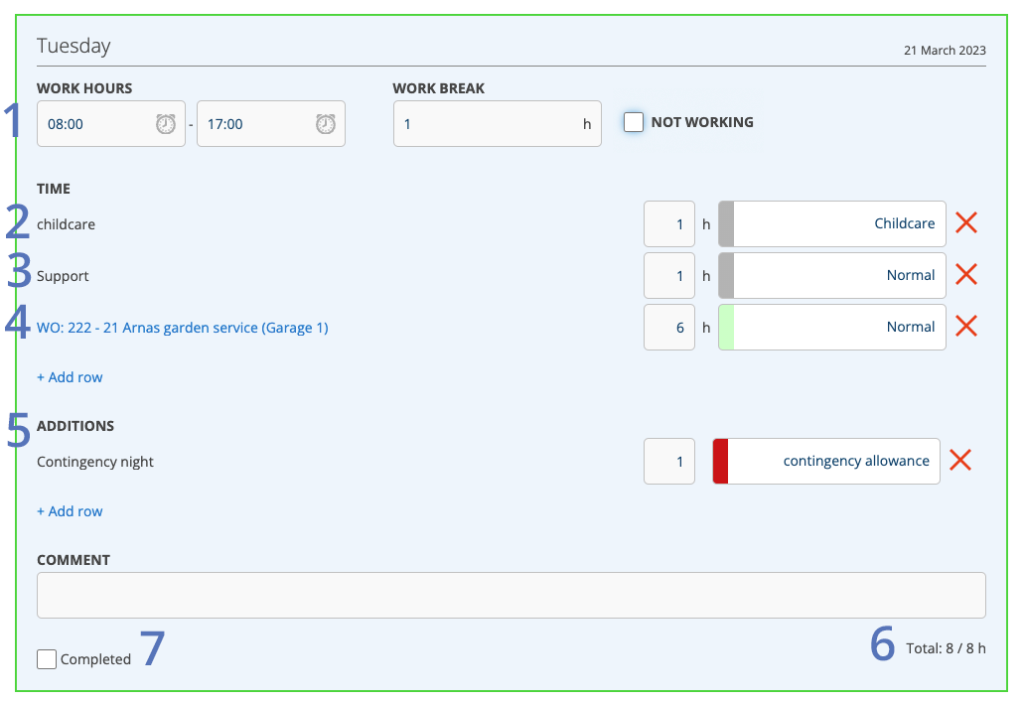
- At the top of a time report, you see the working hours you normally work. The time is set in your User Settings with an admin account. The time can be changed here if necessary.
If you didn’t work mark the box NOT WORKING.
A row is created and the number of hours you would have worked according to your schedule is automatically filled in. Fill in the type of leave and then click Save. - The system automatically retrieves your working time from orders. What may need to be done is to select the type of working time, the right field in the image above.
- “Childcare” is retrieved from the Planner/Calendar. You click on a day in the Planner and select Other and a list of types of leave is displayed – holiday, full time etc. The information is automatically moved into your time report. It is also possible to add this type of information directly here in your time report. Place the cursor in the right field and the time report types you have chosen to use will be displayed.
- It is also possible to write free text – like here “support” or choose from time report types that have been entered for your particular company. Entering new or editing the types requires a user permission.
- If you have chosen to use Additions, it is shown here. The addition field can be used when you want to enter something other than hours, for example an outlay or when you receive a fixed sum for contingency.
- Here you see the sum of your reported hours. The number on the right is your working hours according to the schedule.
- When you are done with reporting, click on Completed so your payroll manager knows you are done. There are two different settings for Completed. See more in section “Free marks as competed or not?”
- Don’t forget to save!
To edit click on the day you want to edit.
Do this to enter working hours that are not on orders
- Click on the day.
- Click on + Add row under Time.
- Enter a description of the work or choose from the drop-down list with suggestions.
- Enter time.
- Select type from the list.
- Click Completed.
- Save.
You can see that there are unsaved times in two different ways:
Partly because the box around the time is gray. If the changes have been saved, the frame around the box is blue. See example in image 3.
Partly when you hover over a day and the text Contains unsaved changes appears.
If you have the Addition field activated, you also fill it in, if necessary. The field is linked to specific time codes in your administrative system. Admin permission is requiered to make that connection.
Read how to set the addition connection when using Fortnox Lön.
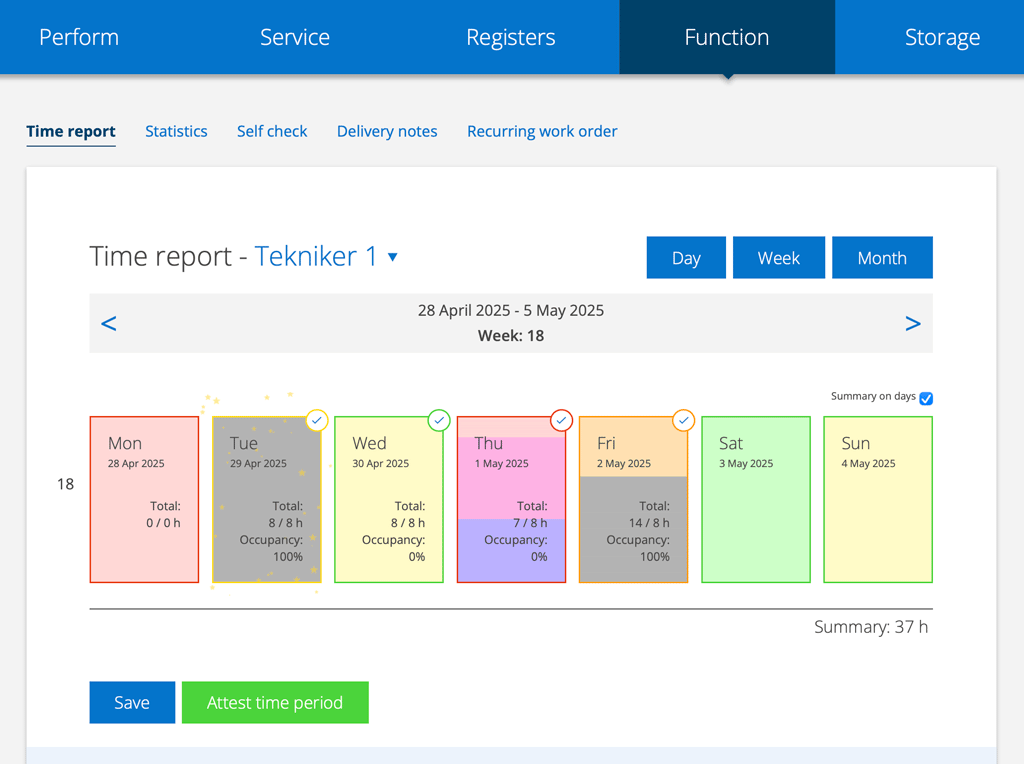
When you are done for the day, click Completed.
A day marked as completed have a check mark in the right corner.
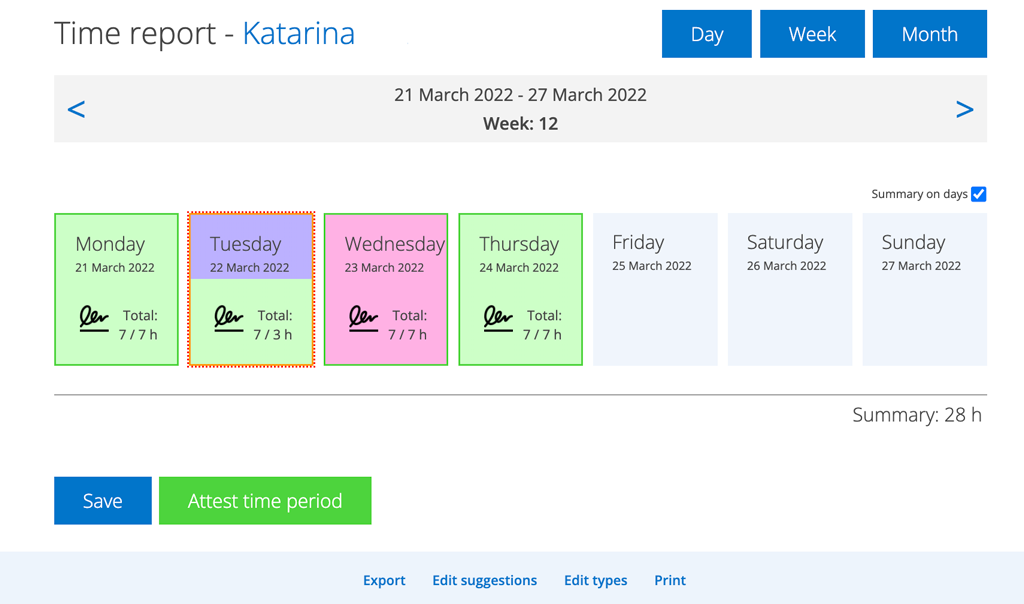
The time report can be printed (Print), exported (Export) to Excel or the accounting system Visma for those who use that system. Print gives a summary of the user you are looking at, while Export shows a summary of all users, but in Excel format.
Keep in mind that the time reports must be saved and attested to be included in the export.
Learn more about Exporting time reports here.
Free mark as completed or not?
There are two different settings that can be made for marking as completed – Free mark as completed or not. See more under Information for administrators.
The default setting is that once you have marked as done, you cannot change your time report anymore.
If you have a Free mark as completed, you can uncheck the completed mark, click Save and then change the times.
It is possible to mark a time report as completed even if the time entered does not correspond to the specified working hours.
With admin permissions you can always remove a “Completed” mark.
If the hours taken from work orders differ by more than 1 hour from your working time, a comment (Time from order: Xh) and the text (Allocated hours do not correspond to the specified working time) are displayed. (see image 3)
Example:
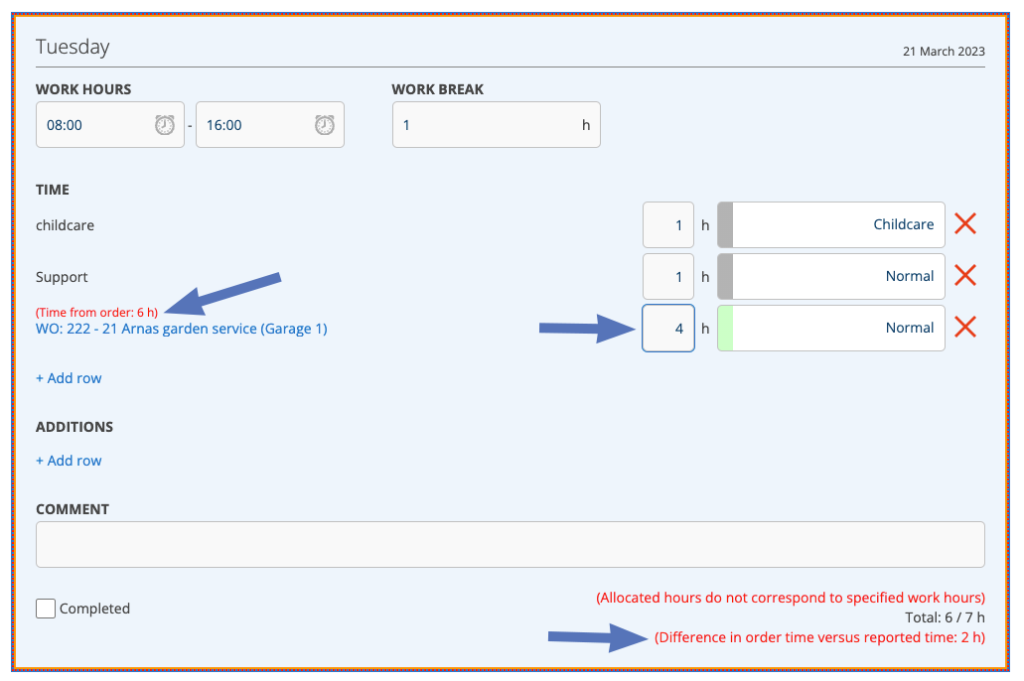
In the example (image 3) the system retrieves “Time from order” 6h but only 4 hours is added. This is probably because you changed the time on the order after you saved the time report.
You can also see the difference in order time versus reported time at the bottom of your time report.
If there is unsaved time on an order, it is added to the time report when you open the time report.
If you change the time in an order
If you change the number of hours on an order, your time report will be updated automatically IF the time report has not been saved yet (blue outer frame). If the time report has been saved (red or green frame), you need to change the hours yourself.
If you have completely removed working hours from an order, you can remove it from your time report by clicking on the red cross so the time is set to 0. Save the day. Open the day again and you can remove the working hours/order by clicking on the red cross again and save.
Difference?
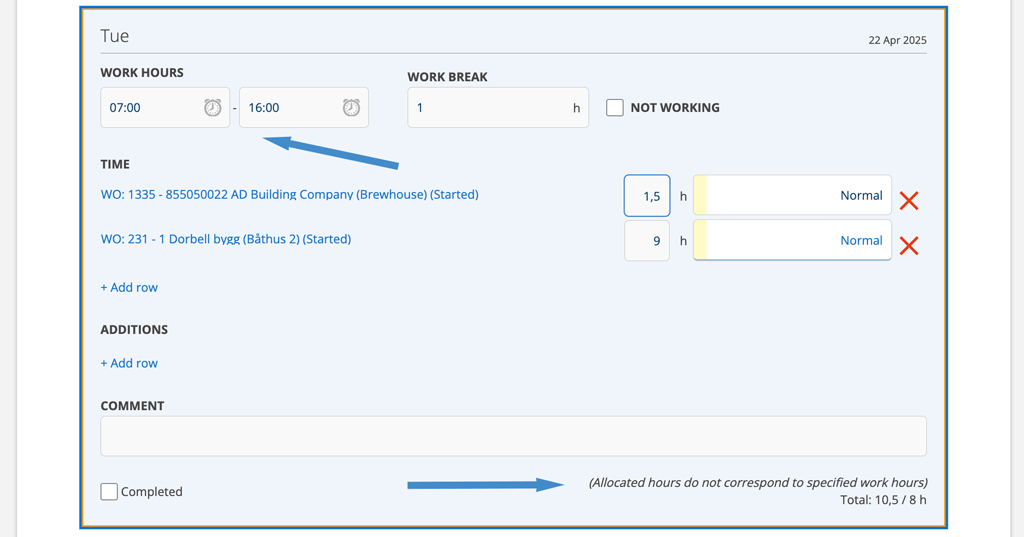
In image 4 we still get an error message. This is because your reported time is 10,5 hours. Here you can choose to change the WORKING TIME field, so that the times match your actual time worked. See image 5.
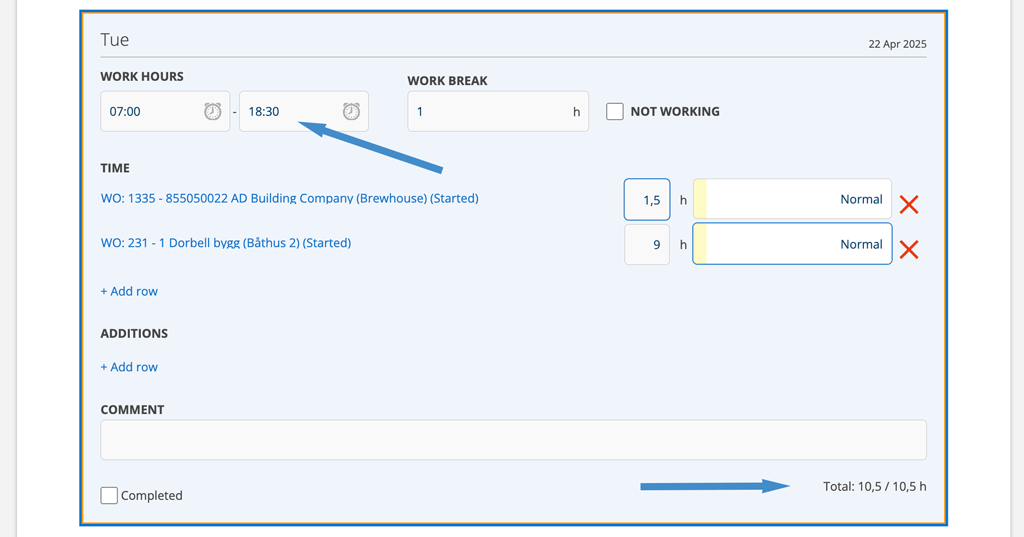
The red information text does not have to mean that something is wrong, but is a signal that times do not match between the order, time report and the user’s working hours. Either you change the time report or you save. The day can not be marked Completed, but the time report can always be certified.
If you have the Time report setting Free mark as Completed, the information text about the difference in time is black instead and the day can be cleared even if the times do not match.
The system assumes that you work 8 hours/day. You always see a summary of the hours in the left number under Total. The right shows the working hours an administrator has entered for you. If no working hours have been entered for you, an error message will be displayed until you click save.
Have you saved and signed an order and discover that you accidentally entered something wrong?
If you have the permission to clear signatures, you start by entering the order and clicking on Clear signatures.
If you do not have that permission, ask an administrator with permission to clear signatures for help to change.
When the signatures are cleared, you can click on Edit and change working hours. Save. The time report is updated automatically if the time report is not saved yet (blue frame). If the time report is saved (red or green frame), you need to change the hours in your time report yourself.
Entered time on the wrong day?
Have you accidentally entered the wrong day for your working hours on an order, the order is signed, set to Ready for invoicing and the time report marked Done? Read how to fix it here.
Description of the colors
- Blue frame in open day – not saved
- Orange frame – the times do not match the entered working hours, overtime entered
- Orange frame – the times do not match the entered working hours, overtime entered
- Red frame – the times do not match the working hours, too few hours reported
- Gold – all your working hours can be invoiced to your customers. Great job!
The colors are combined. For example, you can have a red inner and a blue outer frame, which means that you have unsaved times and that the times do not match (too few hours) with your entered working hours.
To change the colors within the frames and description suggestions, user rights are required. See more under For supervisors.
Warning when not reported time
An admin can set a number of days you are allowed to wait before filling in your Time Report. First you get a warning that you have to report time and if you don’t do it after a set number of days, you can’t work before you can move on.
Saturday and Sunday do not count. Holidays count. Learn more about User settings.
The time from your time report is stored locally on your device. This means that you can be locked out if you change devices or if an admin records your time even though you can continue working on your regular device.

For supervisors
Click Attest to approve the time report. After that, the time report is locked and cannot be changed. If you use Fortnox Payroll, the report will be sent there after certification.
If the time report is saved / attested, that line will not be retrieved again. This means that it is possible to change the time on an order without changing the time report. This also means that if a time is changed on an order and the time report is saved, you need to update the time in the time report manually.
To delete a Completed mark, click the Completed mark box and then click save. Now it is possible to change the time report.
Via a admin account, you can set that clear Completed can be done even if the time entered does not correspond to the reported time.
This setting makes it easier if your working hours vary a lot. See Information for administrators.
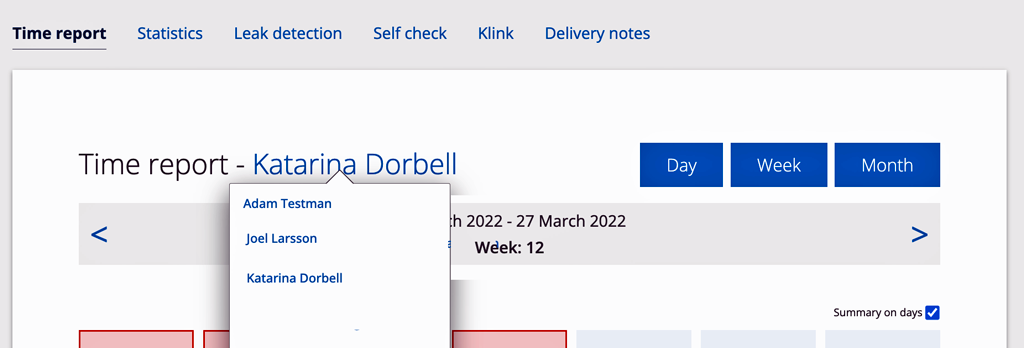
Do you want to change the time report or report for another user?
This requires you to have the user permission to View All and Edit All. The permission is set with your admin account. See Information for administrators. As an admin, you can always mark as completed – even if you have not selected the Free mark as completed setting.
Do this:
- Click on the name at the top of the timesheet. A menu with all the people in the group will drop down.
- Click on the person you want to report time for.
Export list
Click on Export at the bottom of the Time report.
To see the Export button, you need to have the permission for Time report – Export.
A popup will open where you select the type of export you want to do.
Time reports must be saved and certified to be included in the export.
If choosing Excel

NOTE: This is just an example of columns. The columns that appear depend on what has been entered into your timesheets and which timesheet types you use, but the order is always the same.
The columns show:
- A: the technician’s/employee name
- B: number of possible hours calculated based on working hours set in user settings.
- C – K : shows hours entered on different timesheet types.
These lines vary in number and content depending on which timesheet types you are using and whether there is information to display. For example, if no one has specified Childcare, the table for Childcare is not included in the list. - L: Summation of all entries under the columns before, in the example C – K, i.e. all time that is not reported on orders.
- M: Summary of time spent on orders.
- N: Number of words that a technician spent time on.
- O: Average time per order (the working time for each order).
- P: Number of jobs. For example, if a technician has been to the same place for the same order twice, it counts as 2 jobs.
- Q: average per job, as above.
Statistics split
If using the Time report setting – Use statistics split, you can also get occupancy/technicians. Then a further step is required. The working time to be counted needs to be set as “valid” underEdit suggestion descriptions. All time types that are worked time are marked by clicking in the Valid box. Such as holidays, parental leave etc. should not be marked.