
NOTE: This is a special solution and before you as an admin choose this setting, we recommend that you contact us for more information.
This setting opens special fields where you can enter how you have distributed your working time during the day. All hours must be distributed by yourself.
The system checks against the working hours specified in your user settings (set by admin). If the working hours on the time report are changed, the system will warn.
By using Statistics split you can get the occupancy per technician. The occupancy is the difference between reported time and invoiced time.
Information for administrators – Required settings.
Information to technicians – How to report you time.
Required settings – Enable statistics distribution
Before you start, some settings are required.
Step 1:
Step 1 requires admin permissions.
- Go to Group settings.
- Click Time report settings.
- Select Use statistic split.
Step 2: Set types and descriptions
For step 2, you need to have permission for Time report – Edit type list.
For information concerning how to set types and descriptions click here.
Go to Function – Time report. Scroll to the bottom.
2:1 Click on Edit description suggestion.
All description suggestions you should be able to choose from must be entered here. When reporting time, you can only choose from these. This means that you cannot enter your own text in your time report if a description is missing.
Save.
2:2 Click on Edit types.
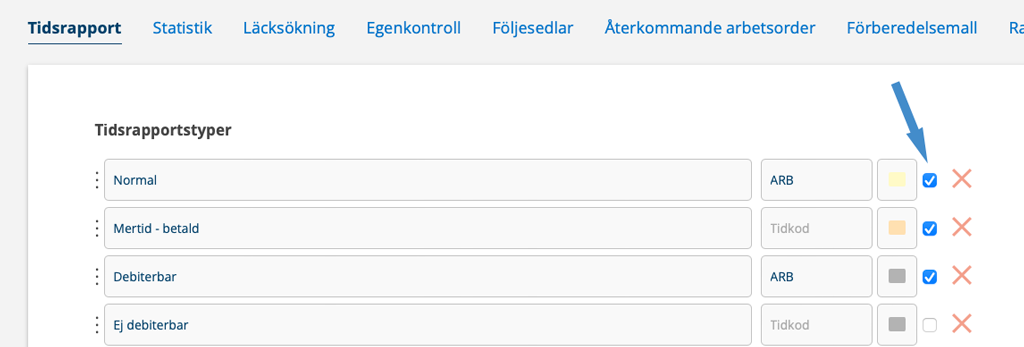
All time types that are worked time and that should give salary are selected by clicking in the Use box, see arrow in the image below. You will see the text “Use” if you hover over the box.
Non-worked time such as child care, leave, etc. should therefore not be marked. These will not be included in the “allocation of today’s hours to salary”.
Report your time worked like this
You must record how your working hours will be distributed for each day and all the hours you will work.
The time report retrieves information about your working hours from your user settings (set by an administrator). The number of hours you are required to report is shown in brackets, e.g. (8 hours). If you work less than your working hours, you need to report why you did not work and the number of hours.
All orders and the number of hours spent on them are listed at the bottom of a daily report as support. See example in the screenshot below.
If no working hours have been set, the system assumes that you will work 8 hours. If your working hours are instead, for example, 7 hours/day, a warning will be displayed even if the number of hours is correctly distributed. To avoid this, ask your supervisor to enter your working hours in the user settings.
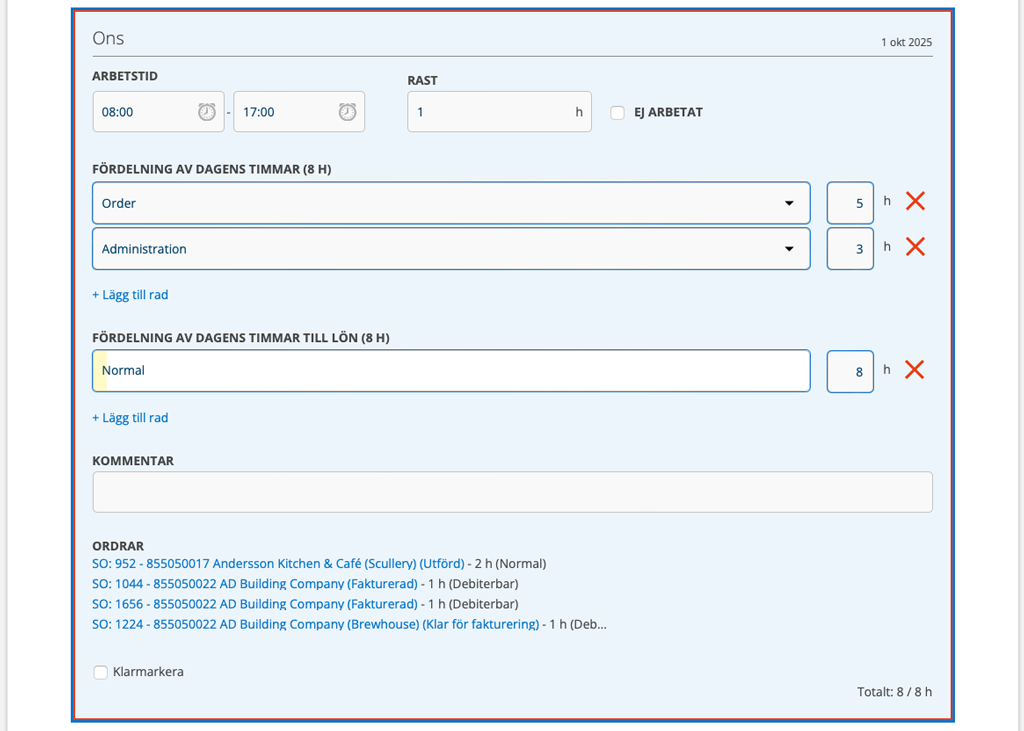
Start by allocating the hours of the day.
- Click + Add row.
- Choose from the description suggestions (click on the arrow to open the list of your set description suggestions). In the example above, Order and Administration are selected.
Then distribute your “hours to salary”, i.e. how many hours you should be paid for. You also need to report what you did if you did NOT work. You can use the comments field for this.
- Click + Add row.
- Choose a time report type for each choice – normal, additional time, overtime, etc. Check with your supervisor which types apply if you are unsure.
If the times are not correct, you will receive information about it, marked in red or black depending on whether you have selected the Free mark as completed settings (black) or not (red).
You may also need to enter a comment about the time difference, for example if you worked overtime. The COMMENT field will then be marked in red. Fill in a comment and then click Save.
When you are completely finished, click in the completed box.