
Articles that are added to the article register appear as suggestions in various views in the system when articles are to be added, such as e.g. in a work order, when articles have been used.
Read more about adding article on order.
On the article register, you can see in which orders etc. an article is used, if the article has sub-articles and if the article appears as a sub-article and where.
If you use the storage function, you will also see information about stock status, reservations and transaction history.
Search articles

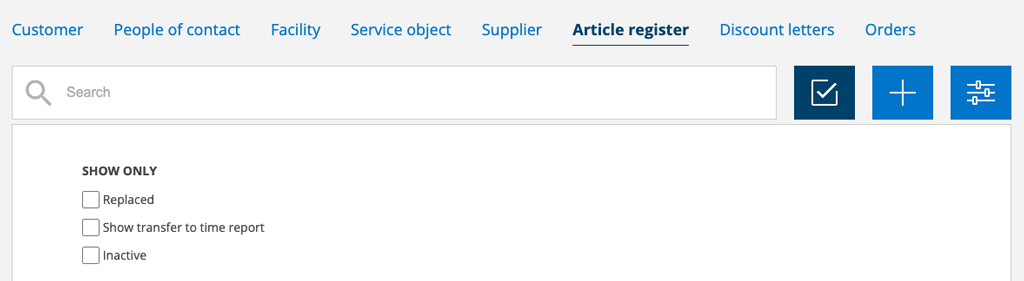
The search function helps you narrow your search. You can search for only time articles, replaced or inactivated articles, articles with a specific tag, from a specific supplier, the supplier’s article number etc. Click the search icon.
EDI connection
Articles can be delivered by several suppliers and the supplier’s article number can be specified as a link to the specific supplier if desired. The main supplier is displayed in the pick list. See list of supported suppliers.
In the Article settings, you can specify whether you want to use EDI to update net and/or gross prices from suppliers.
Upload article register
To upload an existing article register, see the section Upload register. Always download a new version of the upload file when you need to upload a register, as fields are added from time to time.
If there are new suppliers in the article file you are going to upload, you must first add them to the Supplier Register to include the information about the supplier.
Settings
What you see when you post or view an article is set with your admin account under Article Settings. Requires admin permission.
If you want to hide certain articles from logged-in customers and when printing, you set it using the Collection function.
Add an article
- Go to Register > Article register.
- Press the button with the +sign to the right of the search box.
- Enter the article number and description.These two fields are mandatory. The article number must be unique.
The description can be changed when you add the article to an order. This means that you can, for example, have a “junk article” where you add temporary articles that do not need to be in the register. - If you have subgroups and the article should be linked to a Subgroup, you select the group, otherwise you skip that selection and the article is displayed for all subgroups.
- Fill in unit, gross, net etc.
The more information you enter on the article record, the less work on the orders.
VAT is stated as a percentage. If the customer does not have an organization number specified or is a private person with a social security number added, the VAT is shown on each article line. If the customer has an organisation number, VAT is not displayed. This can be change by changing the VAT-type on the customer card.
If you have set VAT in Article Settings, the VAT will be retrieved from there. The VAT can be changed on the article.
Accounting code. For those of you who have integration with Fortnox, the Accounting code field will also be displayed where you enter the sales account for articles.
Unit is always retrieved from the article record. Any changes to the unit on an order will only be sent to the protocol, not to any financial system. Remember to also set allowed units in your financial system. - Add article group if used.
- Enter other information.
- Show as default search.
If you check this, the articles will appear under the Standard articles selection when you add articles to an order. Can be used to speed up the search for articles that you use very often. - Can be house work
The choice is activated in the Article settings “Use rot/rut”. Applies only in Sweden. - Hide from customer and print.
This means that the article is hidden from logged-in customers when they view orders, and is removed from PDF prints. If you are using Fortnox and don’t want the article to be added on orders please see instructions here.
Read also: Hide article for customer and print an order
- Show as default search.
- Note.
Here you can add information about the article. - Sub-articles.
If this article consists of one or more sub-articles, this is specified here.
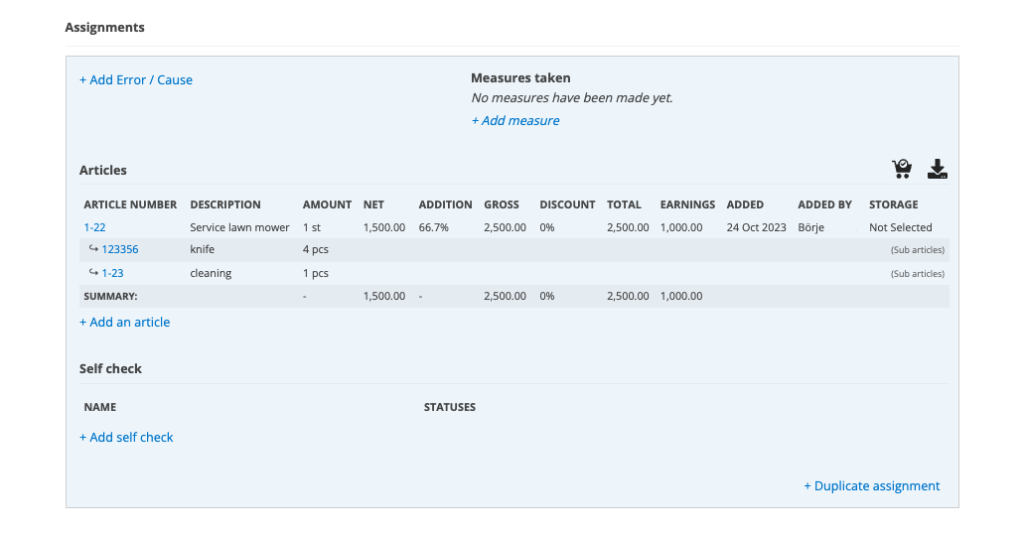
The sub-articles are listed on an order when you have added the article. No prices are taken from articles listed as the sub-articles. See example in picture 1.
Read more about subarticles. - Choose whether the article should be moved to Time reports (called Time article). Learn more about Time articles.
- Enter a digit. 1 means that 1 hour is entered as 1 hour on the time report. For example, if you enter the number 2 here and have added 3 hours to the order, 6 hours (2 x 3 = 6) are moved to the time report.
- Enter the time report type to use when this article is passed to the time report. Additional types can be added in the time report view (set by user permission).
- Supplier
- If the need for a supplier exists, it is possible to add these by pressing the + Add supplier button.
- The search function helps you find existing suppliers.
- If a supplier is not registered, fill in the supplier name and this is added automatically to the register of suppliers. ATTENTION! Remember (when you are ready adding the article :)) give the new supplier a supplier number. You can find the supplier in Register – Suppliers.
This number then needs to be entered when you add articles by uploading records. - Choose the main supplier by clicking the main supplier button (the star) if you have two or more suppliers of the article. The main supplier will then appear as supplier in the pick list. If you don’t choose a main supplier when having two or more supplier listed on the article post no supplier will show in the pick list.
If there is only one (1) supplier that supplier will be displayed in the pick list.
When you create a purchase order, you will see and can select (in the popup) from the suppliers you have registered for the article. The main supplier is marked with a star.
- Press the Save button at the bottom of the page to save the new article.
Last modified
As soon as you open an article record, i.e. click on Edit, a date and the user name of the person who changed it are added under the heading “Last edit:”. To see the date of previous changes, click the arrow to the right. This also updates the “Last Modified” in the list mode.
Note: When you have uploaded an article register via the Upload Register feature, you will only see the date of that update in list mode. The Last Modified date on the article post itself doesn’t change.
Information about where the article is used
When an article is used on an order, it is listed under the heading Used in. Which information is displayed differs depending on which function applies.
If you use the Storage module, quantities in stock and reserved are also displayed here.
For Sales orders, date shows the delivery date.
At the bottom of the article record there is a link to the Transaction history where you see a little more information about the article’s use.
Regarding Storage articles
Explanation of the information under + In stock
IN STOCK = Total in stock, i.e. those that are physically there including those that are reserved.
RESERVED AMOUNT: quantity reserved on orders.
AVAILABLE: articles in stock minus articles on reserve.
ORD. AMOUNT: number ordered in Purchase Orders.
DISPOSABLE: articles that can be reserved, in storage, including amount i purchase orders.
When is an article reserved in the storage?
When you add an article on a Work order or Sales order and have selected a storage, the article is reserved in the storage when saving the order.
Articles on a Service order are not reserved until you have started the execution of the service order and clicked Save. When you then sign the order, the article is pulled from stock (“Consumed Stock” in the Transaction history).
By setting a number of days for “Reservation Offset”, you can control when the system checks for reserved items on service orders. Learn more about Reservation Offset in the article Settings concerning Storage.
VIf you want to see more about the transactions – reservations and when the article is used, by whom, etc., click on Transaction history at the bottom of the article record.
Under the Reservations tab, you will see a summary of reservations. It is a history and it does not say everything about the article.
When is the article removed from stock?
When you then sign the order or protocol, the articles are pulled from the storage (“Use” in the transaction history).
Regarding articles and clear signature
When you place articles on an order without signing, the articles are counted as “reserved” and when you then sign, they become “used”.
If you remove the signature from an order or article, the articles will be returned to storage. When you then sign the order again, the articles are pulled from the storage again.
About suppliers
Before importing existing articles but with new suppliers, you need to add the supplier to the supplier register. The new supplier is added to the list of suppliers on the article. It is not possible to exchange a supplier for a new one, but if you do not want to keep the supplier on the article, it needs to be removed from the article. Click Edit to remove.
If you import new articles, the supplier is automatically added to the register of suppliers.
Search suppliers’ part numbers and descriptions
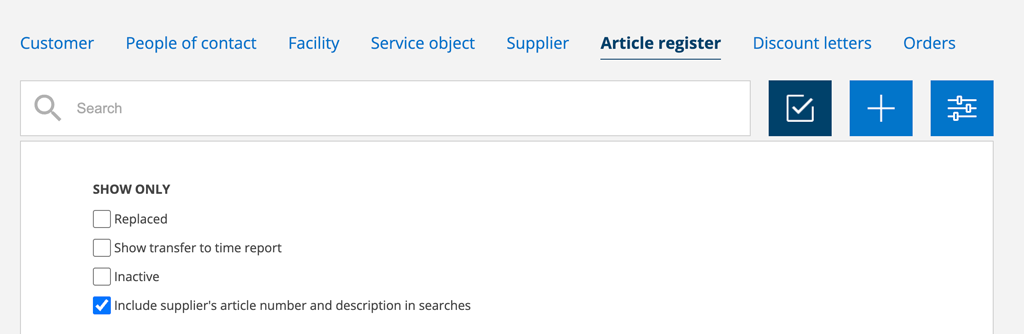
By marking in the filter “Include the supplier’s article number and description in the search” you will also get hits on suppliers’ article numbers.
If you also want to get hits on the supplier’s article number on orders, a setting is required in Article settings. For that, admin permissions are required. See more under Information for admin.
Article Groups
You can fill in a new article group or choose among existing. Being able to add article groups is a user permission. If you do not have that permission you can only select from existing article groups.
In order to use Additional articles and Discount Letter you need to have Article groups. It is also possible to specify discounts on article groups in agreements.
In the module settings / article settings, you can set whether article groups should have special conditions attached to them, such as a discount.
Read more about Article Groups.
Miscellaneous
In the footer you will find more possibilities.
Print creates a QR code as .pdf to print out. Read more about how to print QR codes via the collection function here.
Learn more about how to print labels with QR-codes via the collection feature here.
Information about QR and barcodes are also found here.
Replace article
If the article has been discontinued, you can replace the article with a new one. Click the link Replace article. A pop-up box opens where you select which article to replace and whether the article should also be replaced on service objects and service orders.
If it is a storage item, you will need to make an outbound and an inbound delivery to replace the replaced article in the storage.
Replacement articles are marked in red and the replaced article is indicated in parentheses. Information about replacements is retained and if you replace in multiple steps, the most recent replacement is displayed on the article record.
Example: If you have changed article A1 to A2 and then change article A2 to A3, the replacement for article A1 will be entered as article A3..
Inactivate
If an article is no longer to be used and is not to be replaced by another article, it can be inactivated. Click Inactive. A pop-up will open where you can enter the reason for the deactivation (optional). The article disappears from the register and can no longer be selected on orders. On previously created orders, the article remains for the sake of history.
If you need to inactivate multiple articles use the Collection function.
If you need to see or activate the article again, filter on Inactive.
Upload document
Anyone can upload documents on the article but deleting is a user permission.
History
Under History, you see all changes made to the article and when.
Transaction history
Shows all storage activities on the article.
Delete as storage item
Removes the article from all storages
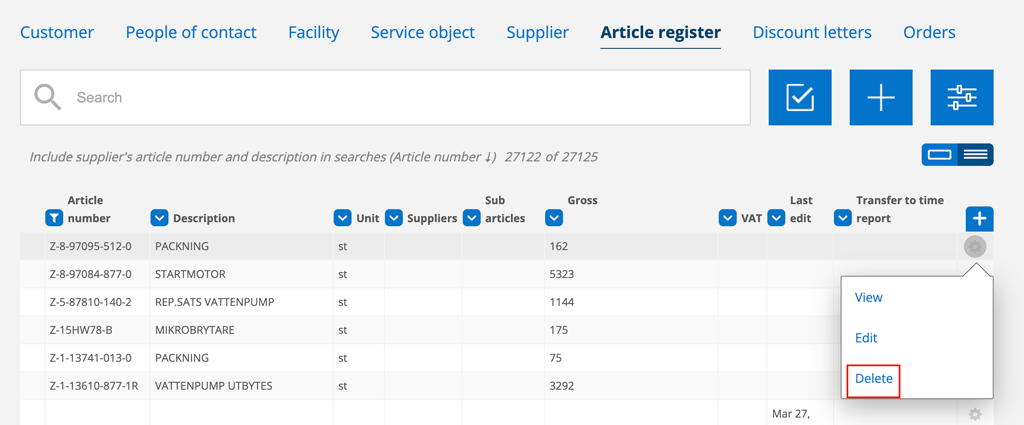
Delete
If an article is on an order, inventory or deliveries, it cannot be removed. This is to be able to keep the history of orders.
If the article is not found in any other places than in the article register, it can be deleted. If you want to delete several articles, it is easiest to use the collection function.
Change multiple articles or article groups, set tags, VAT, print QR code …
If you want to change articles or article groups, it is easiest to use the collection function. Do a filtering on the articles or article group and click on the collection function symbol. Select the articles to change and select what you want to change. Read more about the collection function.
The number to the right above the article list shows how many articles are listed and how many you have selected.
Add article to the register directly on order etc.
If the article is not in the article register when you add it to an order/quote/customer etc., a popup will open where you can add information about the article. The article is saved in the register.
Information to administrators
Editing module settings and user permissions requires admin permission. For information go to the article Article settings.