
Serviceprotocol.com contains several ways to send messages to customers – booking confirmation, order confirmation, protocol, messages to and from customers directly in an order, etc. as well as messages within your group.
First we present e-mail functions to your customers, the more internal e-mails and notifications.
General information
How do I know if I sent it?
Information about when, to whom and who sent the message is displayed at the top (E-mail sent:) of the detail view of a Quote, Work Order or Service Protocol.
f a change has been made to the order, the information about the sent e-mail or booking will be highlighted in red. Consider sending an email with the updated order.
Change to your logo in emails
Replace the service protocol logo with your company logo in all e-mails. The logo that is sent is the one you uploaded in Group settings.
Admin permissions are required.
Do this:
- Go to Group settings
- Click Email settings
- Mark “Show group logo”
- Save
Reply to …
The message comes from a “noreply” address, but the email address (username) of the person who sent the protocol, confirmation or message is also included. The recipient can always reply to the email and it will then go to the person who sent the message.
Regarding SMS (text messages)
The text message sending service is only available for users in Sweden and not included in our standard license or Demo accounts and is charged extra per SMS sent. This applies to both SMS to customers and to technicians (such as reminders and information about changed orders, etc.). You will be charged for the previous period’s messages. Each message (max 152 characters) costs 0.50 SKR. All messages are listed in the Message Log. The service can be activated/deactivated per user. Read more about that under Change how notifications are sent to you.
Contact one of our sales representatives for more information and agreement.
The maximum number of characters in an message is 152. If the message is longer, it will be sent as multiple messages. Keep in mind that an emoji takes up extra space and only gives you 70 characters for the message.
Mobile numbers for text messages are always entered with +country code and without the 0 in the number. Ex: +46705123456
You set the sender name for SMS under Module settings – Email settings. The name can contain a maximum of 11 characters including spaces. This is a limitation of the SMS function and something we cannot influence.
Use own mail server – SMTP
If you want to use your own mail server for your mailings, go to Group settings – Email settings and fill in settings for your SMTP. You need to obtain information about SMTP settings (server, user, password, from-address and port) from your email provider. You may need permission from your provider to use SMTP.
We are not able to provide support when using own SMTP. If you have any problems, please contact your email provider.
Email/SMS (at the bottom of an order)
At the bottom of an order page you will find the Email/SMS link. It may contain slightly different options depending on the type of order, what the order contains and what settings you have made for the function.
- Email order confirmation
- Email protocol
- Email with template
- Send message
- Send booking confirmation
- Send invoice
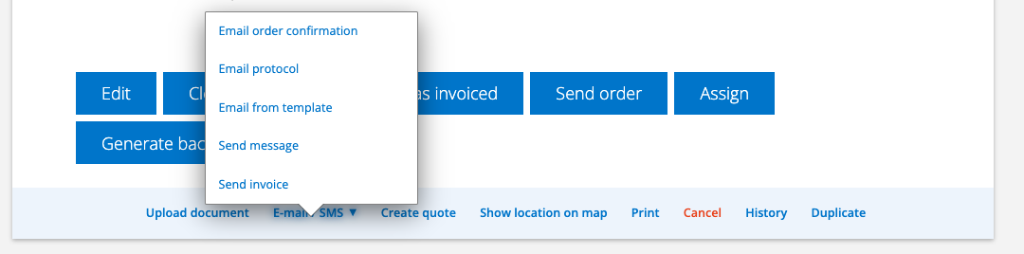
Settings make the Email popup look different
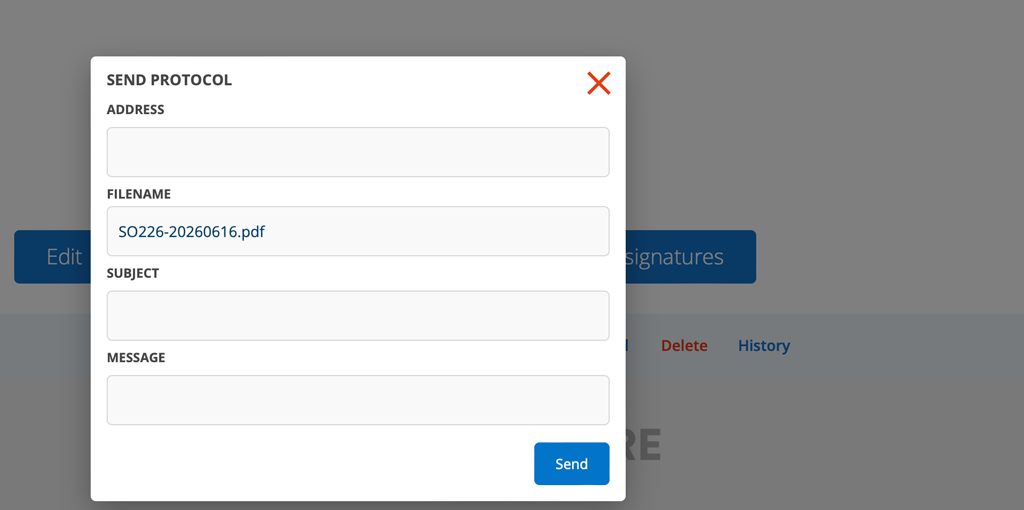
This is what the popup looks like when I have chosen to send a service report and no special settings have been made:
With some settings it will instead be like this:
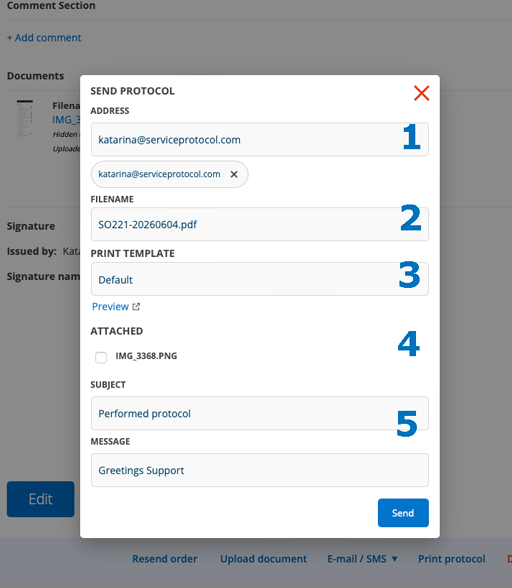
- Contact.This field is standard and will not change due to any settings.
- The file name can be edited int the pop up but is also affected by settings in Service protocol settings – Mail settings.
- Here you choose which print template the protocol should be sent to. Learn more how to create and select your own print templates.
- The Email setting “Ta med uppladdade filer vid sändning” ger möjlighet att välja vilka filer som ska bifogas mailet.
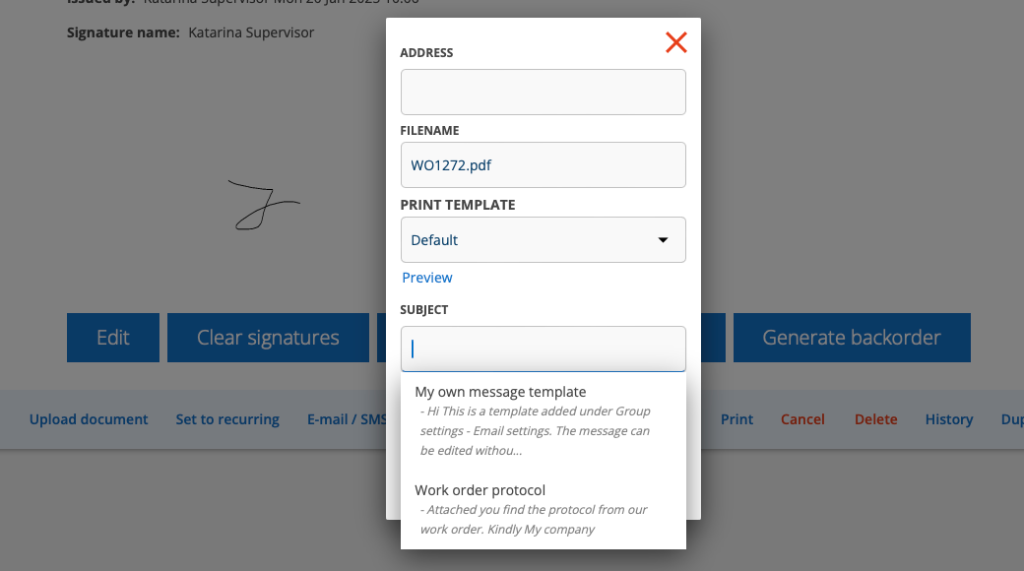
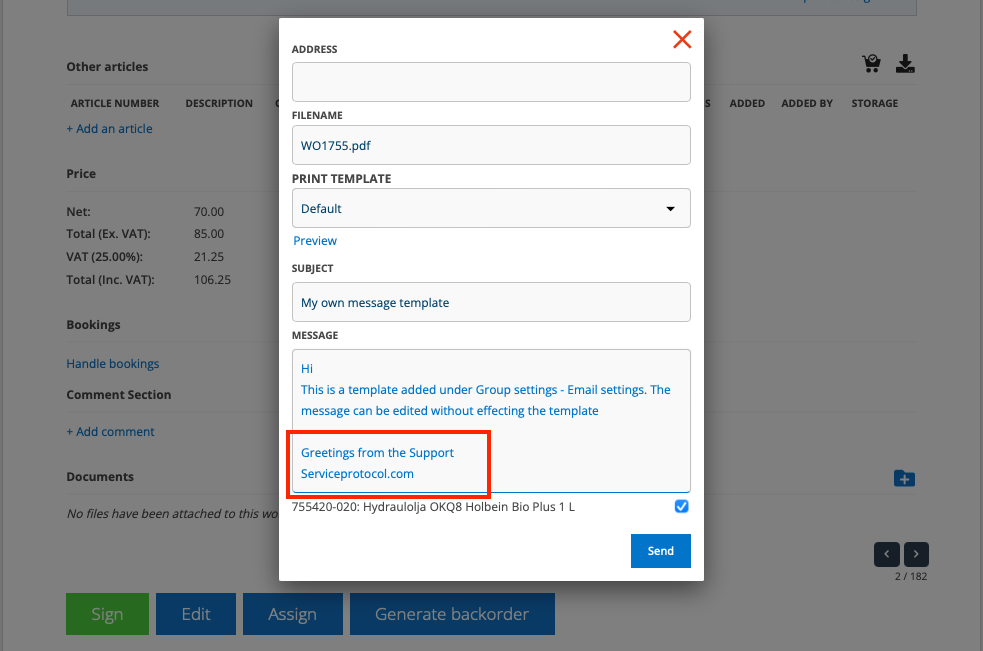
- Email message templates. Place the cursor in the SUBJECT fields and your template(s) will appear. Click on the template you want to use. The subject and text will be filled in automatically. You can change the text in the message. Changes to an individual mailing will not change your template. See image 8.
1. Choose who to send to
If there is a contact person on the order, it will be displayed directly in the address field. Otherwise, place the cursor in the Address field to select more. If there are contact persons at the facility or customer, they will be listed. You can also enter an email address. If you want to send to more than one person, you can enter them with a ; (semicolon) between each address. No spaces between the address and the semicolon. For example, name.name@epost.se;name.name@epost.se.
When you have selected a contact, it will be filled in under the contact field so you can easily see who you have chosen to send to and can easily delete a contact.
The list is sorted alphabetically by first name. After each name is indicated which facility the contact is at. The billing address is also included in the list if this is specified on the customer.
2. Choose what the file should be called
The file name always contains the order number. The file name can be changed manually in the popup if necessary. However, keep in mind that a changed file name is not saved anywhere!
You can also influence the file name by selecting one or more of these in Service Protocol Settings – Mail Settings:
- Include machine number in PDF filename
- Include date in filename
- Include facility in filename
- Include service object description on PDF
3. Print templates
Select which print template the protocol should use. Read here how to create and select own print templates.
4. Attach files to mailings
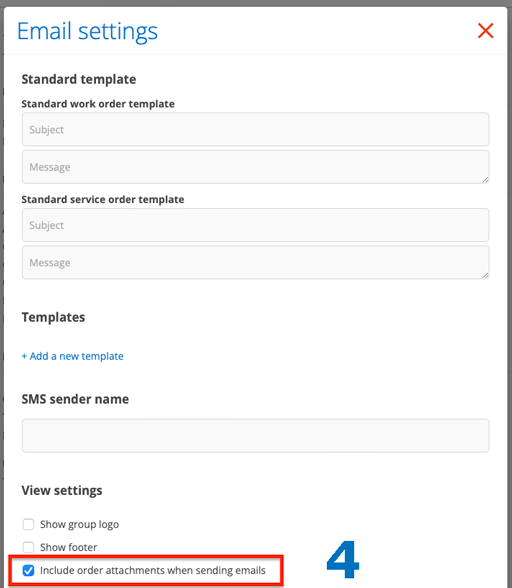
Under Group settings – E-mail settings, you can choose to select “Include uploaded files when sending”. Then you can choose which files should be attached when you send the email. You can only select files that have the setting “Visible to customer”.
On a Service Protocol, you must also have selected the “Show images” setting for this to work. You make the setting in Service protocol settings.
5. Create your own templates for emailing protocols and order confirmations
With this function you can create a standard template for sending out protocols and order confirmations for Work Orders and Service Orders, as well as for order confirmations for Work Orders, Service Orders and Contact Orders.
Templates you create here can be selected in more places – such as Sales Order, Purchase Order and Quote, then under the Send Email button.
The function has a simple editor where you get support in creating the templates. See image 6.
This function adds sa footer with your address and other information and your logo if set in Group settings.
Do this:
Admin permissions are required.
- Go to Group settings – Module settings
- Click Email settings
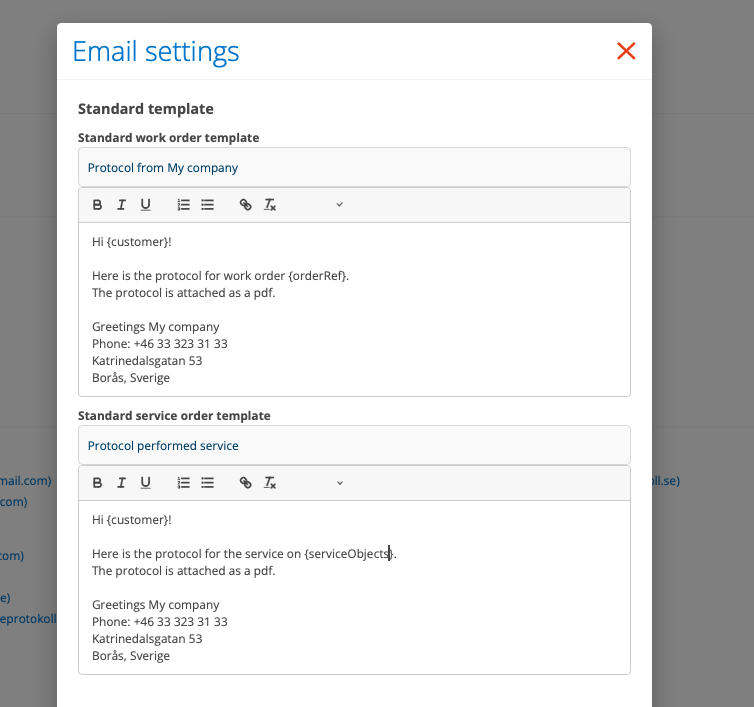
Standard template
Your default template is automatically selected when you click Email/SMS – Email order confirmation or Email protocol. If you want to use one of your other templates, you need to click X in the subject line to bring up your other templates.
- Select Standard work order template or Standard service order template.
- Fill in the subject and the text to be sent. The title is what appears as the Subject on the email.
Templates
Templates you create here can then be selected in many places – Sales Order, Purchase Order and Quote, then under the Send Email button.
You can also use this function if you want to formulate a slightly longer email message, send a survey, etc.
- Click + Add a new template
- Fill in the title and the text to be sent. The title is what appears as the Subject in the email. You can have multiple messages. Click + Create a new template to create more.
Booking confirmation template
Create a booking confirmation according to your own wishes regarding content and layout of the information for work orders, service orders and contact orders. You can create a standard template, as well as different templates for SMS and email.
If you have filled in a standard template, this is the one that is displayed when you send a booking confirmation. If you have not filled in any templates, the system’s standard template is displayed, which contains the following text:
“Hello,
Here is the booking confirmation for a booking made by your company name.
Order number: xxxx
Technician’s name: day, year, time
Regards,
serviceprotocol.com”
Follow these steps to create your own templates:
- Go to Group settings – Email settings.
- Fill in your template(s) under the Booking Confirmation Template field. “Default Template” is the one that will be displayed when you send a booking confirmation.
- Save
Select template when sending
To select any of the other templates you have created, place the cursor in the SMS templates or Email subject/templates field and your templates will appear.
You can edit the text when you send the booking confirmation.
Use these tags to get information into the template:
All the tags are also in the editor under “Tags”. Place the cursor where you want the tag and then click on the tag you want.
| Tag | Gives this information |
|---|---|
| {company} | Group/ your company name |
| {customer} | Name of the customer |
| {facility} | {facility} = Facility name |
| {address} | {address} = Facility address, if none exists, visitor address is retrieved and if none of these exist, it takes the invoice address |
| {futureBookings} | List of futurer bookings (line separated) |
| {orderRef} | The text “Order number:” + order number is printed: Example “Order number: WO1699” |
| {nextBooking}* | Next booking (as text) |
| {nextBookingName}* | The name of the person performing the next booking |
| {nextBookingDate}* | Date of next booking (e.g. Thursday, August 28) |
| {nextBookingTime}* | Time interval (hours) for the next booking |
| {facilityOrCustomer} | FacilityName if exists, otherwise CustomerName |
| {customerOrderNumber} | Order number from customer. If number is not available, the text “missing” is printed. |
| {contactName} | Contact person’s name (default “NN”) |
| {nextBookingEstimate} | Either date+time or start–end date depending on whether it is the same day. Example: “We will come to you between {nextBookingEstimate}” you get “We will come to you between Thursday 28 August and Friday 29 August”. |
| {serviceObjects} | List of service objects, separated by , (comma) |
*These tags require a reservation on the order. Otherwise, the tags will be printed.
Example:
Template:
Hi, {facilityOrCustomer}
Our field service technician {nextBookingName} will visit you {nextBookingDate}, {nextBookingTime}
The work is concerning {orderRef}
Yours {company}
Result:
Hi, AD Building Company
Our field service technician John will visit you on Friday 06 October, between 07:00 – 08:00
The work is concerning WO462
Regards My company
Send booking confirmation
(Applies to Work Orders, Service Orders and Contact Orders)
Automatic mailing
When you add a booking on a service or work order and save the order, you will be asked: “Do you want to send an email to the contact person with booking confirmation?”
The question only comes up if there is a contact person on the order and if you have the work order permission “Handle bookings“. Please note that only emails are sent with this automatic feature.
See also Remote signing of service protocol.
Send (new) booking confirmation
A booking confirmation can be sent by e-mail and/or SMS.
If you want to send a new confirmation if the booking changes or if the customer requests it, do this:
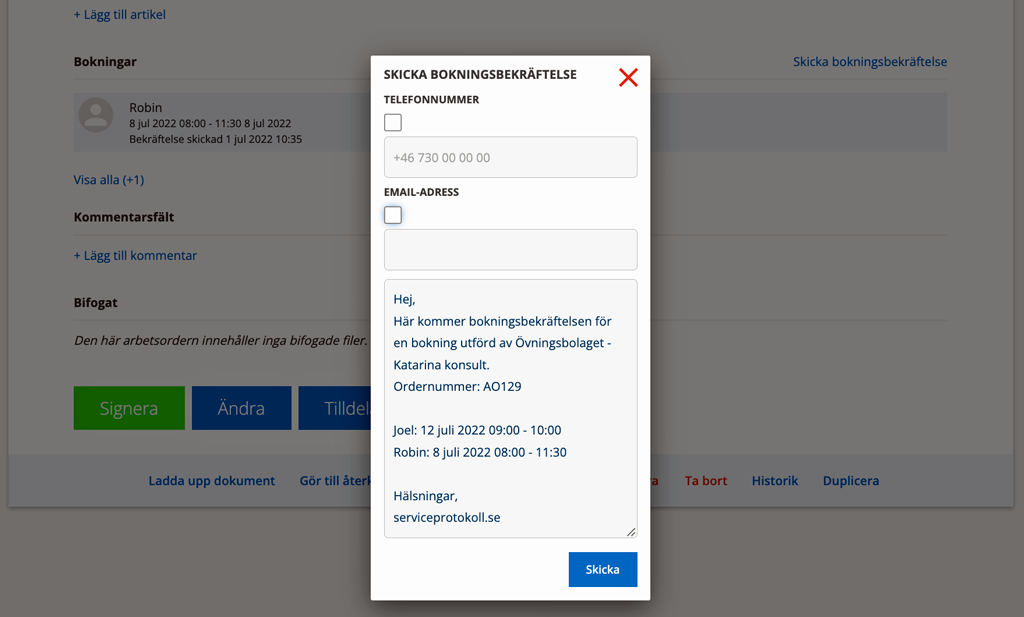
- Click on Send booking confirmation under the heading Bookings without opening (Edit) the order. A popup will open with the option to send email and/or SMS.
- Click on the method you want to send.
- Place the cursor in the fields and suggestions for phone numbers or e-mail addresses will appear.
The text is preset or downloaded from your booking confirmation template (see below), if you have created one, but can be changed in the popup if you wish.
Concerning work order
Send work order protocol
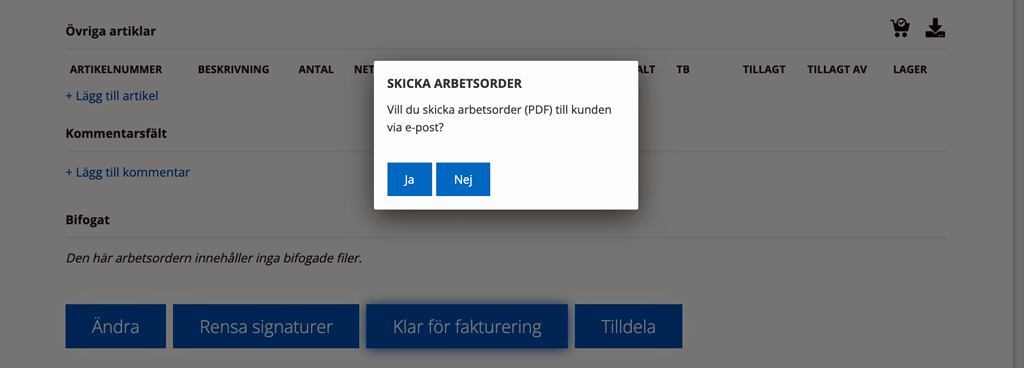
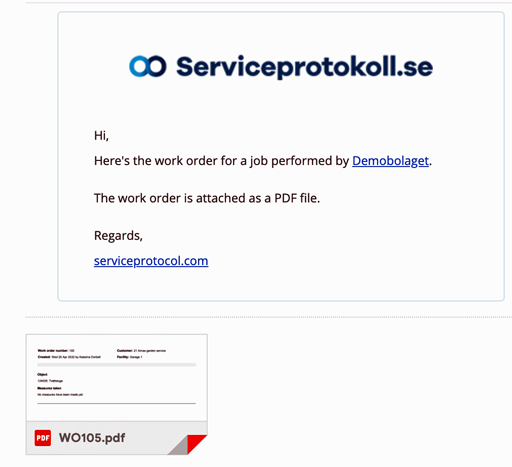
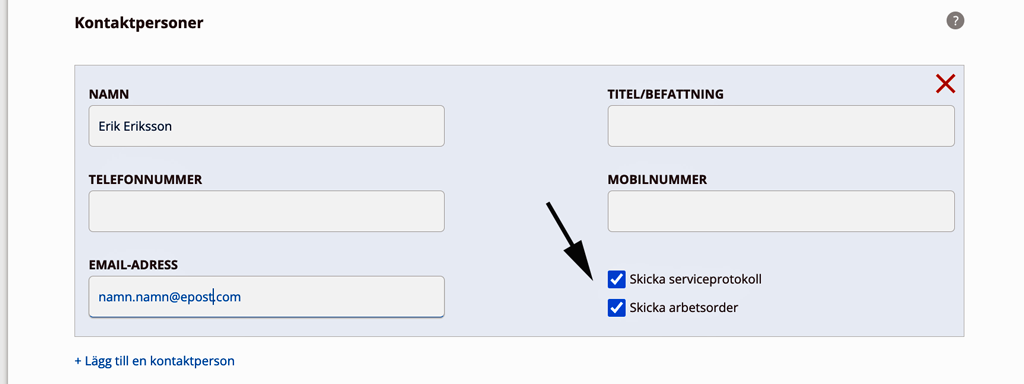
When you click Ready for invoicing on a work order, you will be asked if you want to send the work order as a pdf to the customer if you selected “Send work order: Yes” on the contact person for the customer or facility.
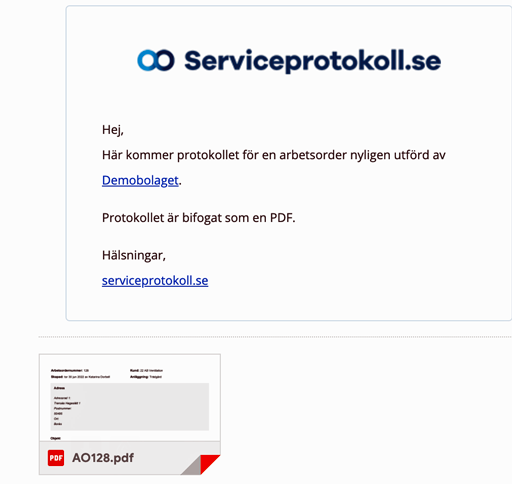
Here is an example of the email that is sent.
Send messages
Do you want to formulate your own text for sending out messages linked to a work order? For example, a message stating that an ordered item is available for pickup?
Do this:
- Go to Group settings (admin-permission is required)
- Click on Work order settings
- Fill in your text in the Default Message field.
To send:
- Open the Work Order you want to send the message from.
- Click on E-mail / SMS in the footer – select Send message.
- A popup will appear with your message. You can change the message if needed.
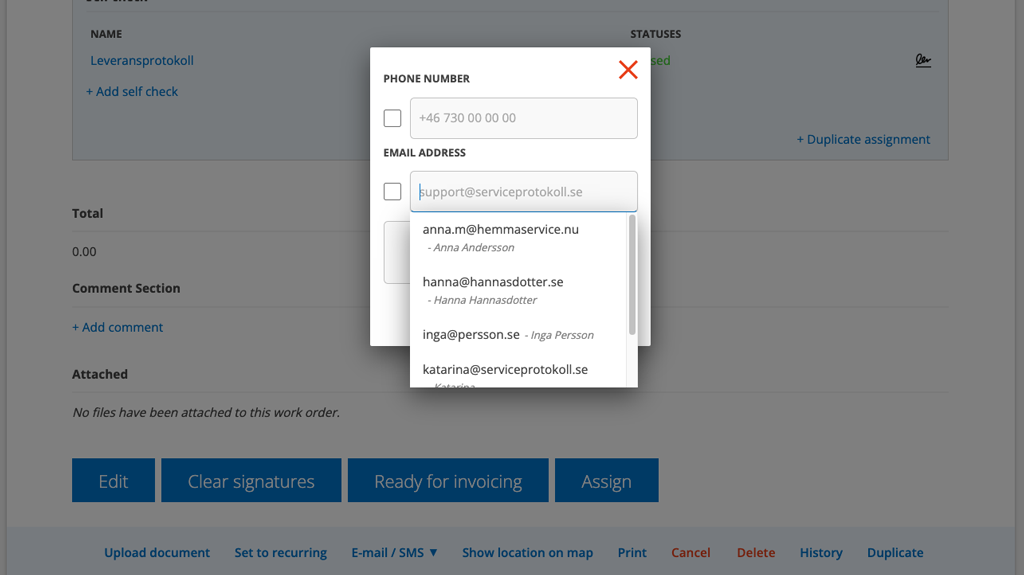
- Choose how you want to send the massage. Place the cursor in the fields to retrieve the address/mobile number of entered contact persons.*
- Click Send
*Select contact person to send message to
When you send a message on a work order, contact persons from the order, the customer, the facility and “invoiced other customer” are listed. E-mail address and name appear in a list when you place the cursor in the field for e-mail.
Message to/from customers via the Comment field on an order
Notifications can also be sent via comments to and from customer users on a work order. Read more about how this works under Work order comments.
Applies to Service Protocol
Protocols are automatically sent to a service order’s contact person if you specified this on the contact person for the customer or facility. In the field for the contact person, select “Send service protocol: Yes”. When you have created a service protocol, you will then be asked if you want to send the protocol.
The text in the email sent is preset and cannot be changed.
If the recipient is a customer user or user of the system, he receives a direct link to the order, otherwise only the pdf as an attached file.
If you want to send to additional people, click on Email protocol at the bottom of the page. If you want to send the message to several people at the same time, write the addresses with a comma between them but without spaces. Example: name.name@mail.com,name2.name@mail.com
Remote signing of service protocols
If you have chosen to have customer signatures, the service protocol can be signed via a link sent by email. Once the protocol has been signed by the customer, the signature is added to the protocol. The link is valid for 30 days.
Conditions for the link to be created:
- Service protocol setting: “Use customer signatures” and “Use external signing”.
- There must be at least one contact person for the customer.
- In order for the link to be created, the protocol must also:
- • already signed by the technician
• not invoiced
• missing customer signature
Change the file name of the protocol (PDF).
Setting to Include machine number in the PDF file name. Requires admin permissions.
- Go to Group settings – Module settings
- Click on Purchase order settings
- Select Include machine number in PDF file name
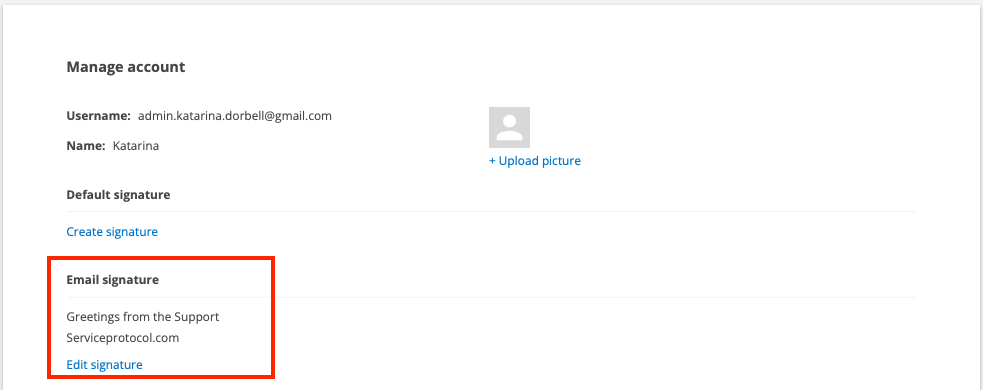
Email signature
Do you want it to be sent with a signature that shows that it was you who sent the message?
Then you add an email signature in your account settings. This is then your personal signature and is automatically added after a message you have created as above. The signature will not be displayed unless you have selected one of your templates.
Internal emails
The settings are made in Group Settings. Admin permissions are required.
Work order
- Click on Work order settings
Here you can fill in which email address should receive notifications about the following for work orders:
Service order
- Click on Service Order Settings – Email for articles to order.
Fill in the email address of the person who should be notified when articles needed to be ordered.
Purchase order
- Select Purchase Order Settings – Send to default email.
Fill in the email address that should be added to any purchase order.
Change how notifications are sent within your group
- Planner Settings
Choose whether you want to Send notifications on other bookings. “Other” is here a booking not made on an order but other time type.
Change how notifications are sent to you
Notification of when you have been assigned an order, booked or when orders are created or changed or if you want a service reminder, you set yourself up via your own Account settings. Click on your username to access your Account Settings.
The setting for e-mail/SMS to be sent can also be changed by admin under User permission on a user. Select Edit user settings. However, the admin cannot change the type of messages to be sent, only the user can do this.

