
By creating a template for Self-check, you can easily specify the type of Self-check to be carried out and how, as well as add clear instructions, to facilitate and ensure quality.
You add self-checks to a Work order under the heading Assignments.
A self-check can also be placed on a service object to, for example, perform a daily inspection.
Self-checking can be mandatory when performing a service or work order, ie you must perform the self-checking to proceed in the service protocol or sign the work order.
On Service Orders/Protocols, the function is only available as “mandatory self-check”. Learn more about mandatory self-checks here.
To create a self-check:
- Go to Function > Self check.
- Click om the +symbol to add a new self-check.
- If you have created and uploaded your own print templates, you choose which of your templates should be used for this particular self-check. Read more about creating own templates for self-checks.
How to put together a self-check
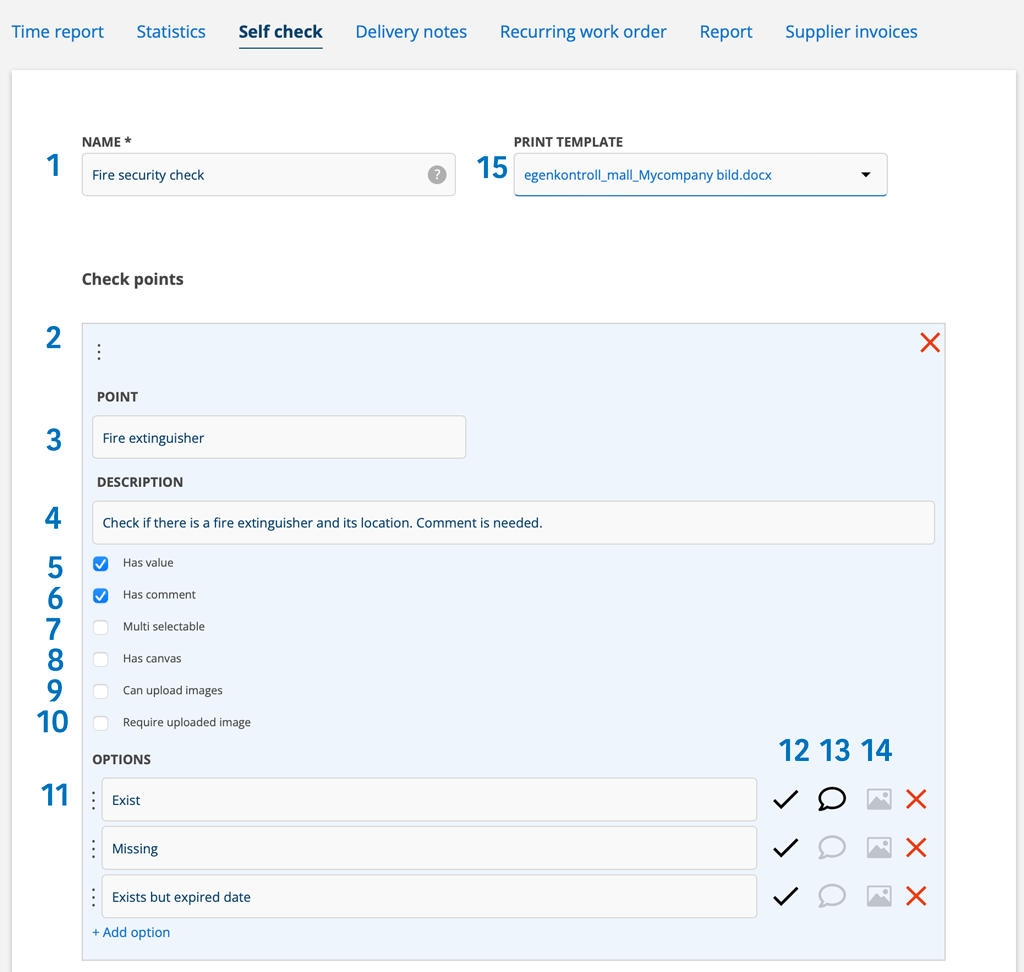
- Name. Enter a descriptive name for the point. The name is what you search for when you want to add a self-check to an order.
- If you want to move the points or the options, click on Edit, “grab” the three dots and drag them to the desired location.
- Point. Give the point a name. In the picture below you see one (1) point. A self-check can consist of an unlimited number of points. Each point can be set individually
- Description. Describe what is to be done at the point. The description appears under the question mark on the self-check and is a support for the person who will perform the self-check.
- Has value. Here you choose whether the point should contain fields to enter a value. On the picture below (Example of self-check) you see where the value fields end up.
- Have a comment. Here you choose whether the point should contain fields for a comment. On image 2 you see where the fields for comments end up.
- Multi selectable. Used when you want to be able to select several options on the point. All the points must be approved choices (see number 12 in the images above, all the ticks should be black).
- Has canvas. Adds a drawing area. You can also upload a photo and then draw on it. See image below.
Can upload images. Allows images to be uploaded to the point.
- Require uploaded image.
A photo is required to complete the self-check. If you click on this, “Can upload images” will also be marked and the photo symbol (14) will be marked on all options. - Options. Fill in any number of options for the self-checker to choose from.
- Click the checkmark so it turns darker gray if the option should be an accepted choice to continue the order. The choices that are not marked as approved will be marked “Passed with remarks”.
- Click on the speech bubble if a comment is required to proceed. The comment is written in the field marked with 5, which is why you must have selected “Has comment” as well.
- If you have created several own templates for printing self-checks, you can choose here which template you want to use for this particular self-check (15). The selected template is then always used when printing linked self-control. You cannot choose between different templates when printing, so if you have specified a template, that is the one used. If you do not specify a template, the standard printout is used.

If you want to move the points or the options, click on Edit, “grab” the three dots (2) and drag them to the desired location.
Save your changes.
Performing a self-check
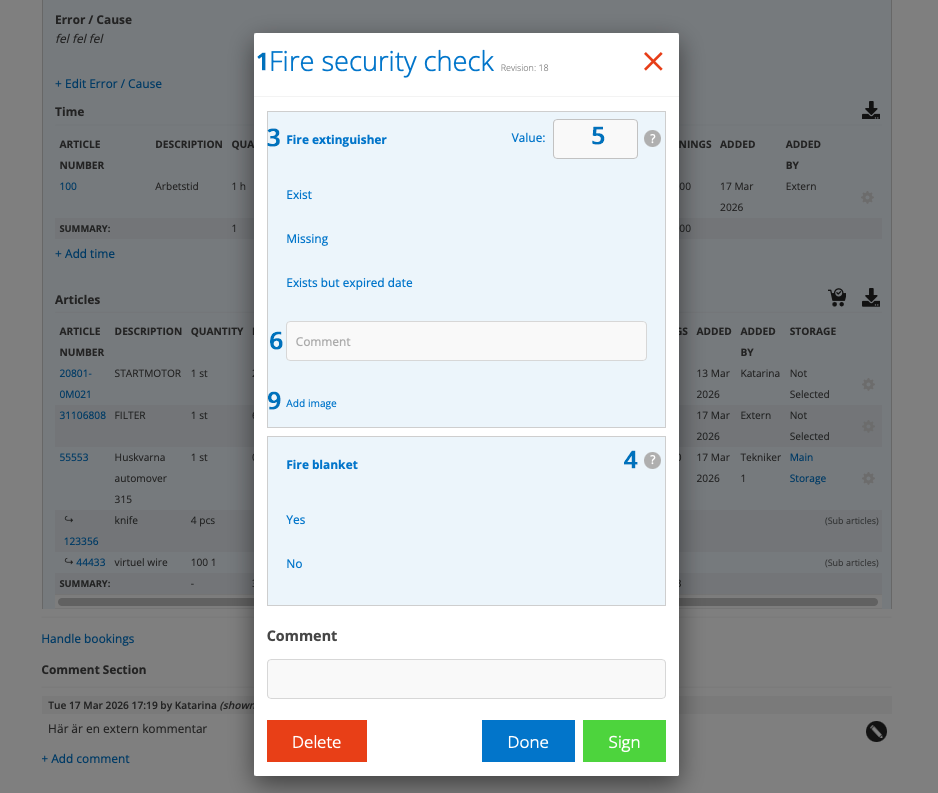
To perform a self-check, click on the name (link) and a popup with the self-check will open.

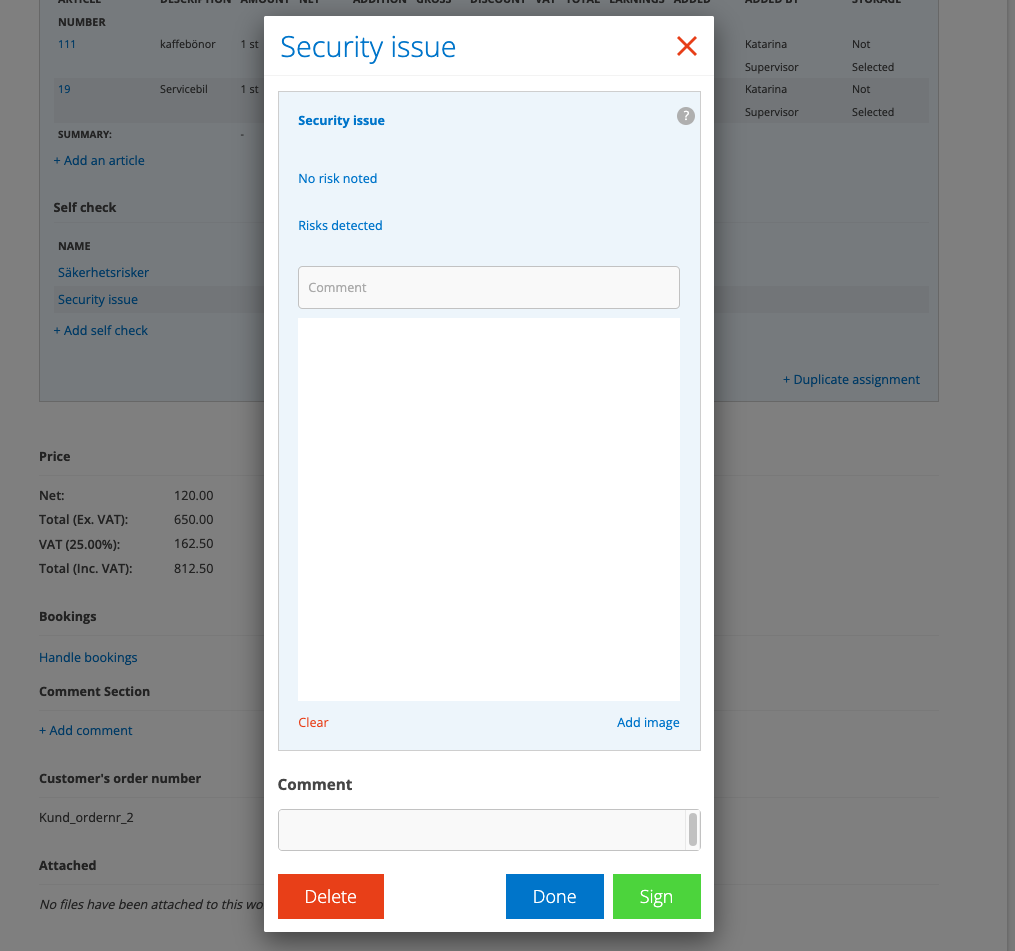
This is what it looks like if there is a drawing area. You can upload an image to the drawing area by clicking Add Image (on the right below the drawing area) and you can draw on top of the image. To remove the image, click Clear (on the left below the drawing area).
Not yet ready?
If you do not have time to complete the self-check, click Done to save what you have done. The date and time are added to each point that is completed when you save.
Done!
When you are finished, sign the self-check. If you have missed something, you will receive a warning and the field that is not complete will be marked in red so you can easily find where you need to complete it.
You can see if the check is complete and signed by the changing of status of the work order to Passed and adding a date and the signatur symbol. If there are remarks, the status is set to Passed with remarks. The colors on the status also indicate whether the self-check is approved or not.
It may also be required that the self-check is Approved in order for you to proceed.
Change?
If you need to make changes to a completed and signed self-check, click on the signature symbol and then on “Clear signature”. You must have the permission to Clear signatures.
If you want to print the self-check with comments, click on it after signing and a PDF will be created. If you have a custom print template selected for a self-check, that is always the one used when printing. You cannot choose between standard and custom templates at this point.
Risk analysis
Use self-checks to create forms for risk analysis, for example in connection with a work or service order. With your signature, you confirm that the risk analysis has been performed.
Mandatory self-checks on service order and/or Work order

The self-check/risk analysis may be mandatory, ie you cannot progress in the service record or work order without having performed the self-check. It may also be required that the self-check is Passed in order for you to move on.
You cannot set self-control on a single order. If you choose to use mandatory self-check, the self-check becomes mandatory for all service protocols and/or work orders. If you specify two or more mandatory self-checks, they will all have to be performed before you can proceed.
Setting mandatory self-checks requires admin permissions.
Do this:
- Go to Group settings– Module settings- – Service protocol settings and/or Work order settings
- Select the self-check that should be mandatory.
- Choose whether the self-checks must be approved in order to proceed – Require the self-check to be valid.
- Save
Export self checks
At the bottom of a self-check you can choose to export. The file format is .json.
The idea behind this opportunity is to be able to share your own controls with a partner. Under Upload register you can upload self-checks in .json-format.
Settings that can be made for templates:
Requires admin permission.
Permissions for users concerning templates and self-checks:
View, Create, Modify, Delete