
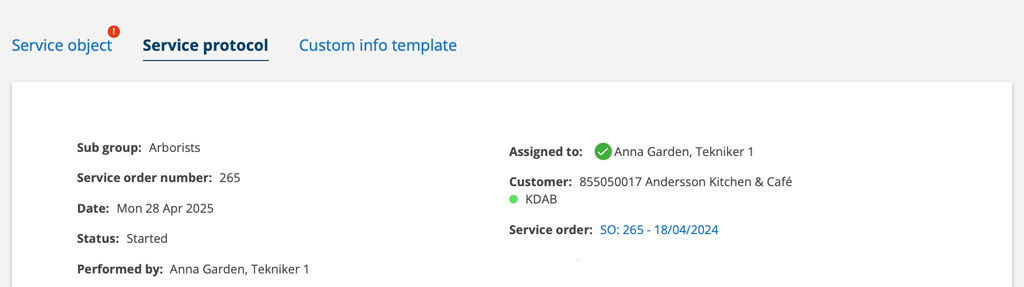
Perform a service and a service protocol is created automatically.
- Click the Service order in the To-Do list or Service Order list that you want to perform.
- Go to the bottom of the page. Feel free to use the down arrow on the right side of the page.
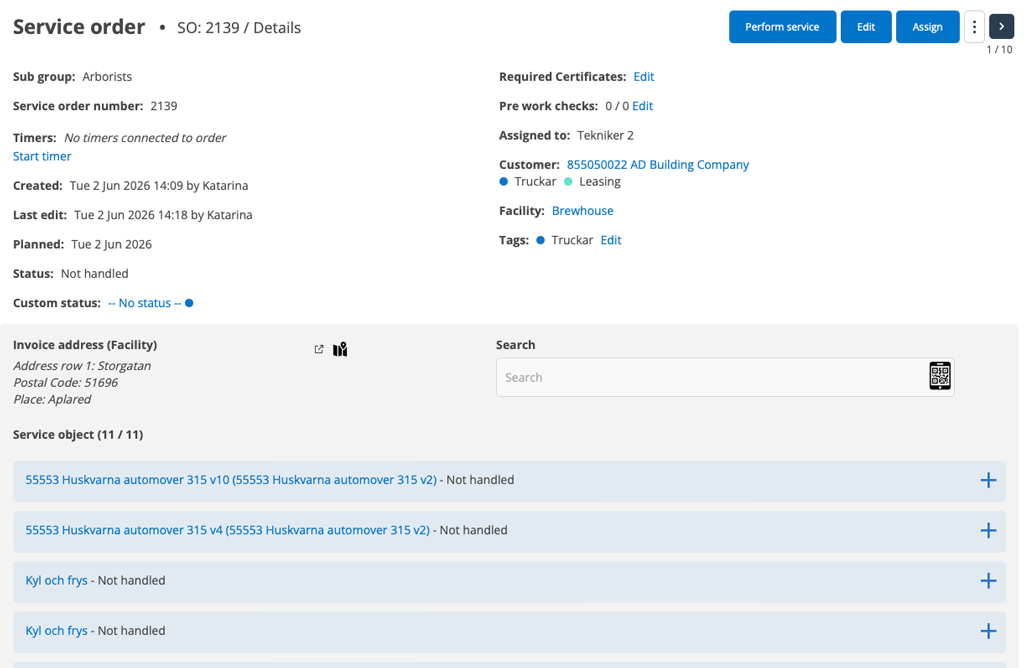
- Click Perform service or, if service has started, Continue. You will be taken directly to a service protocol and can start performing service and fill in the information about the service.
- If the service has 10 or more service objects, the different assignments are tabbed together. Click on the + sign on the right to open a service object. If you have 10 or more, a search field will also appear where you can search for service objects. You can search by description, model, machine number, serial number or scan a QR code on the object.
- Please note that you cannot change a service order if you have started the service.
Here you will find a easy guide for technicians.
Before starting the service – start a timer
Do you want to start a timer to record travel and/or work on a work order or service order? Click on Start timer.The timers box will open. Select Start triporStart work. You may need to refresh the page to see the timer running.
When you are finished with the trip/work, click the Start timer again link or the timer symbol and select Finish work. Click on the assignment or Other to which the time should be linked. The time is now registered on the order.
The facility’s service points
If there are service points you need to perform on the facility before you begin the service, these are listed under Facility. You can add a service point by clicking + Add service component.
Self-check
If you need to perform a self-check, add it under the heading Self-check.
A self-check can also be mandatory, i.e. it is included in all protocols and must be performed.
Missing a service object?
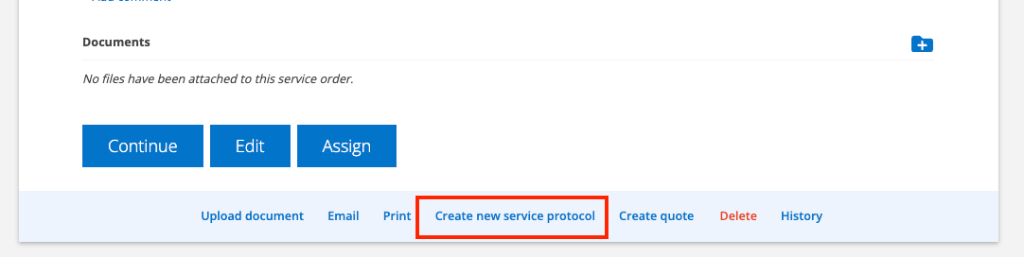
When you need to add a new service object, choose Save the started service protocol. Then scroll to the bottom of the protocol and click the link Create new service protocol. A new protocol is opened which receives the number of the original order and a number, e.g. 1234-2. When you have filled in all the information about the object, you save. The service object is now on the originating order and you can continue with your protocol.
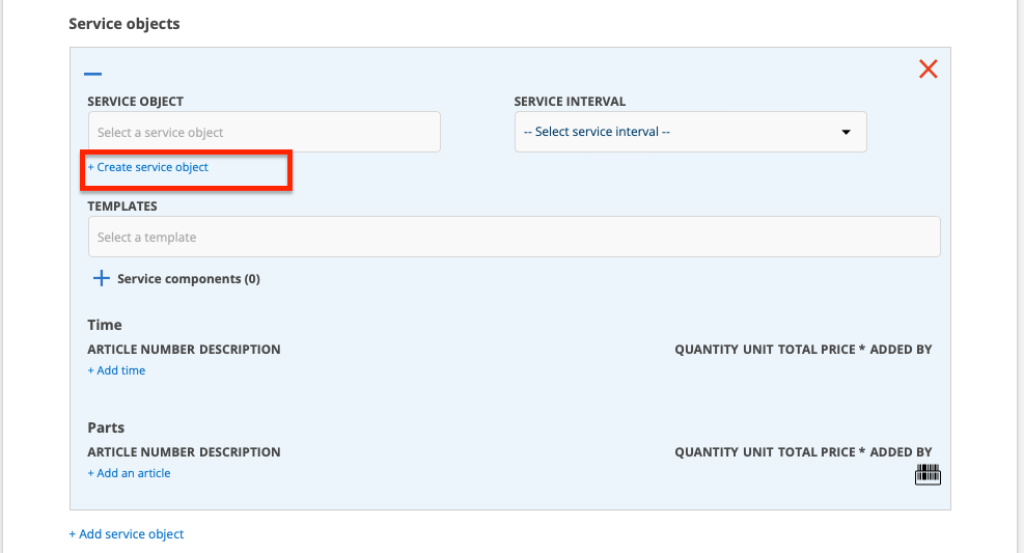
A service object can also be added directly to a protocol. Click the + Add a service object link below the existing service objects.
Create new service object?
To create a new service object, first click on + Add a service object and then on + Create service object. A form will open where you can add an object.
If you have selected a model for the object and the model has service intervals and parts, the system will retrieve that information. To see this information, you first need to save the service order. When you then click Edit/Continue, the information is there and you can choose which service (service interval) should be performed.

Don’t see the link? Then you do not have the permission to add service objects.
Perform service
Partially perform, merge protocol or separate
Partially perform
Choose whether you want to use partial execution or not. It is best not to mix partial perform and perform as it can easily cause confusion about what is complete. If you do not want to perform a partial service at all, scroll down and select Perform service.
Being able to Partially Perform is a user permission. If you have that permission, there is always the Partial perform service button – even if there is only one (1) service object on the service order.
In the example below service on “Frymaster” has been executed and a protocol been created. The protocol receives the service order number + a sequential number: e.g. 107-1, 107-2, etc.
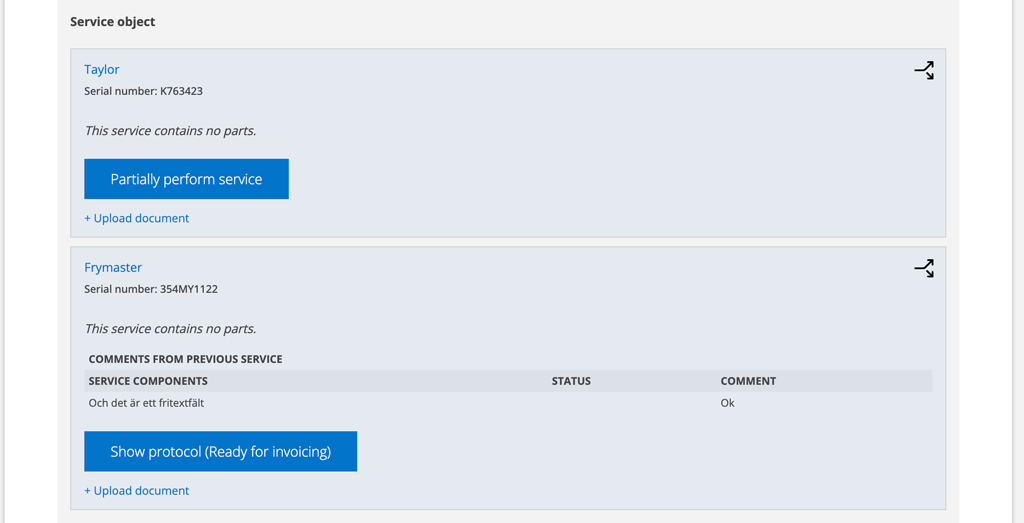
When you are finished with one of the items/tasks, you will see the Show Protocol button.
In the protocol, you see information about the partially completed object, including articles/parts that were used on that particular protocol.
Please note that new service is generated when all objects are executed and signed, not when a object is partially signed.
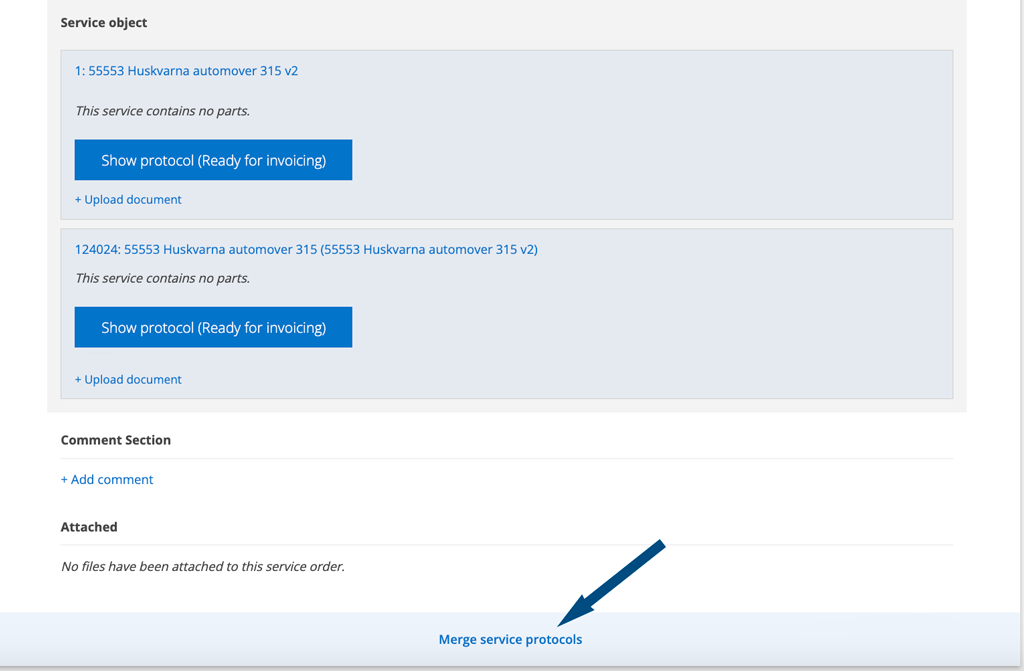
Merge service protocols
If you use Partially perform service and then want to merge the protocols, do this:
- Locate the original service order.
- Scroll to the bottom of the order and click Merge service protocols.
- Click Merge in the dialog box. ATTENTION! The merger cannot be undone, but you can always choose Cancel.
- Sign the merged protocol and the next service is generated.
Conditions: All partial services must be completed and signed for you to be able to merge into a protocol.
If you do not see the Partial Perform button, it means that you do not have the permission to Partial Perform or have chosen not to use this function.
Separate service objects from the service order

By clicking this symbol in the upper right corner, you can create a separate service order for the service object.
If you use this option, you cannot then merge it into a service protocol again as in Partial perform.
Collapse service points
NOTE: This is a setting made by your admin account.
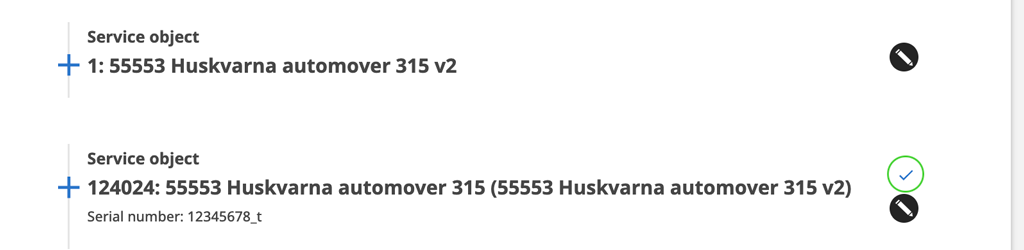
If you have two or more service objects on a service order, the ones you are done with are marked with a green ring around a blue tick (see image below). The information about the service object is “folded together” to save space on your mobile/computer.
If you want to open the information about the object, click on the plus sign to the left of the object’s name.
Add information about the object
If you want to quickly complete or change the information about the service object, click on the “pen” after the object and a box will open where you fill in the new information.

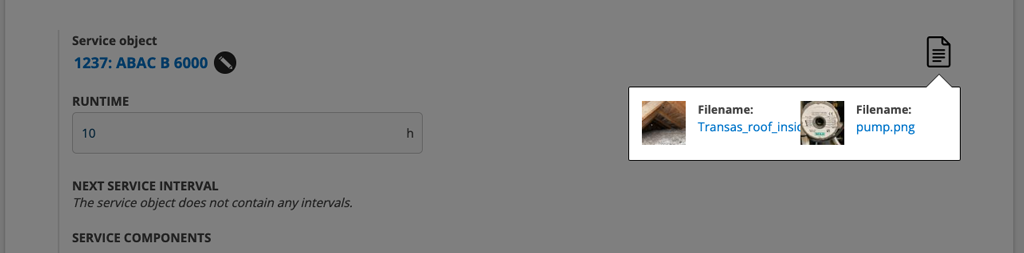
When you execute a service order, you will see this symbol next to the service object name if there are attached files uploaded on the object. Click on the icon to display thumbnails of the attached files. Click on the thumbnail and it will open in a larger version.
SERVICE COMPONENTS
Add service component
The service components and materials needed for the service are retrieved from the service order itself, but you can add both service points and materials by clicking on + Add service component and / or + Add part.
If you want to add a service template, place the cursor in the TEMPLATES field and your existing templates will be listed.
If you want to create a completely new template, click on the + sign to the right of the field and a new tab will open in your browser where you can create your new template.
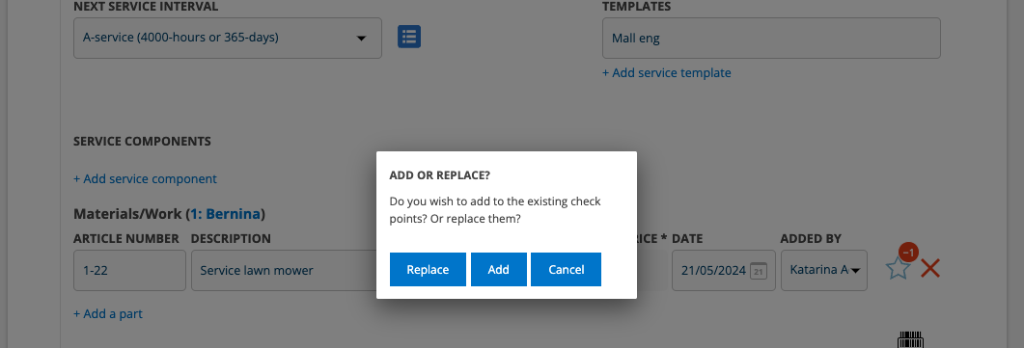
When you have selected a template, you will be asked if you want to replace the template you already have on the protocol or add to it.
If you choose replace, the old template will be removed, if you choose add, you will keep the old one plus the new one.
Adjusted – Should be addressed
If you select Adjusted or Should be addressed, a comment field opens where you can enter comments or choose from your preset suggestions. You can select multiple comment suggestions for a service point. The comments are placed on a line separated by a , (comma). Read more about how to add comment suggestions under Information for admin.
Learn more about adding comment suggestions under Information for admins.

Should be addressed also adds links to Create Work order and Create Quote when saving the order.
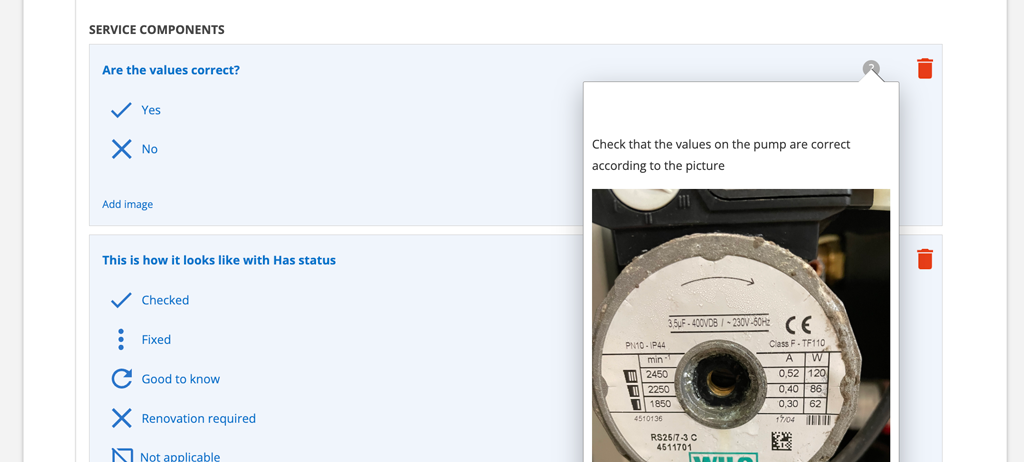
If choosing the Not Applicable symbol the service point will be closed, but you can always go back to it and it will remain for the next service.
You use the dustbin to remove the service point completely. If you do not see the bin, you do not have the permission to remove service points.
Add image
By clicking on Add image, you can take a photo or select a photo from your mobile or computer and upload directly at the service point. The photo will be added to the protocol-pdf. If you want to upload more pictures, click on Add image again.
Help
If there is a description and/or image as instructions to the service point, you will see a question mark to the right of the service point. Click on the question mark to open the description.
Value
Do you have the field Value in the protocol?
The old measurement values are shown grayed out so you can easily compare and follow up.
Learn more about service templates here.
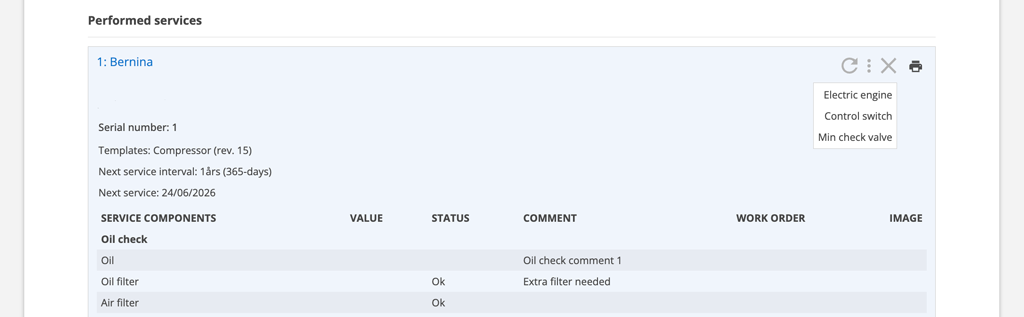
Summery of remarks
When you have finished and saved the service points, symbols will appear in the right corner of the service object if there are any notes (i.e. Corrected, Changed or Should be addressed). Hover over the symbols to see what the points are.
Like this:
Service object
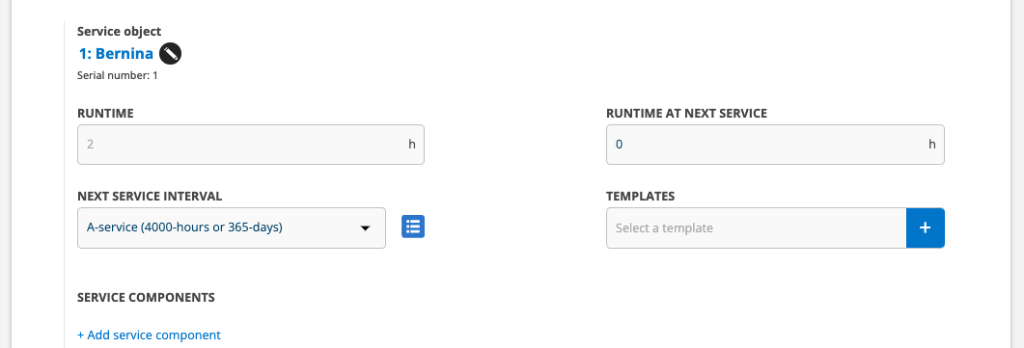
Enter the operating time, if applicable for the service object. “Grayed out”, you see the operating time that the system has calculated based on the previous service and the set service intervals on the service object. Operating time for the next service is calculated automatically and transferred to the next service order.
Next service interval
Here you see which service interval exists for the service object.
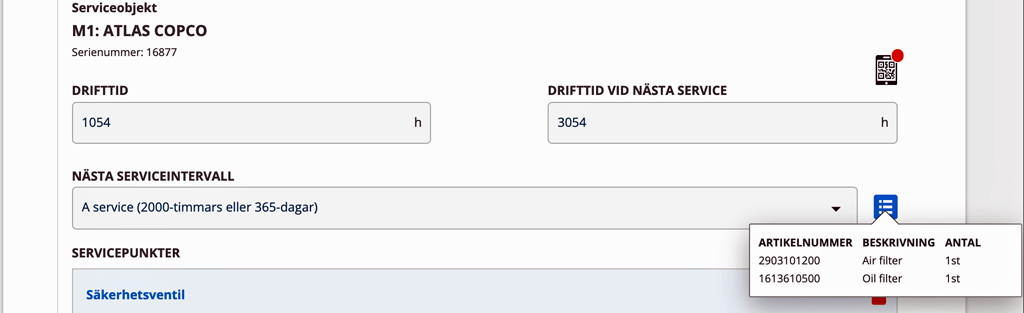
Click on the blue symbol on the right and you will see which articles are required for the service. If there are several service intervals, you can see articles for each individual service.
The QR symbol
If you scan a QR code on an object before clicking Perform service on an order, the code leads directly to the information about the service object.
If you use QR verification, you scan the code on the service object when you do the service. When you read the QR symbol, with your mobile phone’s camera, the dot changes from red to green.
If you would like to change back, if for example you did not have time for the service for some reason, you can click on the QR symbol and choose to remove the validation.
Time
Here you enter the time worked. Time items are displayed in the list.
In the heading “Time” you see which object applies.
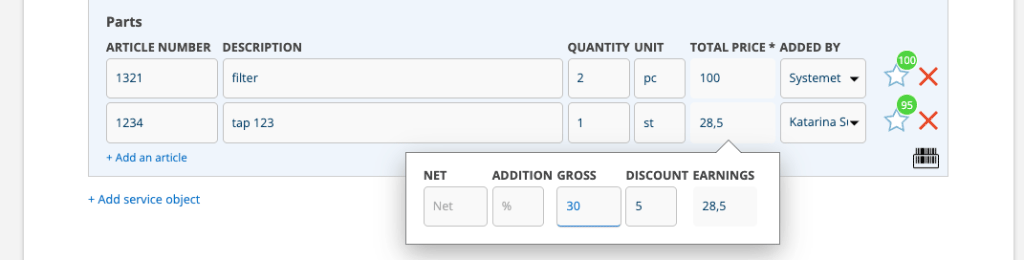
Parts
Here you add material connected to the service object. If you see the symbol for layer, you can indicate from which layer you pick the material..
If there are parts on the object record and the service has been generated by the system, these parts have been added automatically.
In the heading “Parts”, you see which object applies.
TOTAL PRICE *
Click in the box under TOTAL PRICE and a field will open where you can enter more information about the price.
Prices are retrieved from the item register, or you can enter the price yourself. If agreements, customer items or discount letters are linked, the price is automatically adjusted accordingly. The system searches for information in that order: agreements, customer articles and lastly discount letters.
Permissions for users concerning price: View net pricing, View gross pricing and View discount.
Comments regarding the service object
Here you can comment on the service object and you will see any comments from the previous service protocol.
Other material
Here you can enter articles that you do not want to link to the service object or the assignment.
If you have entered articles here but want the article to be included in the service object’s articles instead, click on the green arrow and the article will be moved to Parts / Time.
Comments on the service performed
Comments about the service performed are posted here and automatically transferred to the next service if you have selected that setting (see Information for administrators). For example, about something that should be checked next time. The technician who will perform the next service will then see your comment. These comments are not displayed to the customer. Keep in mind that previous comments may need to be cleared from the protocol so only current comments are included in the next service.
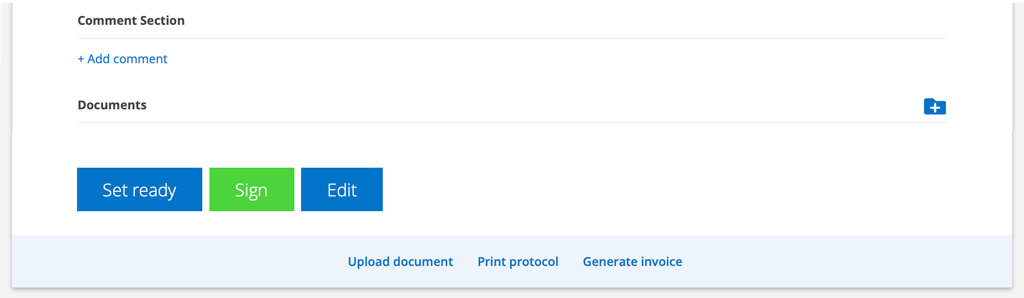
Save, Set ready, Sign and Send the protocol
If you are not finished with the protocol, you can choose to Save changes until you can continue.
If you have missed entering the runtime, that field is marked in red and the protocol cannot be saved until you have filled in the time.
If you have missed filling in a value at a service component, you can save the protocol but not sign it before the value is filled in.
When the service is completed, click Sign and sign the protocol. A protocol is created that you can send via e-mail or print as a pdf. Click Yes in the popup asking if protocol shall be sent. Read more about sending protocols.
See the button Set Ready?
- Click Set ready
- The signing box opens and you sign your work.
Under Assigned, you will now see a mark (a green checkmark) indicating that you have completed your part of the work.
Do you see the Sign button?
Always start by marking the order as ready if that button is available. If you are the last person to mark the order as complete, you should also sign the entire order.
Comments
You can add comments to a service order. The comments can be changed or deleted, displayed to the customer or only internally. The comment is included in the service protocol.
Next service
The next service is generated automatically when signing based on the service object’s set service intervals.
If the settings on the service object mean that you are asked whether the next service should be generated and you then answer no or click outside the popup to close it, no next service will be generated.
Email the service protocol
If you have ticked the contact person on the customer card – Send service report: Yes – you will be asked if the report should be sent.
The protocol file name is set under Service Protocol Settings – Mail Settings but can be changed when you email it.
See Administrator Information – Mail settings below.
f the protocol is to be emailed again or to other persons click E-mail protocol at the bottom of the page. If sending to several addresses, write them with a comma in between and without any spaces. Example: finance@mittforetag.se,customer@customer.se
Send sms (text message) from the protocol
Click on the E-mail / SMS link. Place the cursor in the phone number field. The phone numbers entered for the customer and the facility are displayed. Fill in a message for the customer and click Send.
This function is only available in Sweden.
Any remarks? Create a Work order!
If there are any comments in the protocol (Should be addressed), the Create Work Order link will appear and you can directly create a work order to address the comments. Click Create Work Order and select the actions that should be included in the work order.
When you create a work order based on a service report, the work order will receive the service report number + a number. E.g. 518-1.
If you have added pictures of service points, these will be included with the work order.
Any remarks? Create Quotation!
If there are remarks in the protocol, the link Create quote is displayed and you can directly create a quote to remedy the remarks. Click on Create Quote and select the remarks to be included in the quote.
Generate invoice
This information applies if you do not have any integration with an accounting system.
Once you have saved the protocol, you can generate an invoicing document. Click Generate invoice at the bottom of the report. A PDF will be created.
In the Module settings – Service protocol settings you select which fields are to be included in a printout. See Information for administrators below.
If your group/company does not have integration with an accounting system, keep in mind that the Work order setting “Remove prices from printing” under View settings also affects whether or not the price is shown on the invoice.
Integration reference
If you have integration with accounting and financial systems, an integration reference is added to the order when it is sent to the accounting program. The Integration Reference field is added to the header of the protocol. Click on the reference (number) to open a pdf with the header Order conformation.
Where can I find the protocol?
You can then find the protocol under Menu> Service> Service protocol, in the Customer Register of the current customer and on the current Service object.

If you want to print (download) multiple protocols for a customer, search for the customer, click on this symbol.
Creating a list of service protocol
It is possible to extract / export lists of service protocols.

Start by selecting if you want to filter your list by clicking the filter button and make your selection.

Then click on this button. The list is created as a xlsx-file or csv-file depending on your groups Group settings.
Information to administrators
User permissions concerning Service protocol
View, View assigned, Create, Edit, Edit assigned, Delete, Cancel, Invoice, Generate invoice, E-mail protocol, Remove check points, Set individually ready, Sign, Remove/edit uploaded file, Change template, Add service object