
There are a number of settings for work orders and permissions that can be made. To set module settings and permissions, you must have admin permission.
Read also:
Group settings – Module settings – Work order settings
- Articles to be ordered email.
Enter an email address to receive email about articles that needs to be ordered. These are sent automatically when a work order is saved. The email will be titled Articles to order at AO:xxx and will contain the articles, a link to the order, and the name of the person who placed the articles for order. - Articles ordered email.
Enter the email address to receive email about items that have been ordered. These are sent automatically when a work order is saved. - Articles delivered email
Enter the e-mail address that should have e-mail when parts are delivered. These are sent automatically when a work order is saved. - Description suggestions
Give suggestions for, for example, common descriptions of the assignment. The suggestions are added as a drop-down list under Description in the Assignment field. - Measure suggestions
Indicate proposals for, for example, common measures for the assignment. The suggestions are added as a drop-down list under Measures in the Assignment field. - Error suggestions
Provide suggestions for common errors or causes for the assignment. The suggestions are added as a drop-down list under Error/Cause in the Assignment field. - Print settings:
- Show signatures.
- Show images.
- Show full self checks
- Remove price from print.
- Include comments in print.
Mark this if you want to include comments that are shown to the customer on the printed pdf.
- List settings:
- Sort on serial number as default.
- Set begun on added articles. If this is not selected, the status of the order will only change to Started when you open it, i.e. click Change.
- Show sub group shifter.
The different subgroups appear as menu tabs over the work order list so that you can quickly choose to see work orders for each subgroup.
Custom status
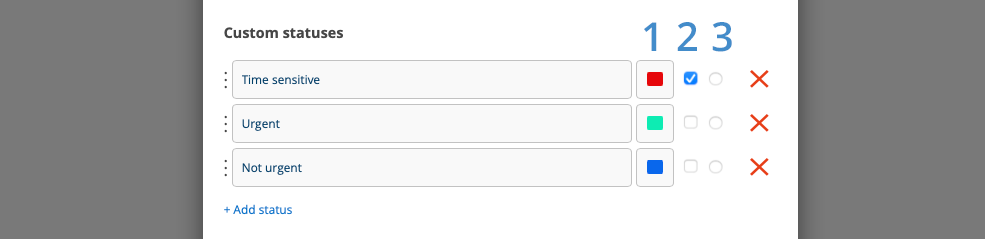
Click +Add status. In a text field, enter the different status expressions you want to use. Select the color that the status will have in the list of work orders.
Read about the other setting options (numbers 1-3) in the articlea Status – Custom status.

The color is added as a narrow strip to the left of the work order symbol.
You can change the order of the status fields by dragging the three dots on the left.
A drop-down menu is created on the work order where you then select which status applies to the current order.
If it is mandatory to enter a status, select that setting under View Settings – Require custom status to sign the order or Required custom status to save order.
Create order type
Enter a name for the order type. Select the color of the field by clicking on the left “button” (number 1 in the image below). The color is shown as a dot after the type. Box two is the text color and does not need to be set.
You can control which of your own print templates will be used depending on the order type. Select a template under “Select a template”. This print template has priority over the print template you have chosen to “star”.
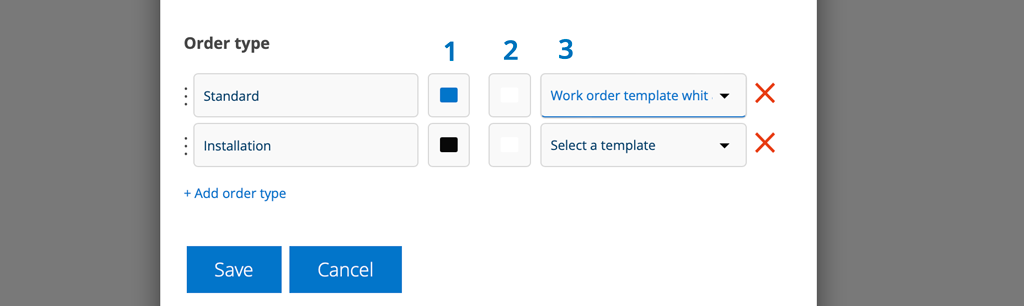
Learn more about Order types here.

To search for order types, use the filter function.
Under View Settings, you can set whether an order type is required to save an order.
View settings
- Disable ready if there are articles to be ordered.
When you click on Ready to invoice, a box will appear informing you that there are articles to order and the order can therefore not be marked as Ready to be invoiced. An order cannot be sent to invoicing if there are articles to order. Articles to order must first be moved to Articles (click the green arrow) to be included on the invoice. - Auto assign user when signing.
- Include custom fields on PDF.
- Include custom status on PDF.
- Include creation date on PDF.
- Require measures to send order.
You must have specified one or more actions before you can send the order to the accounting software. - Require measures to complete order.
You must have added a measure to be able to mark the work order complete/sign it. - Require service object runtime if a counter exists.
The work order cannot be saved without filling in the current operating time. - Require service object picture on create
Image is required when you create a new service object by clicking the + symbol after the “Select a service object” field on the work order. - Require custom status to sign order.
You can not sign the order without having selected a custom status. You create custom status based on your own needs. - Required custom status to save order.
You can not save the order without having selected a custom status. You create custom status based on your own needs. See Custom Status. - Show “Add measure”-button in details view.
The + Add measure button appears below the ASSIGNMENT – Measures field so you quickly can add actions. So you do not need to click Edit first. - Require price on all articles.
Price must be stated for all articles you add to the order. - Show address on details view.
Displays the visit address (in text) on the work order. - Show last edit.
The top part of the order shows the field Last modified:. In a drop-down menu, you see when and who made changes to the order. The field only appears when there are changes. This setting also effects Purchase order. - Require contact information to save order.
You must enter a contact to save the work order. - Require articles from registry. You cannot add articles to an order that are not in the register.
- Include PDF on creating order/invoice
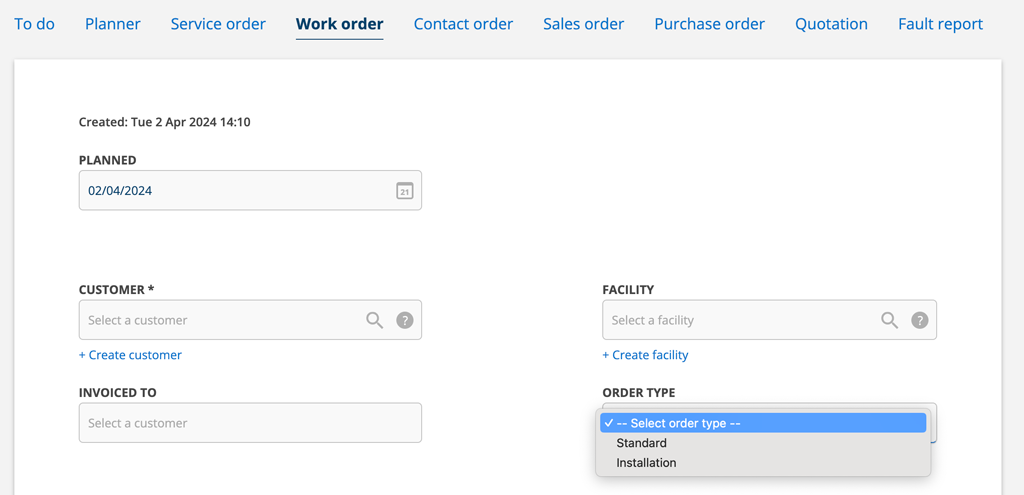
You cannot save the order without having selected the order type on the order. Read more about order types here. - Hide Error/Cause.
This hides the quick entry feature (ie without clicking Edit on an order) to enter the error/cause. - Show requester.
This creates a field for customer contact information.
If you do not want the customer to be saved, make sure that the setting (see next point) “Save customer on facility and customer card” is unchecked. - Save contact on facility and customer card
This is selected by default. Uncheck if you do not want contacts to be saved to customer or facility.
NOTE: This setting also controls whether contact persons you add to sales orders, contact orders, and fault reports are saved. - Save the requester on the facility and customer card.
This is selected by default. Uncheck if you do not want the requester to be saved on the customer or facility. Remember to also select “Show requester”. - Enable search on requester.
This is selected by default. If you do not want to see requester when searching for work orders, disable this. - Show ‘other’ articles.
Field for other articles. May be items that are not directly related to the order. - Show articles to be ordered.
Displays fields for articles to order. - Show bookings.
Displays fields for placing bookings for an order. - Use planned date.
Shows the Planned field at the top of an order as well as in the list views. - Show invoiced to.
Creates a field “Invoiced to” another customer. The information also shows in the detail list view as Invoiced to: - Use fast add articles.
This shows the quick insert feature (ie without clicking Edit on an order) to be able to add articles. - Show custom info.
Adds the content on the Custom Info field from the service object under the Assignment on the work order.
Custom information is retrieved from the service object record. Info templates for Custom information are created in Service – Info template. - Show warning on zero gross price
A popup will appear asking if you want to proceed even though there is no price on an article. Require measure image You cannot save an action without uploading a photo. Does not apply to those with admin permissions.
Signature settings
- Use customer signatures.
Allows a customer to sign after a regular signature has been made. Logic that is executed during a regular signature will instead be executed after the customer has signed. - Require customer signatures.
The order cannot be completed without a customer’s signature. - Require service object for signing.
A service object must be included in the order in order for it to be signed. - Require custom status to sign the order.
You must have selected a self-defined status to be able to sign the order. - Require self-checks to be completed to sign the order.
The self-checks must be completed and signed in order for the order itself to be signed.
Other
- Add model to database.
When you add a service articles and specify a new model, it is added to “Models”. - Set default planned date to today.
- Add articles to Article registry automatically.
- Immediately send to ERP on ready for invoicing.
This means that you will not see the Ready for invoicing button, but instead the Invoice immediately button will appear. See image below.

Fast add articles
Here you can list items that are always coming up as suggestions when creating a work order. If you have subgroups, you set whether all or only selected subgroups should display the articles.
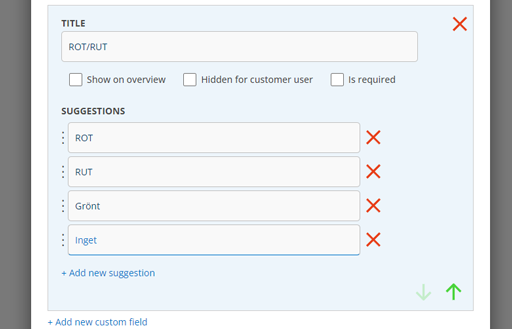
Custom field
Learn more about custom field.
This only applies for Sweden.
For those of you who use Fortnox, there is a specific self-defined field for handling ROT, ROT, etc. deductions. The field should be called “ROT/RUT” and has the different choices for contributions (ROT, RUT, Green, nothing) as suggestions.
On the work order you will then get a field where you can select a deduction. The selection will be sent to Fortnox and handled there.
Mandatory self checks
Enter one or more self-checks that should be mandatory, i.e. you must perform the self-check before the order can be completed. The self-check is automatically added to newly created orders.
Require self check to be valid
If you have the setting “Require self check to be valid” and a technician is assigned to an order, they must have approved self-check to be able to add articles to the order. This setting does not require that a mandatory self-check is set.
Message template
You use this field to write a message that is sent to the customer, for example, when an item is available for pickup or a confirmation that a work order has been received. Only one version of the message can be entered here, but the message text can be changed when you send the message on a work order. Click on “Send message” at the bottom of the order.
Upload templates
Learn how to create Template for Work order protocol and Self-checks
User permission concerning work order
User permission – Work order
View, View assigned, Edit, Edit assigned, Create, Delete, Cancel, Invoice, Generate invoice, Assign, Assign to self, Perform, E-mail protocol, Handle bookings, Send booking confirmation, Set to recurring, Sign, Remove/edit uploaded file, Remove self check from order, Set to ready for invoicing, Set individual ready (The technician signs his/her part of the order), Duplicate, View all custom status
User permission – Other
Clear signatures. All signatures on an order are deleted.
User permission – Artikelregistret
Change which user added an article.
User permission concerning QR-verification
Activation and Perform, Activation means that the user has the permission to activate QR verification on service objects.
Permissions for Service object, Customer and Facility also effects your functionality on a work order.
*Description of the various invoice permissions.
Set ready for invoicing. The user sees the Ready for invoicing button but cannot do anything more about the invoice.
Invoice. The user sees the button Ready for invoicing and can set Mark as invoiced and Generate backorder. Requires that you also have the permission Set to Ready for invoicing.
Generate invoice. Gives the user the right to generate an invoice and the right to send it directly to invoicing. When you click ready for invoicing, you are asked if the order should be sent to accounting software, but also has the Send order (to accounting software) button. Requires that you also have the permission Set to Ready for invoicing.
**Perform
If you want an employee to only be able to perform and not be able to change anything on a work order, you choose only this permission. The employee can still add a Self-Check, if the user is granted that permission.