

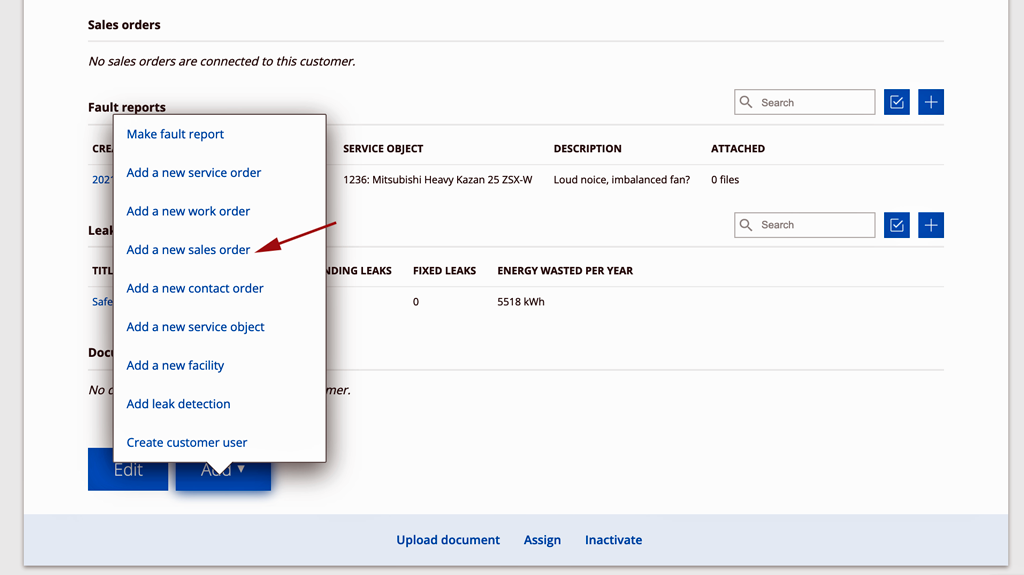
Sales order (SA) can be created in several ways:
- under the menu Perform > Sales order. Click on the +symbol.
- from a customer in the Customer register
- via the agreement with the customer
Search Sales order
The sales order detail view shows:
Status color – Date – Order number – Customer – Status
Under the customer, any facility and service object are displayed.
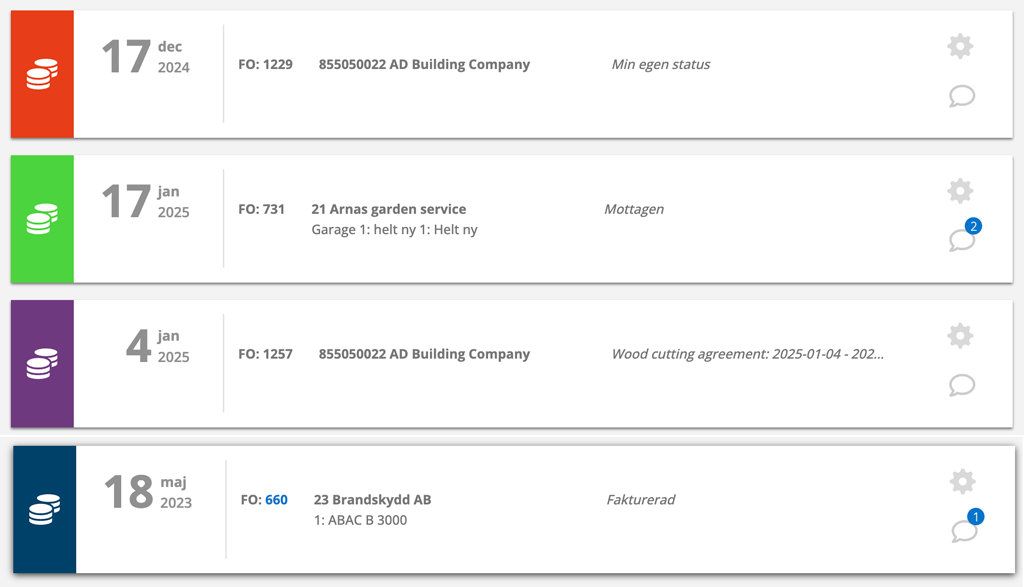
These colors are used:
Green – received
Red – delivery date has passed
Purple – ready for billing
Blue – invoiced
Concerning date
The date displayed is controlled as follows:
- The delivery date is displayed first.
- If there is no delivery date but an agreement is associated with the sales order, the next invoice date is displayed.
- If none of the above is present, the creation date is displayed.

Click this button to filter your search.
Example: select those assigned to you, limit by date, etc.

You can browse between sales orders, either by clicking on an order in the list or by browsing with the arrows in the upper right corner within an order.
If you have used a filter for your search among orders, you will browse through that selection.
Sort the list


You can sort the orders in the list. Do this:
- Click on the right part of the symbol (image 4: view setting).
- Click on the small plus sign (image 5) to the right above the list.
- Select categories to be visible.
If you want to change the order, drag the categories to where you want them.
If you want to remove a category, drag the category to the + sign (the same one you clicked to add) and drop the category there.
The different fields on a sales order.
Subgroup
If you use the subgroups function, you select which subgroup to link to the sales order.
If you have added custom fields for a subgroup, those fields will automatically be added to the sales order.
Customer
A customer must be specified. You can search for or add customers in several ways:
- Place the cursor in the Customer field and start typing to list existing customers.
- The search function (click on the magnifying glass) helps you find the right (existing) customer.
Is the customer not in the list? Do this:
- Enter the customer’s name in the field. You will then be asked if you want to add the customer. If you answer yes, a popup will open where you can fill in the customer’s details.
- Click +Create customer under the customer field. A pop-up will open and you can fill in the customer details.
The customer is saved in the Customer Register.
Invoiced another customer
The field is enabled in Sales Order Settings. Requires admin permissions. Learn more about invoicing another customer here.
Facility
Place the cursor in the Facility field and existing facilities for the selected customer will be listed. If you have not selected a customer, all entered facilities will be listed. When you have selected a facility, the system will fill in the customer’s name.
Is the facility not listed? Do this:
- Option 1: Enter the name of the facility in the field and click the blue + symbol. You will be asked if you want to add the facility. If you answer yes, a popup will open where you can fill in information about the facility.
- Option 2: Click +Create Facility under the facility field. A pop-up will open and you can fill in the facility details.
For both options, you can click MORE to open a new window where you can fill in more information about the facility. The facility is saved in the Facility Register.
Service object
Service objects entered for the customer in the customer register will appear when you place the cursor in the box.
If the service object is not in the list, you can add it by clicking + Add a new service object.
Seller
Select a name from the list if you want to assign the order to an employee (referred to as the salesperson on the order). Everyone in your group is included in the list. After the name of the salesperson, the origin of the sales order is indicated, e.g. an Agreement.
Custom fields
If you have created custom fields, they will be displayed here.
Custom fields are created in Group Settings – Sales Order Settings. Learn more about custom fields.
If using Fortnox read also about custom fields for information concerning delivery.
Custom status
If you have created custom statuses, select them here. Custom statuses can be changed without opening the order.
Learn more about creating custom status.
Person of contact
Here you can either search for contact persons/orderers for the customer/facility or add a new contact person/orderer. The information is saved* so you can quickly search for it next time.
*Only applies if you have the work order setting “Save contact person on facility and customer cards”. This setting is the default.
Status
Status is displayed in the list of sales orders. Status can be created in several different ways.
See image 3.
- If you do not enter anything here, the system automatically selects status = Received when you create a new sales order. When you then click Ready for Invoice and Invoiced, the status also changes.
- You can enter any other expression for status. Your custom expression will remain even if you have clicked on Ready for invoicing and Mark as invoiced. In image 3 we have specified a custom status as “My own status”
- If you create a sales order via Agreement, the name of the agreement and the current agreement period will be visible as the status. Example: Service Agreement: 2024-08-04 – 2025-08-04
- If you create a sales order via Quote, the status is Received.
Changed Aug 13 2025. All previous orders have be changed to this now setting.
If you want to change the set status, click Edit on the order. If you want to use the system’s expression, delete all text in the Status field at the latest before you choose to mark as invoiced.
The system sorts the sales order as invoiced, i.e. the order is placed last in the list of SA:s, regardless of the expression entered under Status when you click Mark as Invoiced.
Cost center
If additional information regarding the cost center needs to be included on the invoice, it can be entered here.
Customer order number
Here you enter the customer’s order number, if applicable.
Delivery date
If necessary, fill in the delivery date. If there is no delivery date on the order, the order will be sorted by the date the order was created.
Comment field
Choose whether comments here should be shown to the customer or not. By default, Internal comment is checked.
If the sales order was generated from a quote, the quote descriptions are available as comments. There may be multiple comments depending on whether the quote contains a description of the quote content and a description under the service object that is on the quote.
Articles
Here you add articles. Search among Latest articles or in the Article Register.
The Delivered Quantity field is set to 0 if you do not enter anything there. Only when the Delivered Quantity field is filled with a quantity does the Ready for invoicing button appear. See also information about partial delivery
If there are sub-articles on the articles, they are not displayed to the customer here.

If you want to create a Purchase Order for the articles, click on the shopping cart above the articles, select which articles should be added to the purchase order and click Create new.
Save
Once saved, the following information is also displayed:
Integration reference
When the order is sent to the accounting program and the accounting program supports this, you will see the reference number here.
Agreements:
Specifies from which Agreement (name of the agreement) the order is created.
Created by:
Indicates when the order was created and from which agreement.
Last edit:
Lists who made changes to the order and when.
CONDITIONS: That you have selected Work Order Settings – Show last edit.
Fault report:
If the order is generated from an Fault Report, it is indicated here.
Sent e-mail:
This lists who sent it, when and to which email.
When you have saved the order and the delivery quantity is filled in, you can choose to:
- Ask the customer to sign the order (signatur is activated in the Sales order settings)
- Edit
- Mark as Ready for invoicing
- I steg 2, dvs när du valt Klar för fakturering kommer följande val upp:
- Mark as invoiced
- Generate restorder. The option appears if you have specified at least 1 of the articles as delivered. You can then create backorders for those that have not been delivered. You must have permission to create sales orders.
- Send order (if you have an accounting program connected to the system).
You can also (if you have those permissions):
- Edit
- Email order confirmation or send invoice
- Print the order (Default) or delivery note. Prices are not printed on the delivery note.
- Assign the order to a technician/employee
- Upload documents
- Generate invoice as pdf. Applies to groups that do not have integration with business (accounting) system.
History
See activities on the Sales order
Information to admins
Partial delivery?
Have you made a partial delivery? Click Edit and fill in the quantity in the Delivery quantity field. Don’t forget to save the change.
Admin permissions are required to add partial deliveries.
Concerning Sales order and Fortnox
When you create a sales order from an agreement and want to invoice it in Fortnox, you need to have activated “Periodization” in Fortnox for this to work. This applies if you have an invoice period of more than 1 month.
Here are instructions (only available in Swedish) on how to use accruals in Fortnox: https://support.fortnox.se/produkthjalp/bokforing/periodiseringar#installningar-periodiseringar
Module settings concerning Sales order
Custom fields
If you want to add a custom field, it is created, with admin permission, in Group Settings – Sales Order Settings. Read more about custom fields. Learn more about custom fields.
View settings
- Show invoiced to
- Auto fill delivered amount when editing order.
With this setting, the field delivered (DEL.AMOUNT) is automatically filled in with the quantity ordered when you open the order, i.e. click Edit. - Show warning on zero gross price
Warns if you have articles with 0 gross on the order.
Custom status
Read how to set and use custom status here.
Signature settings
- Use customer signatures
Allows a customer to sign after a regular signature has been added. What usually happens to the order when a regular signature is made only happens after the customer signs. - Require customer signatures
Print settings
- Remove prices from print
- Include comments in print.
Check this if you want to include comments that are displayed to the customer on the printed PDF. - Include custom fields on PDF
- Show signatures
- Show images
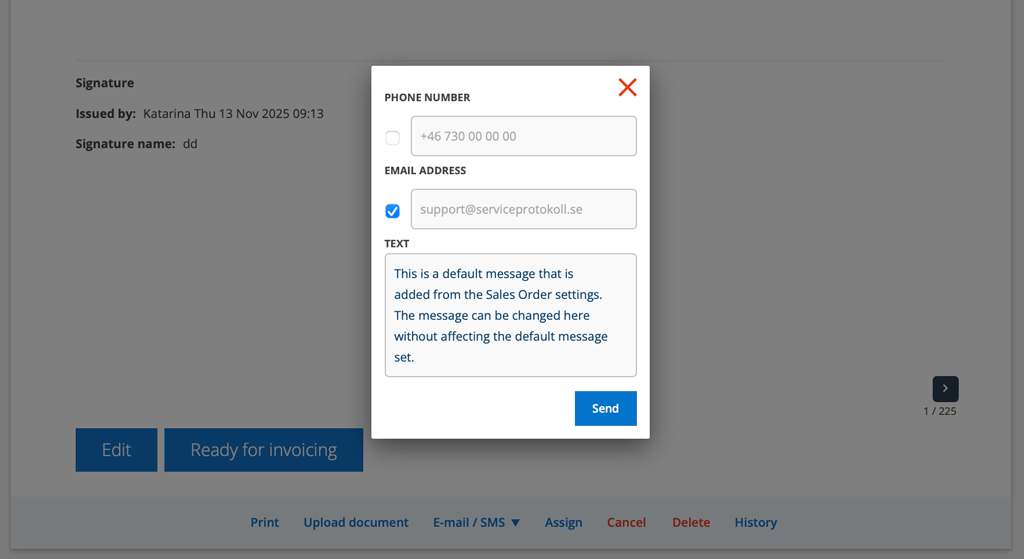
Default message
In the field, enter a message that will be displayed when you click Email / SMS – Send message. You can change the message in the popup without affecting the default message.

Print templates
You can also create your own print templates for sales orders. Learn more about templates for Sales orders here.
Show last edit
The “Show last edit” setting is controlled by what you have set in Work Order Settings.
At the top of the order, the field Last edit: is displayed. A drop-down menu shows when and who made changes to the order. The field only appears when there are changes.
Permissions for users concerning Sales order
View, View (only) assigned, Edit, Edit (only) assigned, Create, Delete, Invoice, Assign, Assign to your self, Remove/edit uploaded file