
Admin permission is required.
Go to Group settings – Module settings – Service protocol settings
View settings
- Collapse service points when performing service.
Choose this setting to save space. When you perform a Service Order the Service Components will collapse into one line. If you need to make a change just click om the service point to open again. - Use date as default name for added service components during creation or edit of a service protocol.
The name can of course be edited when adding the service component. - Search for the check point value.
If, in a service, you want to use a tool that should be searchable, you can enter a number for the tool in the Value field under service points on the protocol. - Show invoiced to.
Adds a field where you can choose whether a customer other than the one on the order should be invoiced. - Show “Other articles”.
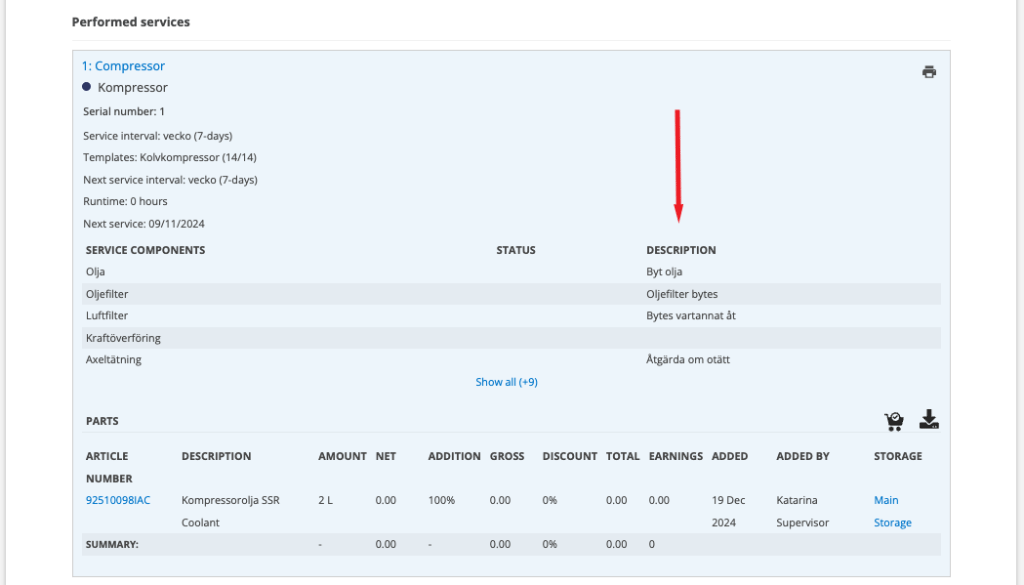
If you do not want other articles to be included in the printout, also click on “Hide customer articles” under Print settings. - Show description on check points.
If this is checked, a column is added to the protocol with all descriptions added to the service template – both those retrieved from the service template and those you added at service points directly on the order/protocol. See picture 1 below. - Remove header checks.
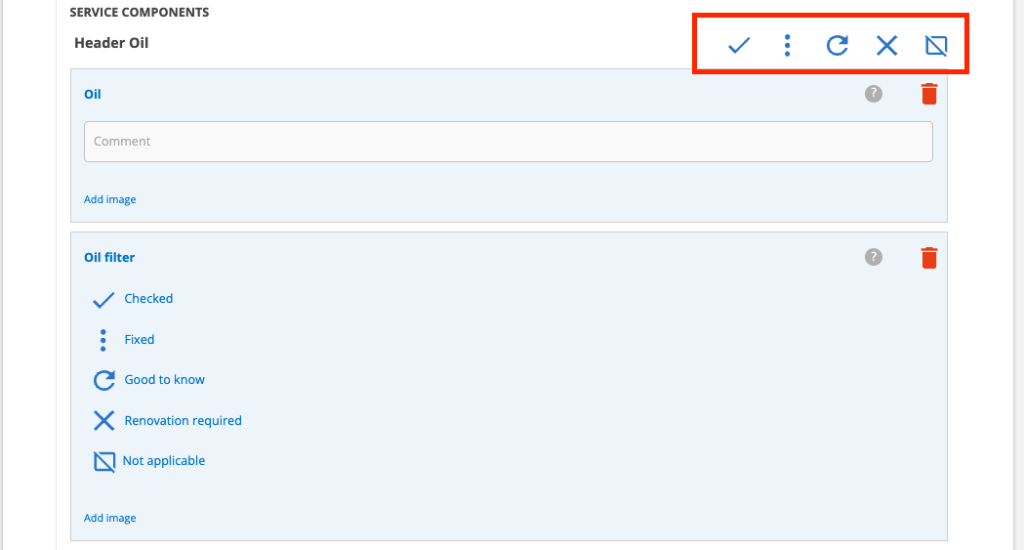
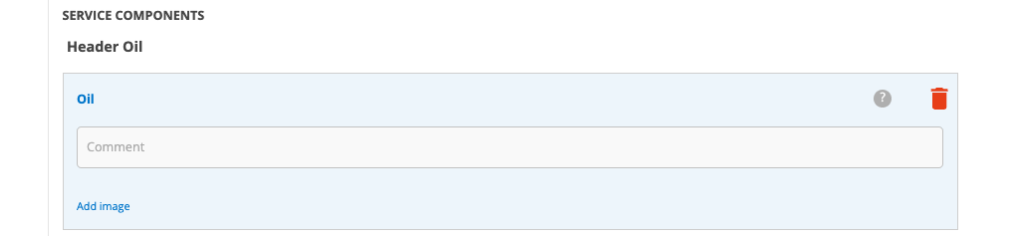
With this setting, the symbols next to a service point that is a “header” are not displayed and the service points cannot be unchecked all at once. See pictures 2 and 3 below. - Set ready for invoicing on signed.
When you sign, the protocol is immediately set as ready for invoicing. You don’t have to do the extra click. - Copy mandatory self check on partial perform.
With this setting, the self-check must be performed for each partially performed service. It is not enough to do it on the first service object, but the self-check must be performed for each object. - Update service intervals when changing checkpoints.
If you make changes to your service template during a service, these are saved to the interval. The next service on the object and interval will only contain the points you saved. If you want to return to the original template, select it when performing the service. Then the next service on the interval will contain the original template again. - Ask “Send to ERP?” when protocol is completed
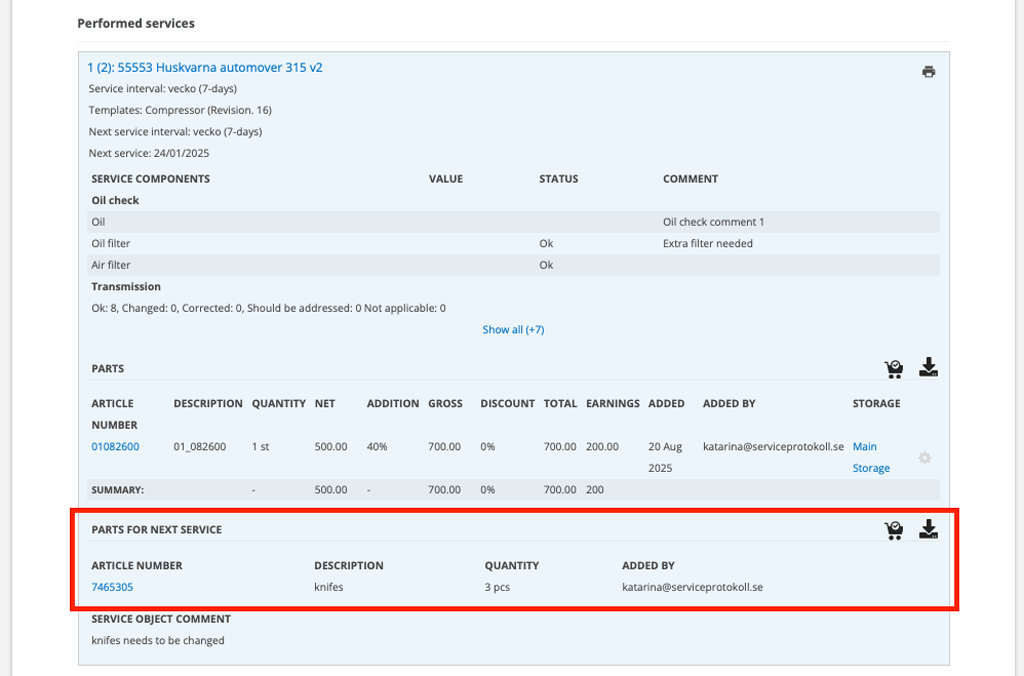
- Show parts for next service
Adds an extra field to the service protocol. Parts you add here will be added to the next auto-generated service order. See image 4 below.
If you want to order the parts, click on the shopping cart and create a purchase order. - Show missing service object year warning
If your system requires that there is always a model year specified on a service object, select this. A yellow warning triangle will then appear next to the service object if the year is missing. Click on the triangle and a popup will open where you can fill in the information. See image 5 below. - Show warning on zero gross price.
If you have articles on the order that have a gross price of 0 (before discount), this warning will be displayed so you have the chance to correct the price before sending it to the financial system.
This setting is default.
.

Email settings
Select the information that should be included in the file name of the service report in addition to the service order number. You can select more than one. If you do not select anything, the report will only have the order number, e.g. SO222.pdf
- Include machine number in PDF filename.
- Include date in filename
- Include facility in filename
- Include service object description on PDF
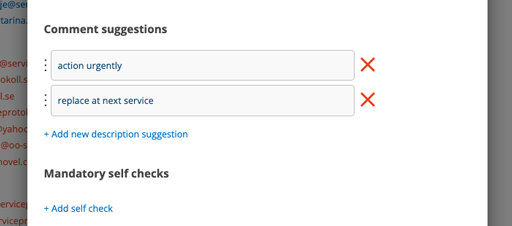
Comment suggestions
Here you add description and comment suggestions. Can for example be such descriptions and comments you use often. The comment suggestions appear in a dropdown on service points when you perform a service, if you selected Adjusted or Should be addressed. The suggestions are displayed at service points on the facility and service objects.
?
Mandatory self checks
Here you specify which self-check(s) should be mandatory, ie the self-check must be performed before the technician can proceed with the service.
You can also specify that a self-check must be Approved to proceed with the work.
Export settings
- Include facility custom fields in export.
Includes the facilities custom fields when you make an export from service protocol
Print settings
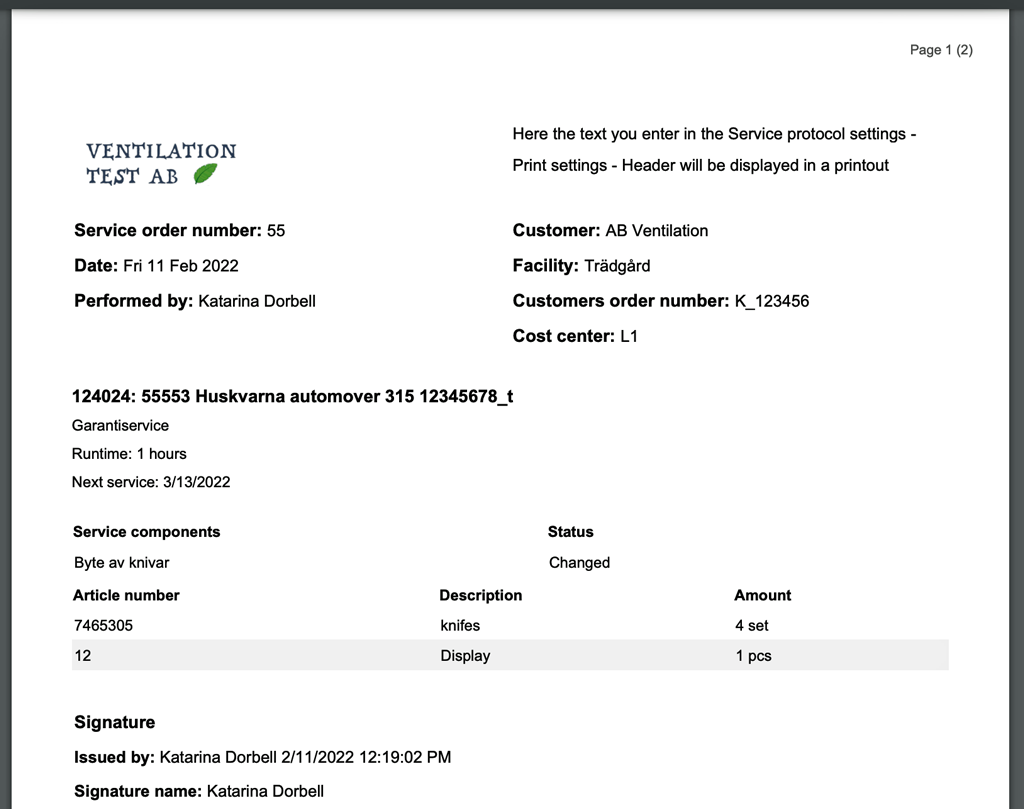
- Show performed by.
The name of the person who executed and signed the order is added to the printout. - Show facility.
The name of the facility is added to the printout. - Show the next service.
The date of the next service is added to the printout. - Show cost center at the top.
If you select this variant, the cost center is displayed in the right part of the “head”. By default, it appears in a row at the bottom of the printout. See picture below. - Show customer’s order number on top.
If you select this variant, the customer’s order number is displayed in the right part of the “head”. By default, it appears in a row at the bottom of the printout. See picture below. - Show service name.
Display the name you entered on the service object’s service interval, eg “weekly service”. - Include service object serial
The serial number is added to the print. - Show images.
Attached photos will be included in the printout. Images should be in jpg or png format. - Show large images.
Attached photos will fill a full page of the record. Requires Show pictures to be selected as well. - Show self-checks.
All fields of a self-check are included in the printout. - Separate Service objects when printing.
If you have several service objects on an order, a separate page is created for each object, with all information (customer name, order number, articles, etc.) - Show service check point descriptions at the end of the protocol.
A complete list of all the service components. - Hide customer articles.
- Remove prices from print.
- Include comments in print.
Mark this if you want to include comments that are shown to the customer on the printed pdf. - Only print template check points
This is used if you have used multiple service templates on a protocol and want to be able to print each service template with its points separately using your own print templates.
By default, all service points are printed on the same protocol and the default protocol you selected.
Conditions:- You have two or more service templates on a protocol.
- You have created your own print templates and linked them to the service templates.
- You want to print each service template separately and choose which printing template to use.
- Auto select print template
Other Print Settings that are recommended to do
- Footer – see more about footers under module settings in Print settings
Header
Here you enter what should be in the header when printing service protocols.
Here you see where the header is placed and when you set the cost center and the customer order number to be displayed at the top.
Comment settings
- Transfer comments to new protocol
Comments written in the comments field for a service point are retained until you actively clear it from the service point.
If not checked, you will see the comments from the previous protocol grayed out and with the text (Previ. xxxx)

Signature settings
- Use customer signatures.
Allows a customer to sign a protocol. A “Customer signature” button is added next to the regular Sign button. - Require customer signatures
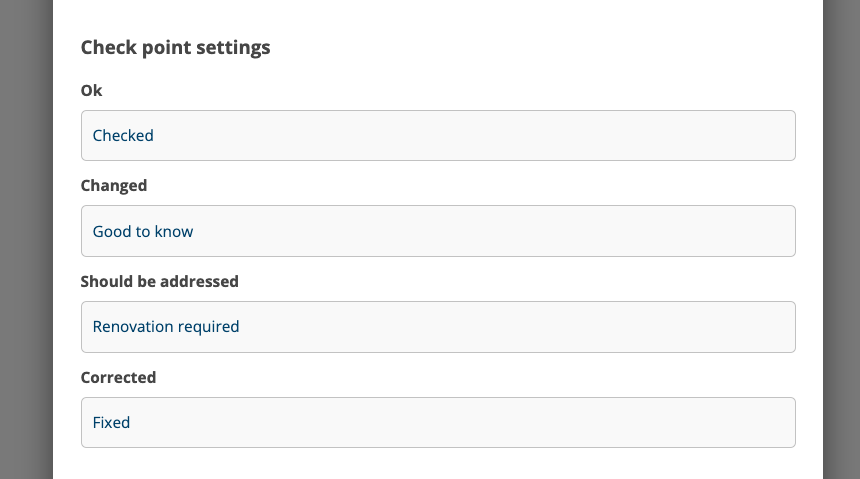
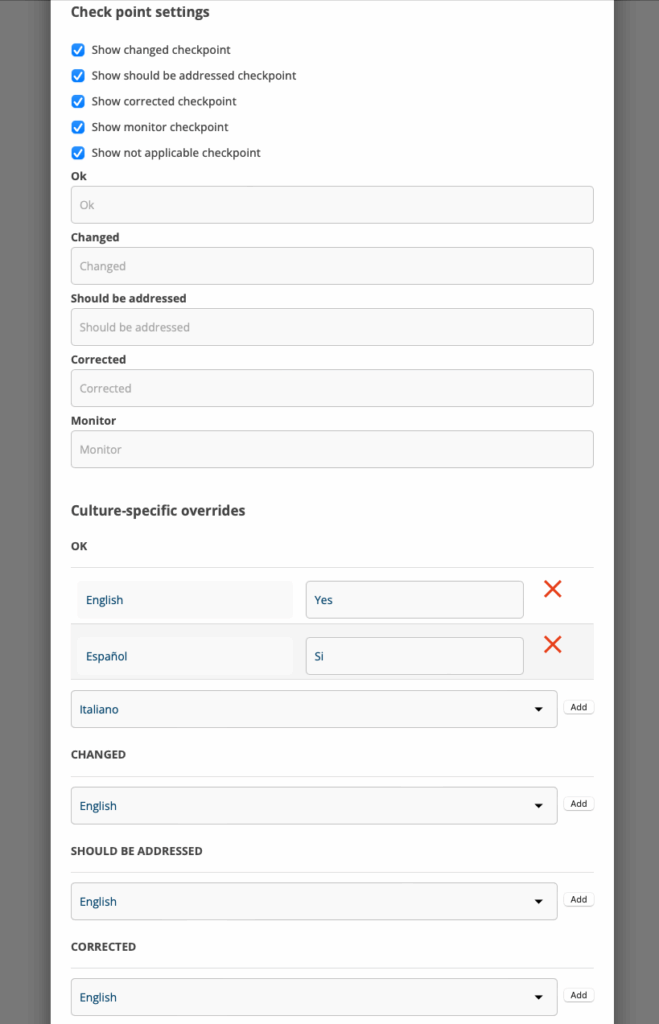
Check point settings
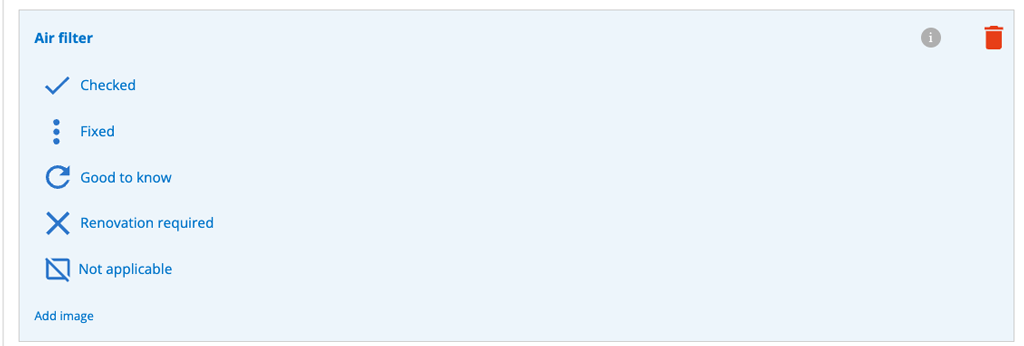
By default, the expressions OK / Changed / Should be addressed / Corrected are used for the check points. If you wish to choose to use only some of them, uncheck the one you do not want to use.
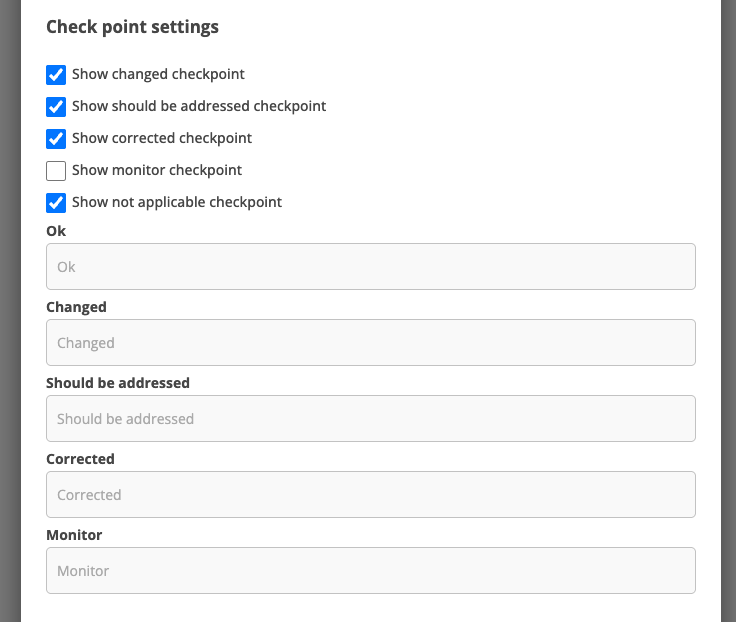
Service point status “Monitor” is not the default setting and must be actively selected.
Adds an “eye” to the service template to signal that you need to pay attention to something at the point. The information is added to the protocol under the Status heading.
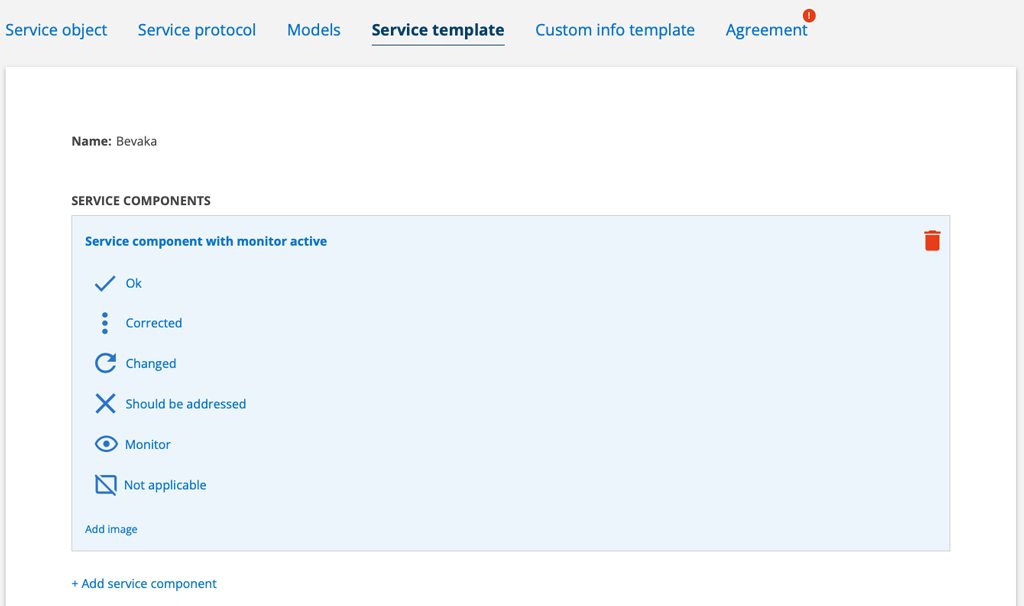
Change the expression for the service components
If you wish to change these expressions, you can add new expressions. The conditions for the different points are the same, i.e. the expression you enter on the standard concept “should be addressed” always gives a note that action is required and opens the way to create a work order.
Translate your own concepts for service points
When you create your own expressions for service points, the system cannot automatically translate these into other languages. If you have users and employees in other countries or who speak a language other than your company’s language, you will need to translate these.
Under the Culture-specific overrides heading in the Service Protocol settings, you can add translations for all languages that Service Protocol provides.
- Choose language in the drop down list
- Click “Add”.
- Fill in the translation
- If you want to translate into more languages, select a new language and repeat the procedure.
- Don’t forget to scroll to the bottom and choose to save
Default message
Enter a standard message here. The message appears when you click on Email / SMS and select “Send message” at the bottom of a service report. This way you don’t have to write a text every time you send it.
The message can be edited or deleted completely once you have opened the function.
Print templates
You can create your own print templates for your protocols. You can have multiple templates and choose which template to use when sending.
Learn how to create, upload and handle print templates for service protocols here.