1. Home
  2. Service object
  3. Service objects

Service objects

In the registry entry for a service object, you can see in which orders the object is used and find the object’s service protocol. You can also quickly clone the service object, create a fault report, work order or contact order for the item. Here you can also find date for previous and upcoming service, address of the object, uploaded documents and download the QR code if you want to print it and put it on the object.

If you have multiple customers with service objects of the same type, it is a great advantage to use the Models function.

All Module Settings – Service Object Settings require admin permissions.

Search for Service objects

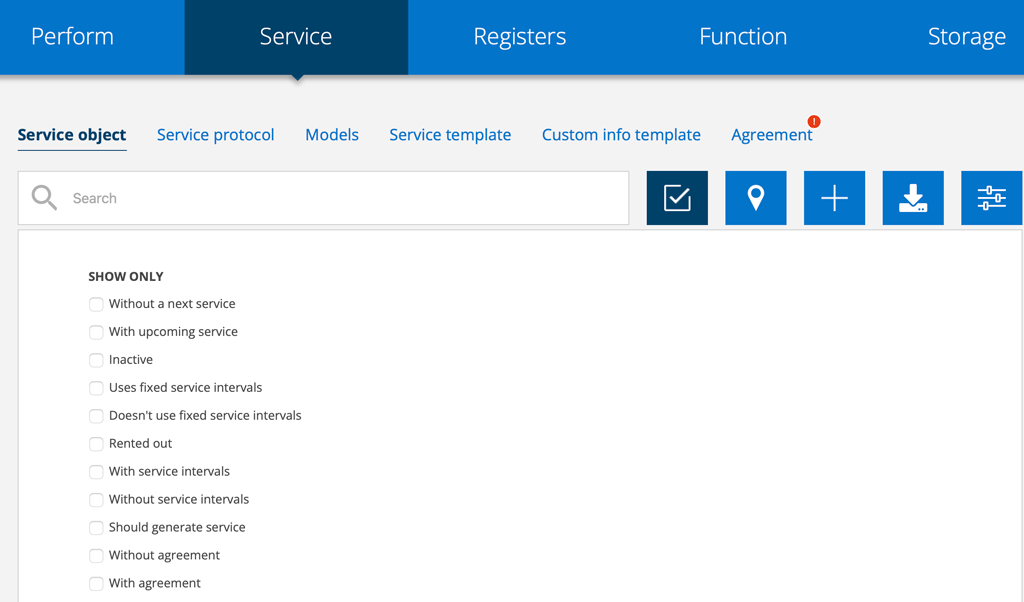
Symbol 1

We recommend using filters when searching for service objects. Click on this symbol and the list of filtering options will open.

Symbol 2

Click on the map symbol to see the location of the service objects on a map.

Symbol 3

Export orders/download a list of orders.

Collection function
Symbol 4

You use the collection function to make changes (eg add tags, update service) or print QR codes on several objects at the same time.

Learn more about QR-codes.

The collection function creates a list (max. 1000) of your objects, so if you have many, it is advisable to filter the list first (click on Search – symbol 1.)

How to add a service object

There are several ways to add service objects. If you have many objects, option 1 is preferable. If it is a single object, option 2 or 3 is the easiest way.

When you are finished, press the “Save” button at the bottom of the page to save the new service object. Assuming you have filled in the required information to generate a service, you will be asked about this.

Alternative 1

Upload a register with multiple service objects. Read more about how to upload registers here.

Alternative 2

Go to Register – Customer. Find the customer. Scroll to the bottom of the customer card and click Add. Select Create service object. All information about the customer will then be added to the service object.

Alternative 3

Go to Register – Facility. Find the facility. Scroll to the bottom of the facility and click Add. Select Create service object. All information about the facility will then be added to the service object.

Alternative 4
  1. Go to Service – Service object.
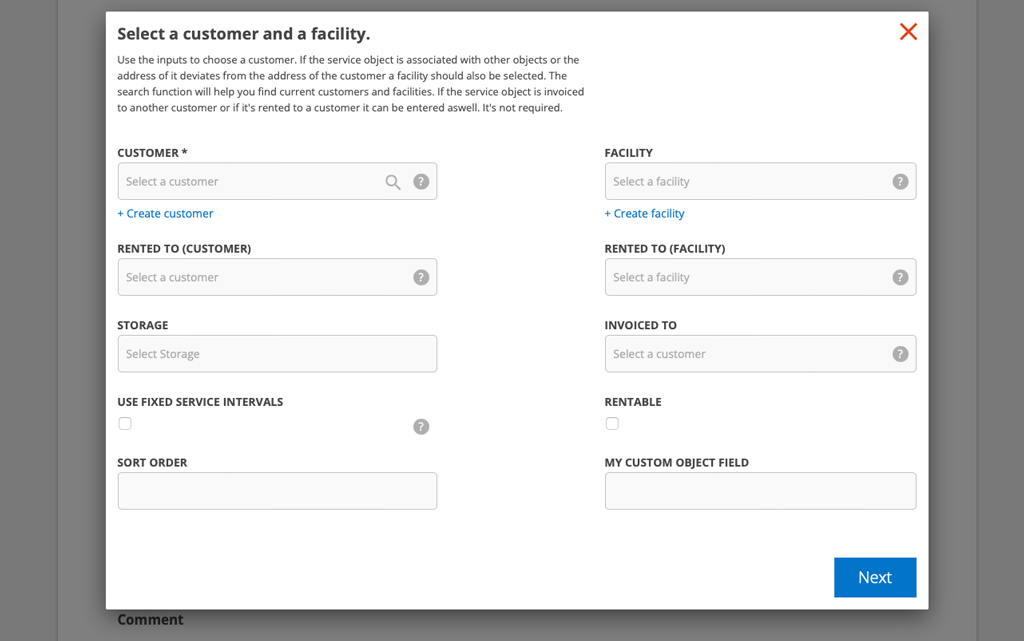
  2. Press the button with the + sign.
  3. Fill in the fields.
    • We recommend using the guide to make it easier. It will give you a description of the different parts.
  4. When you are finished, press the “Save” button at the bottom of the page to save the new service object. Assuming you have filled in the required information to generate a service, you will be asked about this.
Alternative 5 – Clone

To add objects, you can also clone an existing service object.

All settings are copied. The object you are cloning must have a machine number. The new object gets the same machine number as the original machine with a serial number in parentheses. The clones are completely independent from each other and no changes to one clone affect the other clones or the object from which the clones were created.

Example: Object one with machine number 1232 is cloned twice and these get numbers 1232(1) and 1232(2). The number can be changed by clicking on the service item and clicking Edit.

You can also click Edit to move the clone to another customer or facility without affecting the original object.
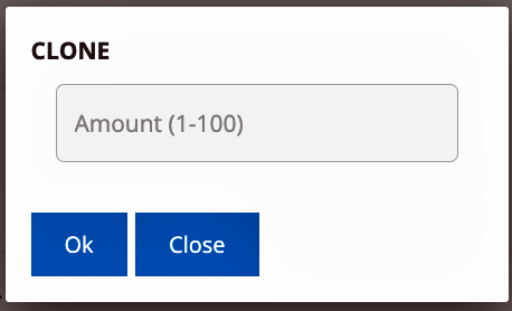
You can find the Clone button at the bottom of the detail view for the service object. A box will appear where you can specify how many clones you want to create.

Being able to clone is a user permission.

Description of the different fields in the form and in the Service Object guide

Note that there is a slightly different order in the fields in the form and in the guide! We recommend using the guide when adding a service object.

CUSTOMER

Place the cursor in the field and added customers will be listed. If the customer is not in the list, click + Create customer and a popup will open where you fill in the customer’s information. The customer will be saved in the customer register.

FACILITY

The search function helps you to locate the customer’s existing facilities. If the plant is not included in the list, enter the name of the plant and the plant is automatically added to the Facility Register.

If the invoice address differs from the address of the service object or if there are several service objects in the same place, a facility should be selected or added. Read more about how to Add facility to customer.

STORAGE

Choose which storage the object should be included in. Leave blank if the object is not included in any storage.

INVOICED OTHER CUSTOMER

If the service object is to be invoiced to another customer, it can be specified here.

The field is enabled in Service Object Settings.

USE FIXED SERVICE INTERVALS

If checked, the next service is created based on when the previous service was scheduled instead of when it was executed. The field is checked by default.

The field is enabled in Service Object Settings.

AGREEMENT NUMBER

The field is enabled in Service Object Settings. The field has no connection to Agreement created in Service protocol.

SORT ORDER

Here you can specify the order in which service on the machines should be performed.

MATCH PREVIOUS SERVICE

If checked, the next generated service will be based on the last performed service. This means that the service will be scheduled on the same day and time of the week and assigned to the same technician as the previous service. In addition, parts that have been used and deviate from the service interval will be included.

The field is enabled in Service Object Settings.

RENTAL

If the service object is rented by another customer, this field can be filled in with information about that customer.

The field is enabled in Service Object Settings.

QR-code

If you have enabled Show QR code on objects, you will see a QR code that can be printed.

Learn more about QR-codes.

QR-Verification

To enable or disable QR verification, click Edit. Click the Disable/Enable link to change the setting. Verification can be used to show that you have been there.

The function is set in Service Object Settings.

The map

Zoom in on the map as much as possible, then place a “pin” by double-clicking on the map to mark where the object is in the room.

If you have not placed the service object on this map, the position of the facility’s address is displayed on the service object record highlighted in red. This is indicated by the text Location (Facility) above the map.

When you add a position to the service object, it is the service object that is marked with a red symbol and the facility is coloured blue.

Map, service object and facility marked
The blue mark is for the facility and the red dot for the service object.

Note that the facility’s address is not shown on the search page’s map, only the object’s position is shown here.

Person of contact

Fill in the contact person.
The field is activated in the Service object settings.

Object

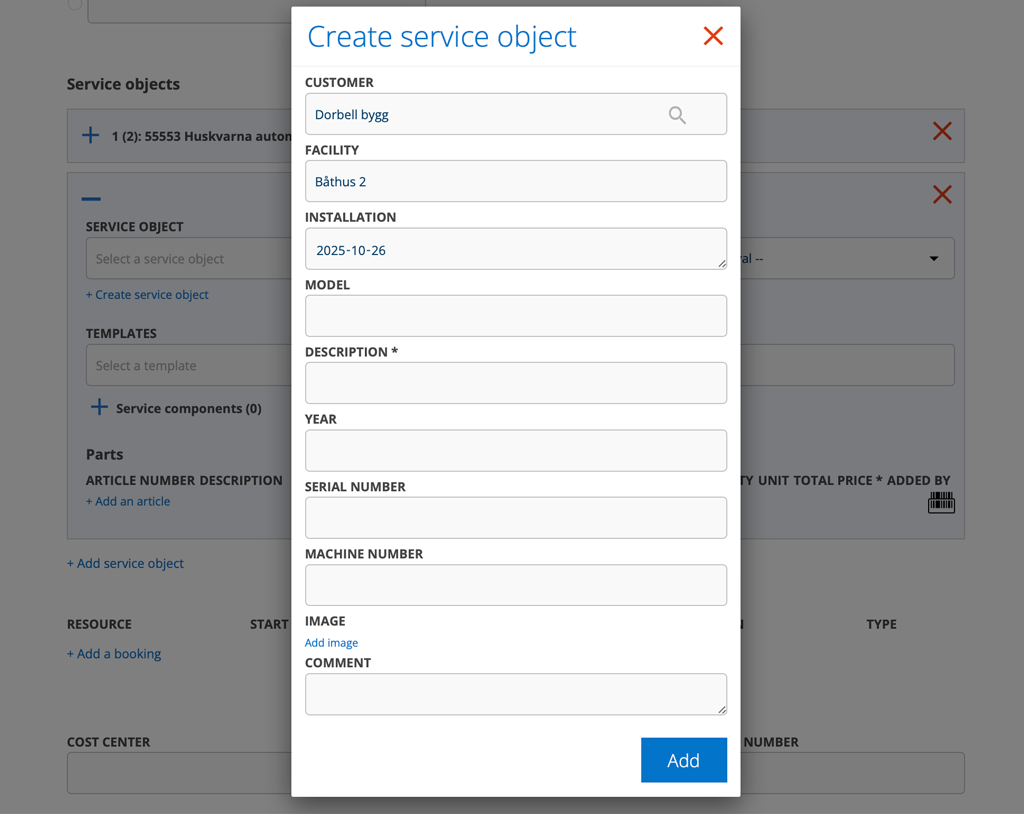
MODEL

Place your cursor in the field and models that are in your model registry will be listed. Select model.

If the model has a counter, it is retrieved.

With the Work Order setting “Add model to database” you can enter a new model in the Model field here. Enter a name and the name is saved in the model register. If necessary, complete the information about the model in the model register later.

Without that setting, new models entered in the Model field are not saved in the Model Register. New models are only entered via Register – Model.

Read also how to update linked service objects on the page Models.

DESCRIPTION

Enter a description of the object.
Description is a required field.

Year model, serial number and machine number …

Year model, serial number and machine number do not have to be specified. For machine number, you can use the Service Object identification number or a description of the machine so that it can be easily identified.

Serial numbers and machine numbers can be auto-generated. You set this in the Service Object settings.

These fields are enabled in the Service Object Settings:

  • Manufacturing Year
  • Serial number
  • Machine number
  • Runtime based
  • It is also possible to use a unique ID. This number will then be in addition to the serial and machine numbers and cannot be changed.
RUNTIME BASED

Specifies if the object is run-time based.
If the object is only changed on a calendar basis, this should not be checked. If the service intervals should be calculated by runtime, this needs to be checked.

Clicking on this opens a field to add time for Operating time during installation, a little further down in the form.

Counter

Add a counter for the object. Give the counter a name. If the model has a counter, that information is retrieved automatically.

When the service is performed, the reading is entered in the Counter field. Previous readings are available in a drop-down menu.

The protocol shows the last entered reading. All previous notes are saved and visible on the next service order and on the service object.

It is possible to have multiple counters. Multiple counters are activated in Service Object Settings.

PARENT

Here you select service object if the object is a  child-service object. No other connections are made between the objects.

The field is enabled in the Service Object Settings – Enable child service objects.

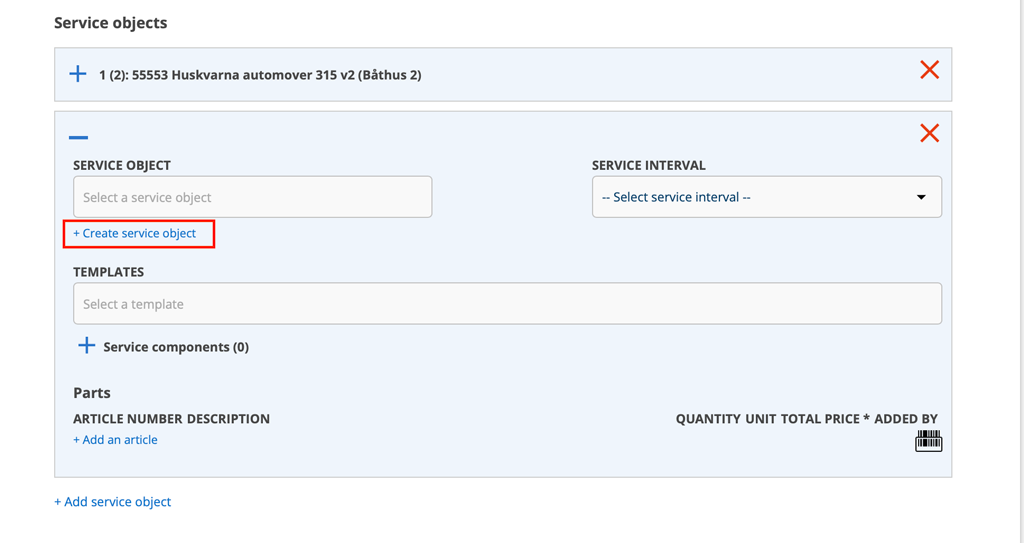
On service orders, any child object are displayed under Service object and on work orders under Assignments.

Show child object on Service orders.
Show child object on a Work order.
Custom info

We recommend using info templates to be able to quickly add information to the object.

Click + Add custom info template to create a new template. The Custom info template function opens. Read more under Creating templates.

Alternatively, click on + Add custom info and fill in the information.

Three dots. Grab and drag

If you want to sort the entries in the information entries and the template, you can hold down the mouse pointer on the three dots, drag and drop to the desired location.

If you want the information (all or just some) to appear on the report when printing, activate this symbol by clicking on it so that it turns black.

If you want to link to information about the object on another website, enter a name for the link under NAME and the URL, the link address, in the VALUE field.

Installation

Enter the date of installation. If there is no information about the installation date, use the latest date you know, e.g. a service performed.

RUNTIME AT INSTALLATION

The field is displayed if you have chosen to tick Runtime based.
Time is given in hours (h).

PERFORMED SERVICES

Add date and run time at that date. Can either be a performed service or a reading of the run time. If it’s just a reading press the icon on the right . If two or more performed services/readings are entered the run time per week is automatically calculated.

RUNTIME PER WEEK

Specifies how much time the service object is active per week. Higher number (maximum 168) generate more frequent services. This value is automatically calculated if two or more performed services/readings are entered. A run time per week is required, but a 0 is possible if the object is meant to only be guided by day intervals.

Parts

Articles under the heading Parts can come from three places.

  • Parts are automatically added from the model if you have specified a model and added parts to the model. You can change the automatically added parts if there is any discrepancy for this service object.
  • If there are more parts for this particular service item, those parts are listed here, click + Add an article.
  • Parts you add to the service interval will be displayed here as well.

Set service interval

Click + to add a service interval. Give the service interval a name, eg annual service.

In this part, you specify the time intervals, as well as which parts are to be replaced at the various services.

Overlapping interval

A service object can contain several service intervals, but they must overlap, e.g. 2000, 4000, 8000, 24000.

If more than one interval with time* (hours) interval is specified, only the first interval can specify a day interval. If more than one interval with daily intervals has been specified, no time intervals can be specified. These form the basis for how often and with which parts service orders are to be generated.

*Shows if the object is set as Runtime based.

Do this if you want to be able to set not overlapping intervals

Overlapping interval are the default.

If you want to be able to add intervals that are not overlapping, you need to uncheck the setting Service object settings – Force overlapping service intervals.

Free intervals can only be used together with daily intervals, not if the object is run time based.

The effect can be, as an example:

An object needs to be serviced 3 times / year. You enter 3 intervals and 3 orders are created. As soon as you perform the first of the three, a new one is created based on the interval performed. So you will always have 3 orders under Next service.

Days required to perform

By entering a number of days here, a booking will adjust in time. For example, if you enter 2 days, the booking in the Planner will automatically be spread over 2 days, for half a day, enter 0.5.

Select Order type

If you have created order types, a field appears where you select the order type. Unlike a selected order type on a service order, this setting of order type follows to the next service.

Specify parts and service components per interval

The intervals are never merged, so all parts and service components to be replaced need to be specified for each interval.

When you have saved the service object, the parts you added here will also appear under the heading Parts.

Parts linked to the service interval

For each service interval you can add parts (search by part number or description to find parts) and service points. The parts you add here will also appear under the Parts heading which you will find just below the map.

Service components connected to the service interval

For the service points, you can use service templates to make things easier. If you have already added service points and choose to add a template, you will be asked whether you want to add the points from the template or replace existing service points.

If you want to create a new template click +Add service templateLearn more about templates here.

If you are not using a template or want to supplement the template with individual service points, click +Add service point.

Set the status of each service component. These you can choose from:
– is measurement
– is yes/no
– has status
– heading
– free text field

What you choose controls what the service components look like in the protocol then. See example below.

Headings can, for example, be used to divide a protocol into different parts to make it perspicuous. E.g. Electrical systems, Mechanics, Work environment, etc. Learn more about settings for Header in a service template here.

Do you want to enter a help text click on ? (the question mark at the far right of the Service component field) and fill in a description of the service component. Thereby the person who is to perform the service receives support.

You can change the order of the service components by moving them. Hold the mouse pointer over the three dots on the far left, drag and drop the field where you want it.

If you then select “Corrected” or “Should be addressed” for the service, a comment field will open where you can enter comments. Suggested comments for these can be filled in under Service Protocol Settings – Comment suggestion.

Comments

Optional comment regarding the service object. Any additional information can be entered here. The comments are displayed when service is to be performed. The comments are not displayed for logged in customers.

Save

Don’t forget to save!
Once you have filled in what is required to generate a service, a question will appear asking if you want to do this. If you select yes, the system will automatically create a next service. If you select no, no next service will be created and you will have to create a service order manually. The system will add an exclamation mark in the menu on Service object. Read more about this here.

Booked information on service objects that are rented out

If you have activated Rental, you will see at the bottom of the object record when the object is booked. You make the booking in the Planner. There you can also create an order or agreement from the booking.

Search for service objects without the next service
  1. Click the Search button.
  2. Select these filters under SHOW ONLY:
  • Without a next service
  • With service intervals
  • Should generate service

Scroll down a bit and you will see a list of service objects that are missing the next service.

Generate next service like this:

  1. Click on an object in the list that you want to have a next service.
  2. Scroll to the bottom of the service object-page.
  3. Click Generate service.
  4. Done.

You can also use the collection function to update service on multiple objects at the same time.

More options

Clone – see info further up this page.

You can also choose to upload documents linked to the service object. Attachments on the Model are also displayed on an individual service object. After the file name it is shown in brackets from which model the files are downloaded. Ex: Manual.pdf (Thermia).

Edit

Click Edit to change the service object information.

Information about a service object can also be changed on orders. Click on the pencil next to the object’s name and a popup will open where you can change, complete and upload images and documents. The uploaded files are saved on the service object.

Add to order

Click Add if you want to add a new service, work or contact order directly to the service object or file a fault report. When you add an order from the object, the contact person is automatically added to the order.

Inactivate

By inactivating a service object, it will no longer appear in lists, but the history will be saved. You do this, for example, if a service object has been scrapped.

History

History lists all changes made to the object, when and by whom.

Information to administrators concerning modul settings on service object

Selecting/changing settings requires admin permissions.

View settings for service object
  • Invoiced to enabled
    A field to indicate that another customer is to be invoiced is added. A drop down-list helps you find a customer.
  • Rented to enabled
    A field to indicate leased to another customer is added. A drop down-list helps you find a customer.
  • Year activated
    A field for manufacturing year are added.
  • Serial number enabled.
    A field for serial number is added. 
  • Machine number enabled
    A field for machine number is added.
  • Auto generate machine number
    The system gives the machine a machine number, automatically. Ie a serial number based on your most recently entered number. The number can be changed manually.
  • Time based service object
  • Autogenerate serial number
  • Contact enabled on service objects.
    Field for contact information is added.
  • Use fixed intervals by default.
    Check box. Checked is the default. The next service is created based on when the previous service was scheduled instead of when it was performed.
  • Use matching with previous service by default.
    Check box. If checked, the next generated service will be based on the last performed service. This means that parts used, which deviate from the service interval, will be included. Service will be scheduled on the same day and time of the week and assigned to the same technician as previous service.
  • Use QR verification.
    Enables the service technician to verify being at place by scanning a QR code. This function is currently not used.
  • Show service object QR.
    Creates a QR code for the service object. Learn more about QR codes.
  • Use multiple counters.
    Enables multiple counters on a service object.
  • Use agreement number on service object
    Creates a field for agreement number. This number is not retrieved from any agreements created in serviceprotokoll.se but is a purely free text field.
  • Activate third part supplier
  • Enable child service objects
    Provides the possibility to specify a service object as a child object of a parent service object. The Parent object field is added to the service object record. The parent object record states that – and where – the object is used as a child object. No other connections are made between the two objects. The field is merely information.
  • Enable support for NFC tags
    Read more about NFC tags here.
  • Custom information enabled
    Makes the Custom information field visible. Read more about the field and creating templates for custom information.
  • Show unique ID
    With this service object setting , a unique serial number (ID) is created for the service object. The ID is automatically generated and cannot be changed. This number is therefore in addition to the serial number and machine number.
  • Force overlapping service intervals
    By default, this is checked and if the intervals do not overlap (See more under Service intervals) you will receive a warning.
    If you uncheck this, however, you can enter intervals that do not overlap and you will not receive a warning.

    If you change the selection, previously created ranges are not changed.
User permissions concerning service object

View, Edit, Create, Delete, Reading, Uploading, Delete uploaded files, Clone

Updated on 2 April 2025
Was this article helpful?

Related Articles