
| Tag | Gives this information |
|---|---|
| {OrderNo} | Order number |
| {Date} | Date performed |
| {Date+365} | Date performed + 365 days. Used if you want the protocol to be valid for 1 year. |
| {PerformedBy} | Performed by |
| {LatestEditBy} | Last modified by |
| {Customer}{CustomerNo}, {CustomerOrgNo}, {CustomerTags}, {PhoneNo}, {InvoiceEmail} {InvoicedTo}, {InvoicedToCustomerNo} | Customer information |
| {CustomerOrderNo} | Customer order number |
| {CostCenter} | Cost center |
| {IntegrationReference} | Integration referens |
| {Facility} {FacilityTags} | Facility including address if address. If there is no address at the facility, the customer’s invoice address is retrieved. |
| {AgreementNo} & {AgreementName} | The number and name of the agreement to which the service order is attached. |
| {Status} | Status of the Service order or the protocol. |
| {Quote} or {Offer} | Which quote the order is linked to |
| {Assigned}, {UserAssignmentNames} {UserAssignments} | {UserAssignments} uses the signature tags per line. |
| {OrderType} | The order type you set in the Service Order Settings is displayed. |
| Address | To retrieve addresses for customers, add Customer and for delivery address, add Delivery in front of Address. Ex. {CustomerAddressRow1}. Only {Address} gives the visiting address. All combinations of the prefixes Delivery, Facility, Customer, InvoicedTo are supported. See all address tags here. |
| Contact | |
| {ContactName}, {ContactTitle}, {ContactEmail}, {ContactMobilePhoneNo}, {ContactPhoneNo}, {ContactPhone}. | |
| Date | |
| {Date}, {DateSentToERP}, {StartDate}, {EndDate}, {Today}, {Date+30}, {Date+365}, {InvoiceDueDate} | |
| {PreviousServiceDate} | Previous service, date |
| Price and currency | Se all tags for price here. |
| Articles | See all article tags here. |
| {PartsNextService} | Parts to the next service |
| Information about the service object | |
| {PerformedServices} | * The tag gives you all the information for an object in one place, so always have this with you. |
| {ServiceObject} | The service object |
| {ServiceObjectDescription} | Description |
| {ServiceObjectYear} | |
| {ServiceObjectInstallation} | |
| {ServiceObjectSerialNumber} | Service object serial number |
| {ServiceObjectModel} | Model |
| {ServiceObjectMachineNumber} | Service object machine number |
| {ServiceObjectComment} | Comment on the service object. Retrieved from the service object record. |
| {ServiceObjectname} | Additional information from custom template, each “name” in the template is placed in a tag. Example: name in the template “unique information” becomes the tag {ServiceObjectunique information}. |
| {Comment} | Comments regarding the service object that you added to the service protocol. |
| {ServiceObjectTags} | Tags from the service object record |
| {ServiceObjectNextService} | Next service |
| {ServiceObjectNextServiceYear} | Nex service year |
| {ServiceObjectNextServiceMonth} | Next service month |
| {IntervalName} | The name of the service interval (e.g. 365 days) For Service Orders with multiple service objects, {IntervalName} and {ServiceIntervalTemplates} should be in a repeating table row with {ServiceObjects} in the first cell of the row. Without that table structure, only the interval of the first service object is used. |
| {NextIntervalName} | The name of the next service interval |
| {ServiceObjectTags} | Tags you added to the object |
| {ServiceObjectParts} {ArticleNumber}{Description}Unit}{Amount} | Parts on the service object |
| {Runtime} | runtime |
| Custom information | |
| {ServiceObjectCustomInfo} {CustomInfoName} {CustomInfoValue} | Tag that prints all additional information for a service object for service protocols. Create a table for the information. *See example at the bottom of this page. |
| Self-checks, signature and planning | |
| Tags for self-checks Tags for signature Tags for bookings Tags for timers | |
| {WorkingHours}, {NextWorkingHours} | Working hours |
| Service check points | |
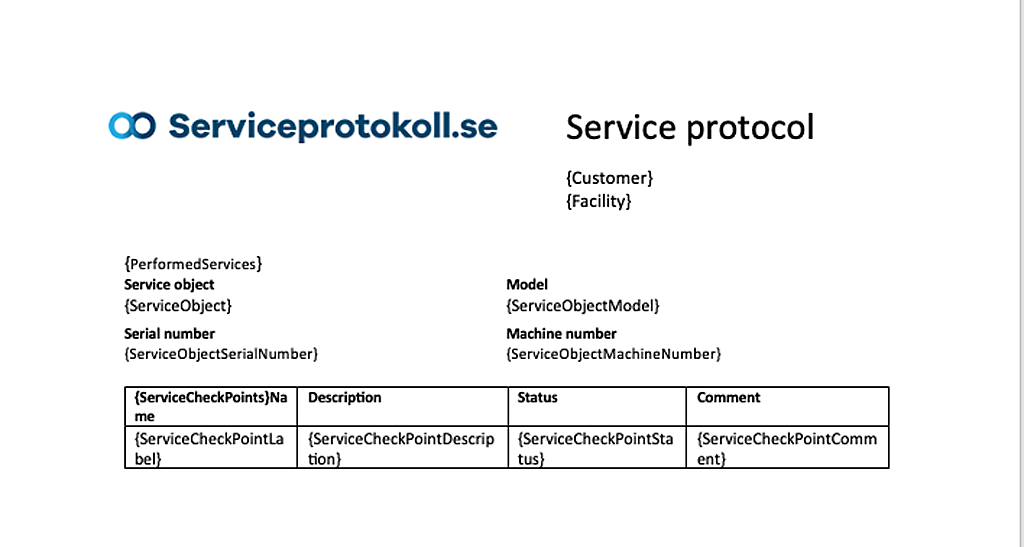
| {ServiceCheckPoints} | Service check points |
| {ServiceCheckPointLabel} | Service check points name |
| {ServiceCheckPointLabelHeader} | Use to list service points you have entered as headings |
| {ServiceCheckPointLabelSectionHeader} | Use to create sections of service points and give the section a clear heading |
| {ServiceCheckPointDescription} | Description of the point, i.e. the text under the question mark. |
| {ServiceCheckPointStatus} | Status |
| {ServiceCheckPointValue} | Value |
| {ServiceCheckPointComment} | Comment on the service point |
| {ServiceCheckPoints}[0-x] Exempel på indexerade kontrollpunkter: {ServiceCheckPointStatus}[n], {ServiceCheckPointLabel}[n], {ServiceCheckPointValue}[n], {ServiceCheckPointDescription}[n], {ServiceCheckPointComment}[n], {ServiceCheckPointImages}[n] | Prints points at your chosen location in the template. Change the contents of the example tag to the numbers in your template, e.g. [0-15] If you want to print a single point, put the number for the point inside the tag [1]. NOTE: One (1) here stands for point number 2 as the system starts with 0. See document with example at the bottom under Article attachments – “Example of table …” |
| {ServiceCheckPointShouldBeAddressed}[ShouldBeAddressed] {ServiceCheckPointChanged}[Changed] {ServiceCheckPointsCorrected}[Corrected] {ServiceCheckPointsOk}[Ok] | With these tags you can choose to print certain selections in service points. For example, if you only want to list all those that are set to “Should be addressed” on a protocol. You build the table in the same way as for {ServiceCheckPoints}. |
| {PerformedServices}[ShouldBeAddressed] | These tags ensure that only objects that have one or more points that Should be addressed are listed. |
| {ServiceCheckPointImages} | Images from the points. Create a table for the images with this tag in the top row + the tag {ServiceCheckPointLabel}. In the next row, add {Images}. The images will be placed under the service points. To clarify which image belongs to which point, you can add the tag {ServiceCheckPointLabel} as the image name. For example: {ServiceCheckPointLabel} (line break) {Images} |
| {ServiceCheckPointWithImages} | Same as above but the images can be placed in the same row/cell as the service point. The {Images} tag is required. |
| {Articles} | To list the articles included in the assignment, create a table within the table with the tag {PerformedServices} Use the tags found Tags for articles. Tags from {ArtNo} to {AddedDate} For service, there is also: {DeliveryDate} for delivery date. |
| {OtherArticles} | Other articles/time. See tags under articles in Work Order Tags {ArtNo} – {AddedDate} |
| {PartsNextService} | Parts to the next service |
| {TotalPriceIncVat} | Total price including VAT per articel/articles |
| Counter | |
| {Readings} {Date}, {DayOfWeek}, {Description}, {Reading} | |
| The service check points for the facility | |
| {FacilityServiceCheckPoints} | The table is built in the same way as {ServiceCheckPoints}. Use the tags: {ServiceCheckPointLabel} {ServiceCheckPointValue} {ServiceCheckPointStatus} {ServiceCheckPointComment} {FacilityServiceCheckPointLabelHeader} |
| Comments | |
| {Comments} | All comments regarding the order, both internal and external |
| {InternalComments} | Internal (not visible to customer) comments on the order |
| {ExternalComments} | External (visible to customer) comments on the order |
| Custom fields | |
| Service Protocol Custom Field: {Field Label} Facility: {FacilityField Label} Customer: {CustomerField Label} Invoice Customer: {InvoicedToField Label} Service Object Custom Fields, Custom Info and Counters: {ServiceObjectNameOrLabel} | Replace “Field label” with the name you gave the barrel, exactly as it is written in the respective setting. |
| Attached files | |
| {Attachments}, {Images} |
- Tags for address, contact person, signatur and articles.
- Tags for adding timers on prints.
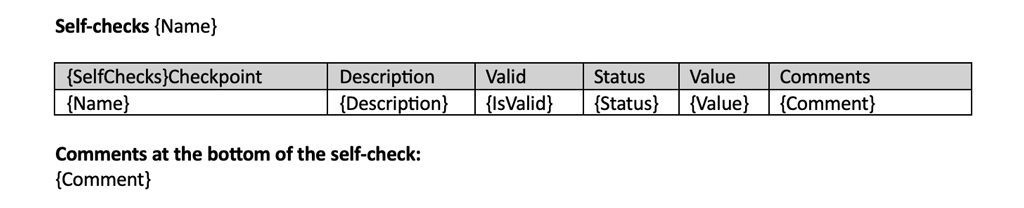
- Tags for Self-checks is placed in a separate table. Here you find the tags for Self-checks.
- Tags for price and VAT
*Suggested table for further information.
| {ServiceObjectCustomInfo} Name | Value |
| {CustomInfoName} | {CustomInfoValue} |

