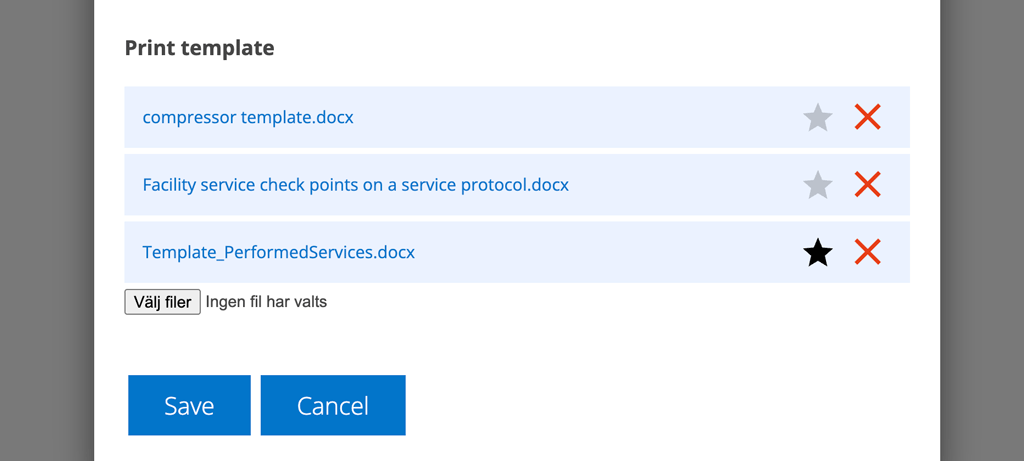
Update 241216: Now you can also use a print template for order confirmations. Upload your template under Work order settings – Print template.
New tag for “Order Type” on work order and service order = {OrderType}
What is a print-out template?
With your own template created as a .docx, you can style your prints exactly as you want them.
Print templates are uploaded under Group Settings under the respective Module Settings. To upload .docx, admin permissions are required.
Currently, you can upload templates for these functions:
- Service protocol
- Self check (upload via Work order settings)
- Quotation
- Sales order
- Work order
- Order confirmation on Work order (uploaded via Work order settings – Upload template)
How to choose template when printing
A popup opens where you choose a template for your print. You still have the option of choosing the default template the system creates. NOTE: Choosing template for self-checks is made when you create the self-check. See more under Concerning Self-checks.
Concerning Self-checks
Templates för Self-checks is uploaded in Work order settings. You can upload multiple templates for self-checks, one at a time.
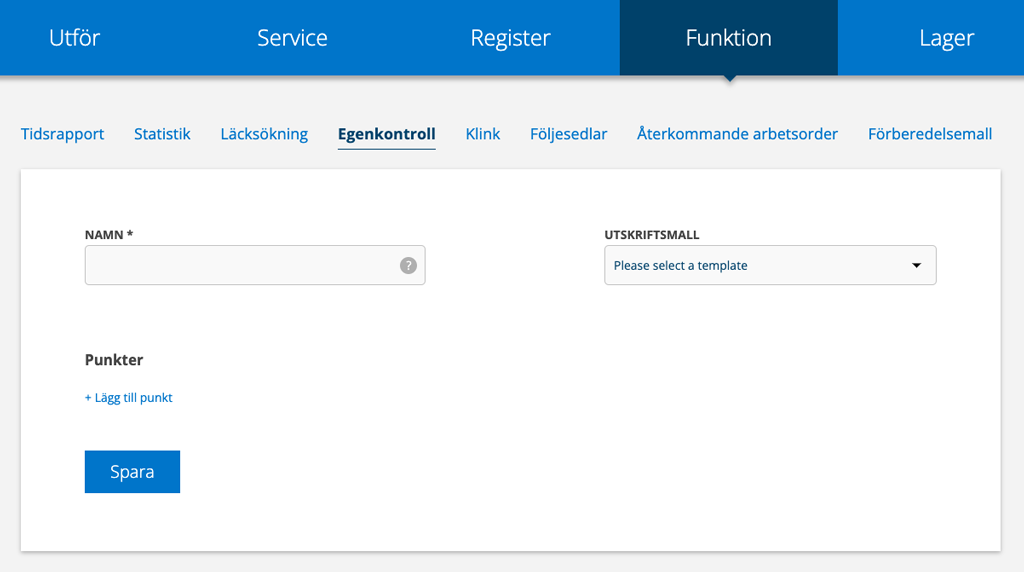
You select which print template to use for the printout for each self-check template under Function – Self-check.
Tags to use
To create the .docx-template and get the information you want on the printout, use and select from these tags.
The tag you add to the .docx needs to be surrounded by these brackets {}.
Custom fields
In general, tags for custom fields are created by putting the name of the custom field within tags. It is important that the name is exactly as you named it, i.e. with a capital letter, spaces, etc.
Example:
Name: My custom field
Tag: {My custom field}
Custom fields on customer and facility can be added to printouts of protocols, quotations, and sales orders in this way:
{FacilityMy custom field}
{CustomerMy custom field}
Tags for work order + order confirmation on work order
Tag | Adds this information: |
---|---|
{OrderNo} | Order number |
{Customer} | Customer |
{InvoicedTo} | Name of the invoiced customer |
{Facility} | Facility |
{CustomerOrderNo} | Customer order number |
{CostCenter} | Cost center |
{ContactName} | Person of contact |
{ContactTitle} | Title |
{ContactEmail} | |
{ContactMobilePhoneNo} | Person of contact mobil |
{ContactPhoneNo} | Person of contact phone |
{Comments} | All comments concerning the order |
{InternalComments} | Internal (not showing to customer) comments concerning the order |
{ExternalComments} | External comments (showing to customer) concerning the order |
{OrderType} | The Order types set in your Work order settings are shown |
Section Assignment | |
{Assignments} | Under this tag add {Articles}, {Measures} and information about service objects |
{ArtNo} | Article number |
{Description} | Article description |
{Unit} | Unit |
{Amount} | Amount |
{Discount} | Discount % |
{Price} | Price |
{TotalPriceIncVat} | Total price incl.VAT/article |
{StoragePlace} | Storage place |
{AddedBy} | Name on the person who added the article |
{AddedDate} | Date when added |
{Articles} | Other materials (time/articles) Create a separate table for other materials section outside the assignment section. Use the article tags {ArtNo} to {AddedDate} |
Signatures | |
{SignatureImage} | Image of the signature |
{SignatureClarification} | Name of the person who signed |
{SignatureDate} | Date |
{SignatureIssuer} | Name of the person logged in, date and time, all in one row. Example: A. Technician 23/09/2024 09:30:48 |
{CustomerSignatureImage} | Image of the customers signature |
{CustomerSignatureClarification} | Name of the customer who signed |
{CustomerSignatureDate} | Date |
{CustomerSignatureIssuer} | Name of the person logged in, date and time, all in one row. Example: A. Technician 23/09/2024 09:30:48 |
Tags for Service Protocol and Service Order
Tag | Adds this information |
---|---|
{OrderNo} | Order number |
{Date} | Date performed |
{Date+365} | 365 days Used if you want the protocol to be valid for 1 year. |
{PerformedBy} | Performed by name |
{LatestEditBy} | Latest edit by name |
{Customer} | Customer name |
{CustomerOrderNo} | Customer order number |
{CostCenter} | Cost center |
{Facility} | Facility |
Address | To retrieve addresses for customers enter Customer and for delivery address Delivery before Address. Ex. {CustomerAddressRow1}. Only {Address} gives visitor address. {FacilityAddressRow1} gives the facility address. |
{AddressRow1} | Address from field nr 1 |
{AddressRow2} | Address from field nr 2 |
{PostalCode} | Postal code |
{AddressPlace} | Place |
{AddressCountry} | Country |
{AddressProvince} | Province |
Contact | |
{ContactName} | Person of contact name |
{ContactTitle} | Person of contact mobil title |
{ContactEmail} | Person of contact mobil email |
{ContactMobilePhoneNo} | Person of contact mobilmobil |
{ContactPhoneNo} | Person of contact mobil phone |
{OrderType} | The order types set in your Service order settings is shown |
Comments | |
{Comments} | All comments concerning the order, both internal and public |
{InternalComments} | Internal (not showing to customer) comments concerning the order |
{ExternalComments} | External comments (showing to customer) concerning the order |
Performed services | |
{PerformedServices} | The tag means that you get all the information for an object together, so always have this with you. |
{ServiceObjectNextService} | Next service |
{ServiceObjectNextServiceYear} | Next service year |
{ServiceObjectNextServiceMonth} | Next service month |
{ServiceObject} | Service object |
{ServiceObjectSerialNumber} | Service object serial number |
{ServiceObjectModel} | Model |
{ServiceObjectMachineNumber} | Service object machine number |
{ServiceObjectComment} | Comment on service object |
{ServiceObjectname} | Additional information from Info template, each “name” in the template is put in a tag. Example: name in the “oil level” template becomes the tag {ServiceObjectoillevel}. |
{ServiceCheckPoints} | Service points |
{ServiceCheckPointLabel} | Service point value |
{ServiceCheckPointLabelHeader} | Header for the service points |
{ServiceCheckPointDescription} | Description of the point, i.e. the text under the question mark. |
{ServiceCheckPointStatus} | Status |
{ServiceCheckPointValue} | Value |
{ServiceCheckPointComment} | Comment of the service point |
{ServiceCheckPointImages} | Adds the images from check-points. Create a table with two rows with this tag in the top row. In the next line, put {Images}. |
{ServiceCheckPointWithImages} | Same as above but only service points with images are printed. |
{Articles} | To list articles included in the assignment, create a table within the table with the {PerformedServices} tag. See tags under Articles in work order tags {ArtNo} – {AddedDate} For service there are also: {DeliveryDate} for delivery date. |
{OtherArticles} | Other articles/time. Use the tags listed under work order {ArtNo} – {AddedDate} |
{TotalPriceIncVat} | Total price incl. VAT/article |
Signatures | |
{SignatureImage} | Image of the signature |
{SignatureClarification} | Name of the person who made the signature |
{SignatureDate} | Date of signature |
{SignatureIssuer} | Name of the person logged in, date and time, all in one row. Example: A. Technician 23/09/2024 09:30:48 |
{CustomerSignatureImage} | Image of the customer signature |
{CustomerSignatureClarification} | Name of the customer who signed |
{CustomerSignatureDate} | Date of customer signature |
Tags for Self Check
You select which print template to use for the printout for each self-check template under Function – Self-check.
Tag | Adds this information |
---|---|
{Name} | Name of the self check |
{OrderNo} | Order number |
{Customer} | Customer name |
{Facility} | Facility name |
{Comment} | Comment |
{SelfChecks} | Self check point name |
{ContactName} | Person of contact name |
{ContactTitle} | Person of contact title |
{ContactEmail} | Person of contact email |
{ContactMobilePhoneNo} | Person of contact mobil |
{ContactPhoneNo} | Person of contact phone |
Tags for the self check In separate table | |
{Name} | Point name |
{Description} | Description of the point, i.e. the text under the question mark. |
{IsValid} | Valid Yes/No |
{Status} | Status |
{Value} | Value set on the service point |
{Comment} | Comment added to a service point |
{Comment} | Content in the main comment field at the bottom of the self-check. Add outside the self check table. |
Signature | |
{SignatureImage} | Image of the signature |
{SignatureClarification} | Name of the person who made the signature/Performed by |
{SignatureDate} | Date of the signature |
Tags for Quotation
Tags | Adds this information: |
---|---|
{OrderNo} | Order number |
{Date} | Order created date |
{YourReference} | Your reference, name |
{OurReference} | Our reference, name |
{Customer} | Customer name |
{PhoneNo} | Customer phone |
{InvoiceEmail} | Customer email |
{CustomerNo} | Customer number |
{Facility} | Facility name |
{CostCenter} | Cost center (from Facility) |
{DeliveryDate} | Delivery Date |
{ServiceObjects} | Service object, machine number and description, can bee multiple |
{ValidUntil} | Valid until, date |
{PaymentTerms} | Payment terms, days |
{DeliveryAddressRow1} | Address from field nr 1 |
{DeliveryAddressRow2} | Address from field nr 2 |
{DeliveryPostalCode} | Postal code number |
{DeliveryAddressPlace} | Post address/City |
{DeliveryAddressProvince} | Region |
{DeliveryAddressCountry} | Country |
{Description} | 1. Gives the quote description if the tag is separate. 2. If the tag is inside the table together with the tag for service objects, it gives the assignment’s description. {ServiceObjectDescription} can also be used. 3. Article description, if the tag is combined with the Articles tag. |
{Articles} | Articles |
{ArtNo} | Article number |
{TotalPriceIncVat} | Total price incl.VAT/article |
{Description} | Article description |
{Amount} | Amount |
{Unit} | Unit (pcs, ltr …) |
{Price} | Price |
{Discount} | Discount |
{NetPrice} | Net |
{TotalPrice} | Sum per article |
{OrderTotalPrice} | Total order price |
{OrderTotalVAT25%} | VAT |
{OrderTotalPriceWithVAT25%} | Total order price incl. VAT |
{Add the name of your custom field} | Change the name between the brackets to the name of the quotation custom field you want to add. Custom fields are created in Quotation settings. Example: Name: My own field Tag: {My own field} |
Customer signature | |
{CustomerSignatureImage} | Image of the customers signature |
{CustomerSignatureClarification} | Name of the person who signed |
{CustomerSignatureDate} | Date of the signature |
The assignment is placed in a separate table structured as in the picture here. The color in the head is just an example. A table for articles is added to the assignment table. If the Assignment table is inside another table, the articles will not be retrieved, so be careful with the table’s location.
Other time/articles are placed in a separate table as in the example at the bottom of the picture.
Tags for Sales Order – Order Confirmation
Tag | Adds this information |
---|---|
{OrderNo} | Order number |
{OrderDate} | Order date |
{Customer} | Customer name |
To retrieve addresses for customers enter Customer and for delivery address Delivery before Address. Ex. {CustomerAddressRow1}. Only {Address} gives visitor address. | |
{AddressRow1} | Address from field 1 |
{AddressRow2} | Address from field 2 |
{PostalCode} | Postal code |
{AddressPlace} | Place |
{AddressCountry} | Country |
{AddressProvince} | Province |
{CustomerNo} | Customer number |
{CustomerOrderNo} | Customer order number |
{Facility} | Facility |
{ContactName} | Contact person name |
{ContactTitle} | Contact person title |
{ContactEmail} | Contact person email |
{ContactMobilePhoneNo} | Contact persons mobile |
{ContactPhoneNo} | Contact person phone |
{YourReference} | Your reference |
{OurReference} | Our reference |
{Seller} | Seller |
{DeliveryDate} | Date of delivery |
{PaymentTerms} | Payment terms, days |
{Status} | Status |
{CostCenter} | Cost center |
{Comments} | Comments concerning the order |
{ServiceObject} | Service object |
Articles | |
{Articles} | Create a table with this tag to add Articles. Use the following tags to add article information and price. |
{ArtNo} | Article number |
{TotalPriceIncVat} | Total price incl.VAT/article |
{Description} | Description |
{Unit} | Unit |
{OrderedAmount} | Ordered amount |
{RestAmount} | Remaining amount |
{DeliveredAmount} | Delivered amount |
{Price} | Price |
{Discount} | Discount |
{OrderTotalPriceOrdered} | Order summery, ordered |
{OrderTotalPriceWithVAT25%Ordered} | Order summery ordered incl. VAT |
{OrderTotalVAT25%Ordered} | VAT, ordered |
{TotalPrice} | Price total |
{OrderTotalPrice} | Order summery, delivered |
{OrderTotalVAT25%} | VAT, delivered |
{OrderTotalPriceWithVAT25%} | Order summery delivered incl. VAT |
Custom fields | |
{Name of the custom field} | Change the name between the brackets to the name of custom field you want to add from the sales order. Custom fields are created in Sales order settings. Example: Name: My own field Tag: {My own field} |